** Legacy Documentation for Statseeker v5.5.3 **
Index
- Overview
- Requirements
- Creating the Statseeker Image
- Creating a Virtual Machine in Azure
- Server Licensing and Network Discovery
Overview
Statseeker can be deployed to the Microsoft Azure platform. This document provides an overview to the process required to, and highlights the key considerations for, creating an Azure Statseeker deployment.
- Any screenshots presented, and processes described were accurate at the time of writing this document but may become out-of-date due to changes made to the Azure platform
- All CLI command examples assume a Unix/Linux CLI. It is possible to perform the same steps on Powershell but you will need to adjust the commands to suit
Requirements
The Azure account used will require the following permissions:
- Create Azure Resource Groups
- Create Azure Storage Accounts
Creating the Statseeker Image
The Statseeker image can be used to instantiate multiple virtual machines the creation of this image only needs to be done once for each version of Statseeker that will be deployed. If an image has already been created, skip to Creating a Virtual Machine in Azure.
Install the Azure CLI
Install the Azure CLI on your local machine. For detailed instructions on installing the Azure CLI 2.0, see the official Azure CLI installation instructions.
For Linux/FreeBSD user, simply run the following command on your local terminal:
# curl -L https://aka.ms/InstallAzureCli | bash
Access your Azure instance via the installed Azure CLI.
# az login
- az -h
- az login -h
- az group -h
- az group create -h
Create a Resource Group
If you already have a Resource Group that you want to use, proceed to: Create a Storage Account, otherwise run the following to create a Resource Group:
# az group create --name {NAME} --location {LOC}
Where:
- {NAME} – name of the group to create
- {LOC} – location of the resources within the group (e.g. australiaeast)
A JSON object will be returned which gives information on the newly create resource group
Example:
# az group list ; az group list --out table
[
  {
    "id": "/subscriptions/af36419b-af36419b-af36419b-af36419b/resourceGroups/azureStatseeker",
    "location": "australiaeast",
    "managedBy": null,
    "name": "azureStatseeker",
    "properties": {
      "provisioningState": "Succeeded"
    },
    "tags": {},
    "type": "Microsoft.Resources/resourceGroups"
  }
]
Name            Location       Status
--------------  -------------  ---------
azureStatseeker  australiaeast  Succeeded
Create a Storage Account
If you already have a Storage Account that you want to use, proceed to: Create a Storage Container, otherwise run the following to create a Storage Account:
# az storage account create --resource-group {GRP} --location {LOC} --name {NAME} --sku Standard_LRS
Where:
- {GRP} – the name of the resource group which will house the account
- {LOC} – must be the same as the location of the resource group
- {NAME} – name of the storage account
The above command will return a JSON object with information about the storage account created.
Example:
# az storage account list ; az storage account list --out table
[
  {
    "accessTier": "Hot",
    "allowBlobPublicAccess": false,
    "azureFilesIdentityBasedAuthentication": null,
    "blobRestoreStatus": null,
    "creationTime": "2020-11-03T03:42:07.195242+00:00",
    "customDomain": null,
    "enableHttpsTrafficOnly": true,
    "encryption": {
      "keySource": "Microsoft.Storage",
      "keyVaultProperties": null,
      "requireInfrastructureEncryption": null,
      "services": {
        "blob": {
          "enabled": true,
          "keyType": "Account",
          "lastEnabledTime": "2020-11-03T03:42:07.257737+00:00"
        },
        "file": {
          "enabled": true,
          "keyType": "Account",
          "lastEnabledTime": "2020-11-03T03:42:07.257737+00:00"
        },
        "queue": null,
        "table": null
      }
    },
    "failoverInProgress": null,
    "geoReplicationStats": null,
    "id": "/subscriptions/af36419b-af36419b-af36419b-af36419b/resourceGroups/azureStatseeker/providers/Microsoft.Storage/storageAccounts/statseeker",
    "identity": null,
    "isHnsEnabled": null,
    "kind": "StorageV2",
    "largeFileSharesState": null,
    "lastGeoFailoverTime": null,
    "location": "australiaeast",
    "minimumTlsVersion": "TLS1_2",
    "name": "mystatseeker",
    "networkRuleSet": {
      "bypass": "AzureServices",
      "defaultAction": "Allow",
      "ipRules": [],
      "virtualNetworkRules": []
    },
    "primaryEndpoints": {
      "blob": "https://statseeker.blob.core.windows.net/",
      "dfs": "https://statseeker.dfs.core.windows.net/",
      "file": "https://statseeker.file.core.windows.net/",
      "internetEndpoints": null,
      "microsoftEndpoints": null,
      "queue": "https://statseeker.queue.core.windows.net/",
      "table": "https://statseeker.table.core.windows.net/",
      "web": "https://statseeker.z8.web.core.windows.net/"
    },
    "primaryLocation": "australiaeast",
    "privateEndpointConnections": [],
    "provisioningState": "Succeeded",
    "resourceGroup": "azureStatseeker",
    "routingPreference": null,
    "secondaryEndpoints": null,
    "secondaryLocation": null,
    "sku": {
      "name": "Standard_LRS",
      "tier": "Standard"
    },
    "statusOfPrimary": "available",
    "statusOfSecondary": null,
    "tags": {
      "Department": "azureStatseeker"
    },
    "type": "Microsoft.Storage/storageAccounts"
  }
]
AccessTier    AllowBlobPublicAccess    CreationTime                      EnableHttpsTrafficOnly    Kind       Location       MinimumTlsVersion    Name             PrimaryLocation    ProvisioningState    ResourceGroup    StatusOfPrimary
------------  -----------------------  --------------------------------  ------------------------  ---------  -------------  -------------------  ---------------  -----------------  -------------------  ---------------  -----------------
Hot           False                    2020-11-03T03:42:07.195242+00:00  True                      StorageV2  australiaeast  TLS1_2               mystatseeker  australiaeast      Succeeded            azureStatseeker   available
Usage of the Storage Account requires a key, this key can be retrieved with:
# az storage account keys list --resource-group {GRP} --account-name {ACC}
Where:
- {GRP} – the name of the resource group which houses the account
- {ACC} – name of the storage account
This command will return a JSON object that contains two keys, either key can be used, you may wish to keep a record for easy access.
Create a Storage Container
If you already have a Storage Container, proceed to Upload a VHD, otherwise run the following to create a Storage Container:
# az storage container create --account-name {ACC} --account-key "{KEY}" --name {NAME}
Where:
- {ACC} – the name of the Storage Account
- {KEY} – a valid key for the storage account
- {NAME} – name of the container
The above command will return a JSON object with information about the storage container created.
Example:
# az storage container list --account-name mystatseeker
[
  {
    "metadata": null,
    "name": "mycontainer",
    "properties": {
      "etag": "\"0x8D878D878D87\"",
      "hasImmutabilityPolicy": "false",
      "hasLegalHold": "false",
      "lastModified": "2020-11-03T05:46:09+00:00",
      "lease": {
        "duration": null,
        "state": null,
        "status": null
      },
      "leaseDuration": null,
      "leaseState": "available",
      "leaseStatus": "unlocked",
      "publicAccess": null
    }
  }
]
Upload a VHD
VHD files are uploaded as a blob, while Azure supports a number of blob types (see https://docs.microsoft.com/en-us/azure/storage/storage-introduction for details), we must use the page type.
The VHD itself will be supplied by Statseeker, contact your Regional Sales Manager for access to the Statseeker installation media appropriate for your license.
Run the following to upload a VHD:
# az storage blob upload --account-name {ACC} --account-key "{KEY}" --container-name {CTR} --type page --file {FILE} --name {NAME}
Where:
- {ACC} – the name of the Storage Account
- {KEY} – a valid key for the storage account
- {CTR} – name of the container
- {FILE} – the name of the local file to upload
- {NAME} – the name of the file on azure (file extension must be .vhd)
The above command will return a JSON object with information about the upload.
Example:
# az storage blob upload --account-name mystatseeker --account-key
"xyz123-xyz123-xyz123-xyz123-xyz123-xyz123-xyz123-xyz123-xyz123-xyz123-xyz123-xyz123-xyz123-xyz123-" --container-name mycontainer --type page --file /release/Release_5.5.3/statseeker_5.5.3.vhd --name statseeker_5.5.3.vhd
Finished[#############################################################]  100.0000%
{
  "etag": "\"0x8D878D878D87\"",
  "lastModified": "2020-11-11T03:47:48+00:00"
}
[abc@srv-zzz-111 ~]$
Create a Disk
Create a disk from the uploaded VHD with:
# az disk create --resource-group {GRP} --name {NAME} --source https://{ACC}.blob.core.windows.net/{CTR}/{VHD} -z {SIZE}
Where:
- {GRP} – name of the Resource Group
- {NAME} – name of the disk to create
- {ACC} – name of the Storage Account
- {CTR} – name of the Storage Container
- {VHD} – name of the local file to upload
- {SIZE} – size of the disk (in gigabytes), Statseeker recommends a minimum of 200G
A JSON object will be returned which gives information on the newly create disk.
Example:
# az disk create --resource-group azureStatseeker --name "Statseeker553_1" --source
https://statseeker.blob.core.windows.net/storageblob/statseeker_5.5.3.vhd -z 65
{- Finished ..
  "creationData": {
    "createOption": "Import",
    "galleryImageReference": null,
    "imageReference": null,
    "logicalSectorSize": null,
    "sourceResourceId": null,
    "sourceUniqueId": null,
    "sourceUri": "https://statseeker.blob.core.windows.net/storageblob/statseeker_5.5.3.vhd",
    "storageAccountId": "/subscriptions/af36419b-af36419b-af36419b-af36419b/resourceGroups/azureStatseeker/providers/Microsoft.Storage/storageAccounts/mystatseeker",
    "uploadSizeBytes": null
  },
  "diskAccessId": null,
  "diskIopsReadOnly": null,
  "diskIopsReadWrite": 500,
  "diskMbpsReadOnly": null,
  "diskMbpsReadWrite": 100,
  "diskSizeBytes": 69793218560,
  "diskSizeGb": 65,
  "diskState": "Unattached",
  "encryption": {
    "diskEncryptionSetId": null,
    "type": "EncryptionAtRestWithPlatformKey"
  },
  "encryptionSettingsCollection": null,
  "hyperVgeneration": "V1",
  "id": "/subscriptions/af36419b-af36419b-af36419b-af36419b/resourceGroups/azureStatseeker/providers/Microsoft.Compute/disks/Statseeker553_1",
  "location": "australiaeast",
  "managedBy": null,
  "managedByExtended": null,
  "maxShares": null,
  "name": "Statseeker553_1",
  "networkAccessPolicy": "AllowAll",
  "osType": null,
  "provisioningState": "Succeeded",
  "resourceGroup": "azureStatseeker",
  "shareInfo": null,
  "sku": {
    "name": "Premium_LRS",
    "tier": "Premium"
  },
  "tags": {},
  "tier": null,
  "timeCreated": "2020-11-11T03:49:26.040619+00:00",
  "type": "Microsoft.Compute/disks",
  "uniqueId": "d5875107-d5875107-d5875107-d5875107",
  "zones": null
}
Create an Image for Distribution
Create the image that can be used to instantiate Statseeker VMs:
# az image create --resource-group {GRP} --name {NAME} --os-type Linux --source {SRC}
Where:
- {GRP} – name of the Resource Group
- {NAME} – name of the VM to create
- {SRC} – ID of the disk created in the previous step
# az disk list --resource-group {GRP}
Where:
- {GRP} – name of the Resource Group
A JSON object will be returned with information about the newly created image.
Example:
# az image create --resource-group azureStatseeker --name Statseeker553Image_1 --name Statseeker553Image_1 --os-type Linux --source "/subscriptions/af36419b-af36419b-af36419b-af36419b/resourceGroups/azureStatseeker/providers/Microsoft.Compute/disks/Statseeker553_1"
{- Finished ..
  "hyperVgeneration": "V1",
  "id": "/subscriptions/af36419b-af36419b-af36419b-af36419b/resourceGroups/azureStatseeker/providers/Microsoft.Compute/images/Statseeker553Image_1",
  "location": "australiaeast",
  "name": "Statseeker553Image_1",
  "provisioningState": "Succeeded",
  "resourceGroup": "azureStatseeker",
  "sourceVirtualMachine": null,
  "storageProfile": {
    "dataDisks": [],
    "osDisk": {
      "blobUri": null,
      "caching": "None",
      "diskEncryptionSet": null,
      "diskSizeGb": 65,
      "managedDisk": {
        "id": "/subscriptions/af36419b-af36419b-af36419b-af36419b/resourceGroups/azureStatseeker/providers/Microsoft.Compute/disks/Statseeker553_1",
        "resourceGroup": "azureStatseeker"
      },
      "osState": "Generalized",
      "osType": "Linux",
      "snapshot": null,
      "storageAccountType": "Standard_LRS"
    },
    "zoneResilient": null
  },
  "tags": {},
  "type": "Microsoft.Compute/images"
}
Creating a Virtual Machine in Azure
To create your Statseeker VM:
- Login to the azure portal (https://portal.azure.com)
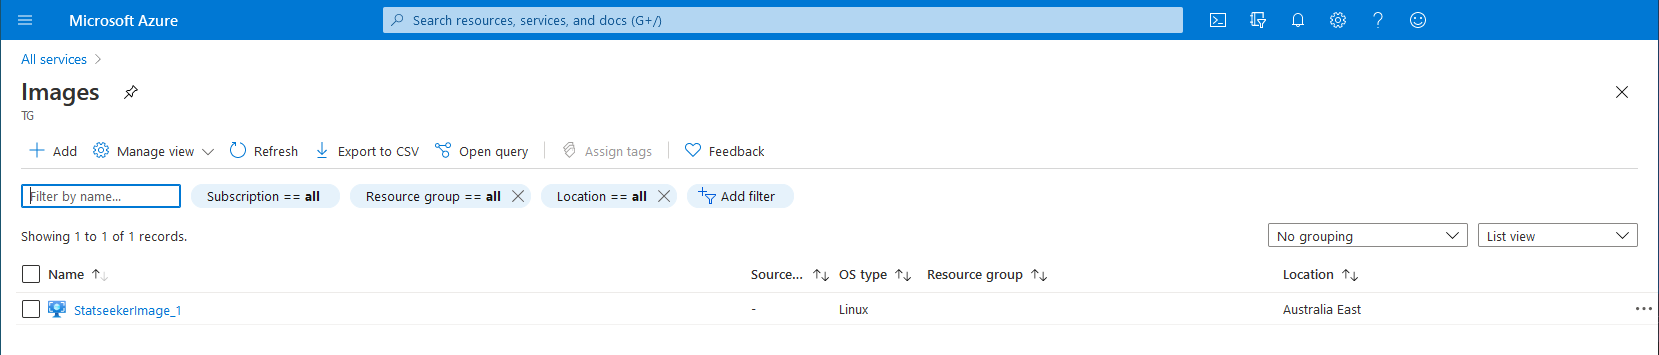
- Navigate to the Images section
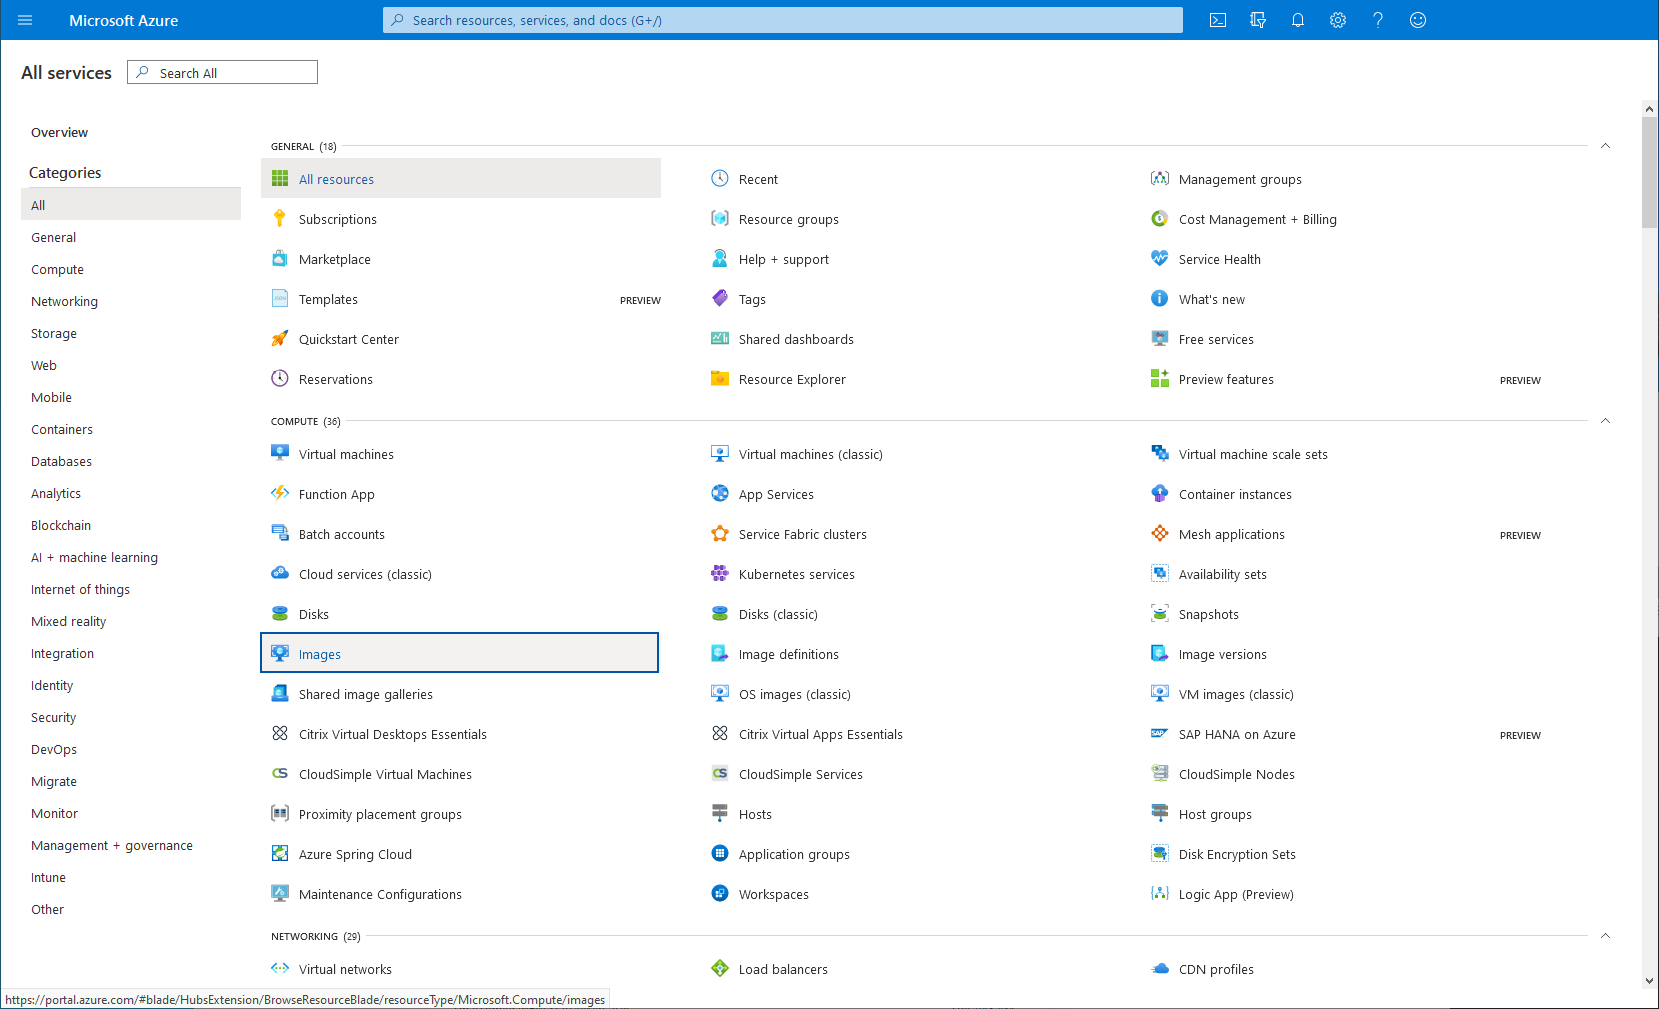
You will see a list of images that your account has access to.
- Click on the image you would like to use
This will present an overview of the selected image.
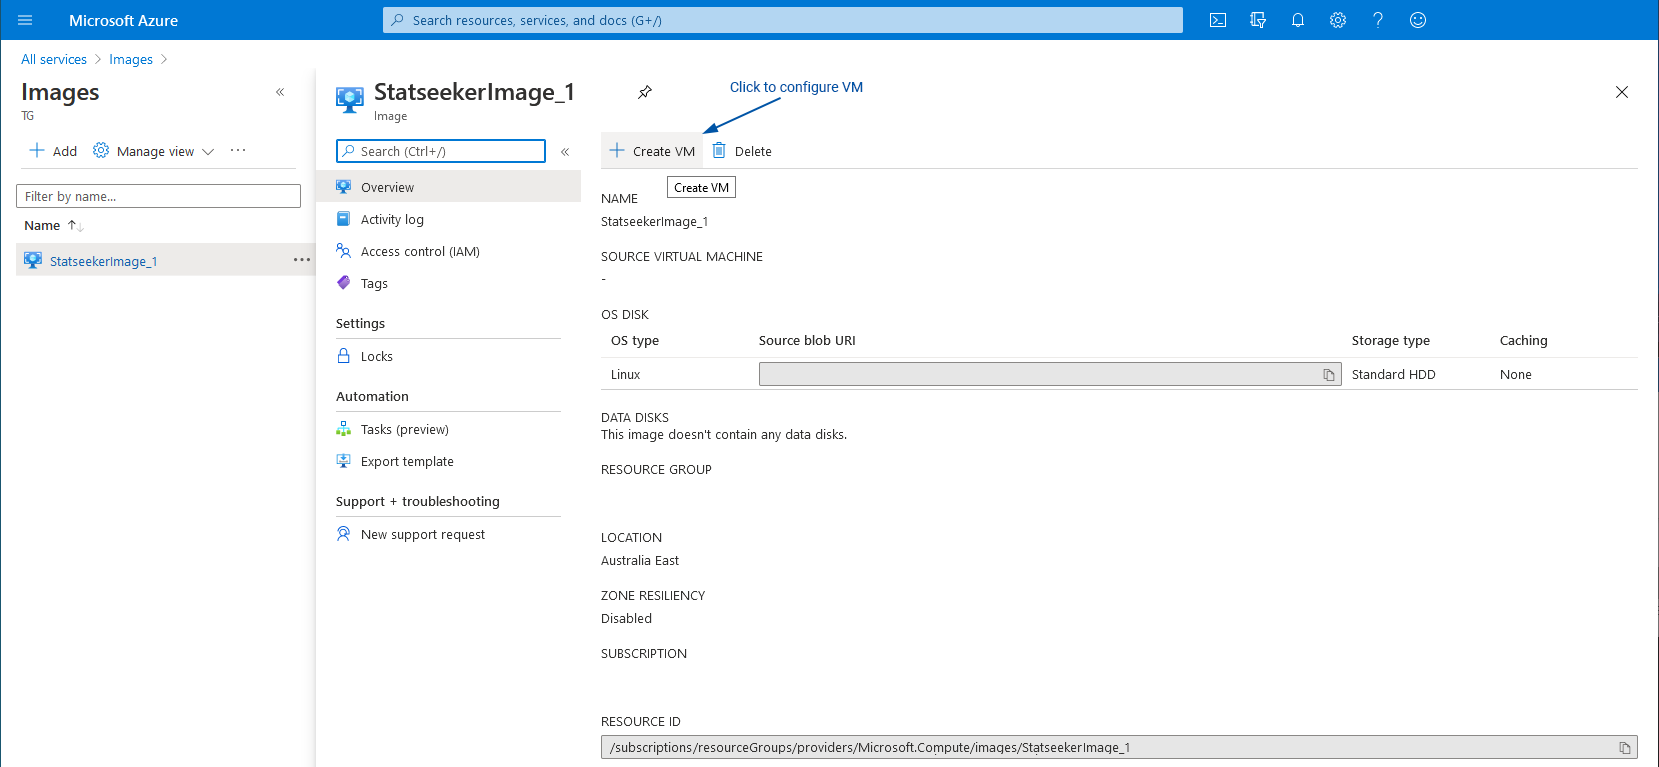
- Click Create VM (top-left of the overview)
- Set basic VM configuration:
- Resource Group – select as needed
- Name – name of the VM
- Disk Type – befitting the network that will be monitored, see System Requirements for details
- Authentication Type – set to ‘Password’
- User Name – this MUST be statseeker
- Password – for the ‘statseeker’ account
- Inbound Ports – SSH is needed to manage your Statseeker server, HTTPS is needed for the Statseeker web UI
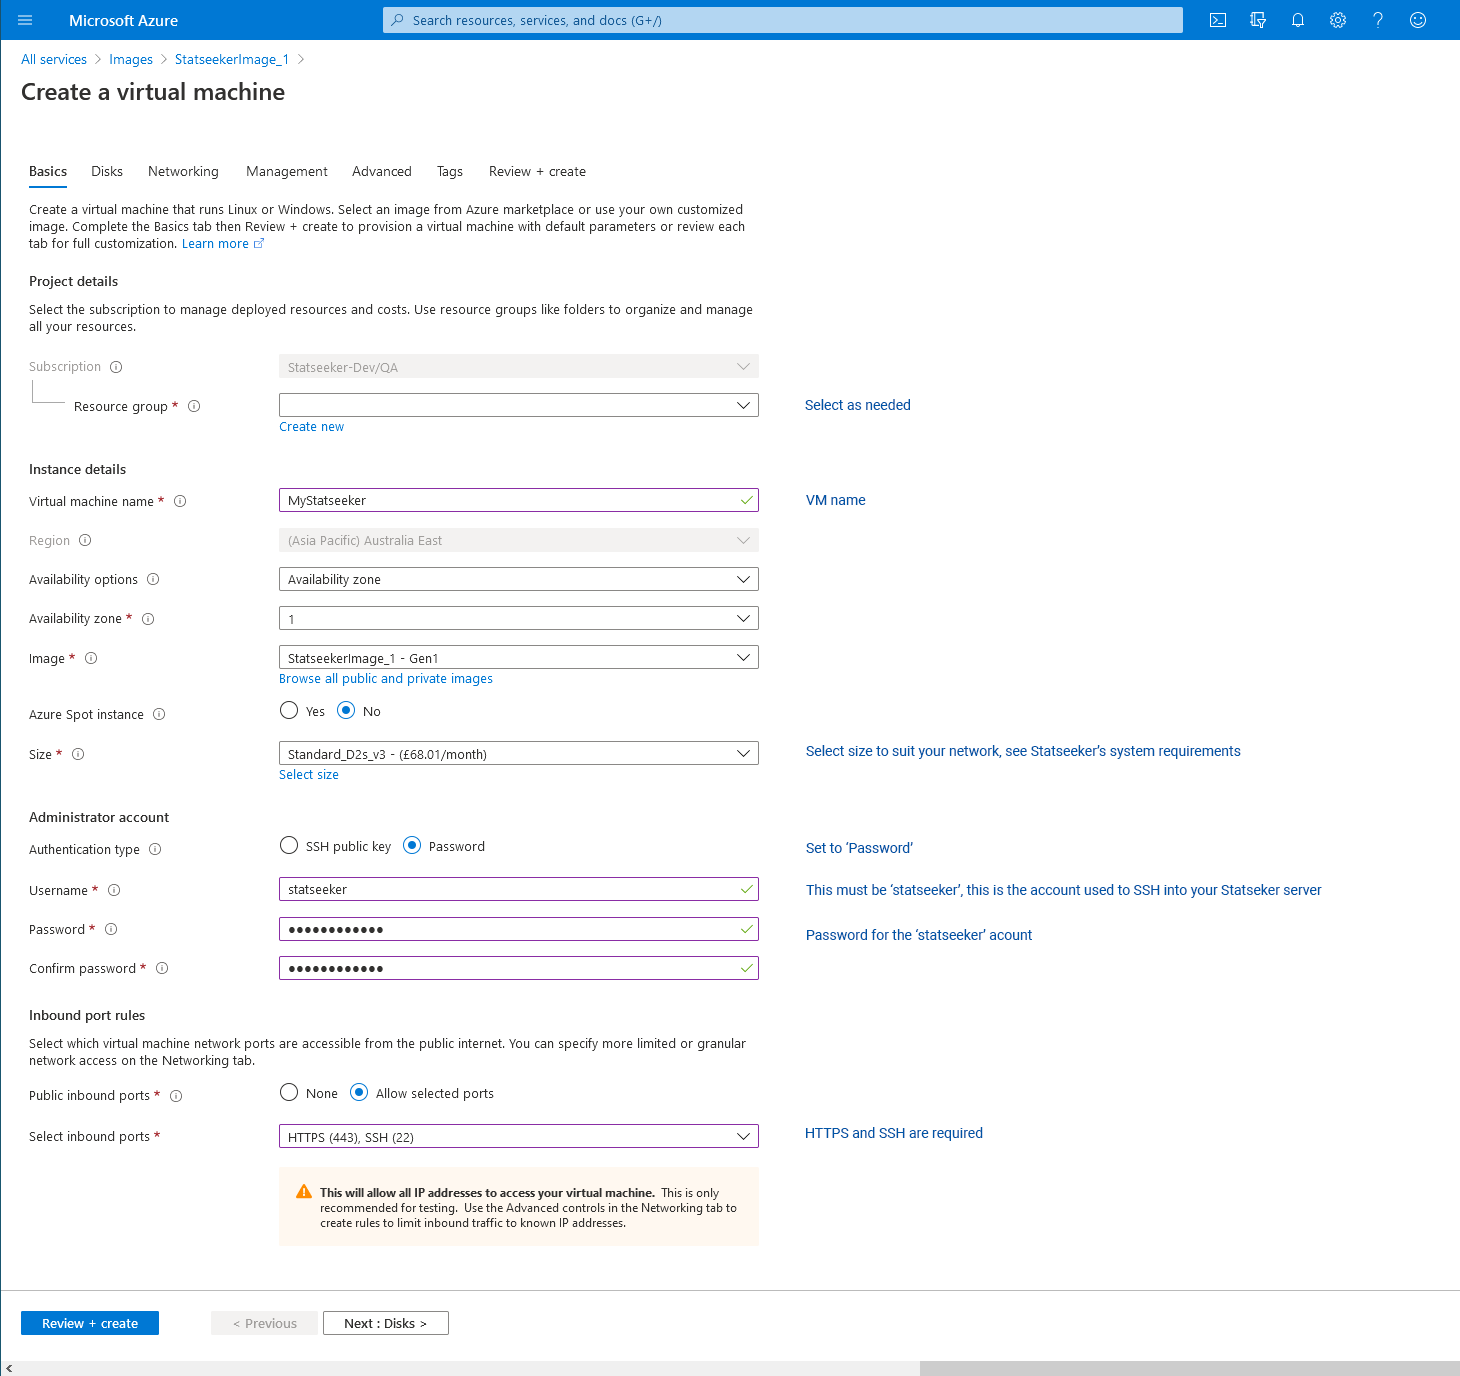
All subsequent settings are optional, assign as required for your environment but it is recommended that you leave Boot Diagnostics enabled. On the final tab:
- Review the configuration and click Create
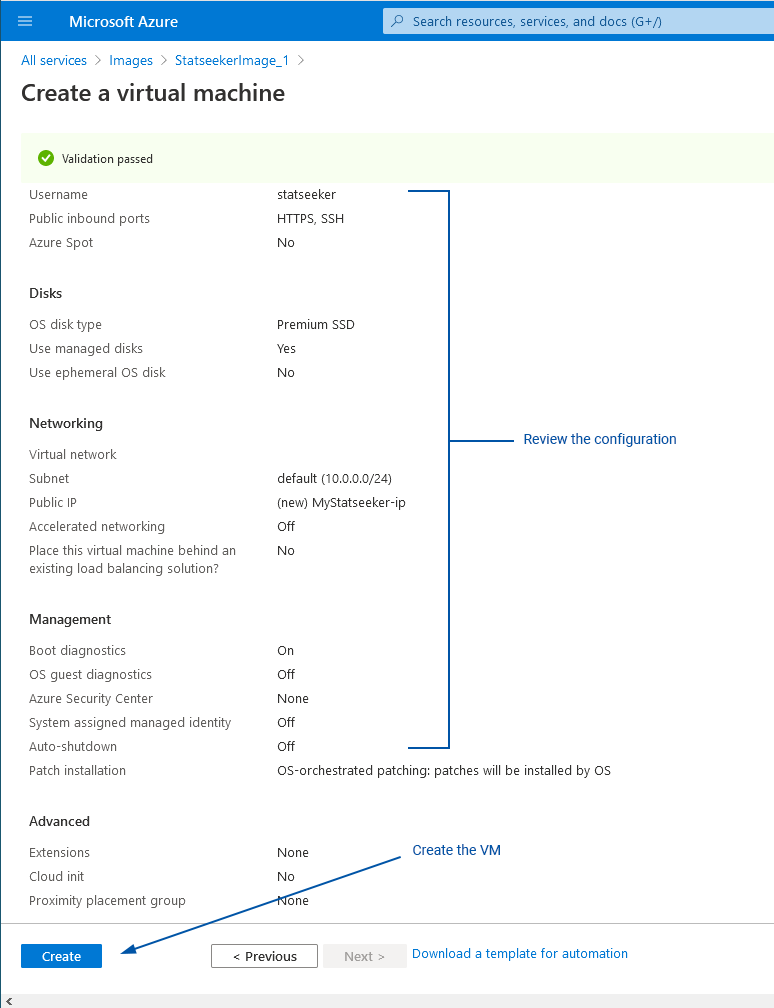
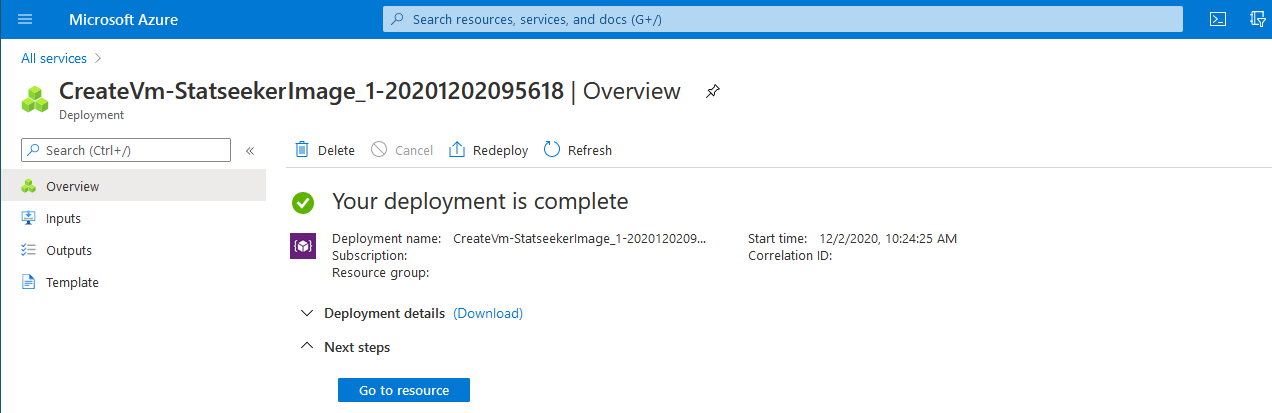
The progress of the creation process is logged on screen, when complete click Go to resource.
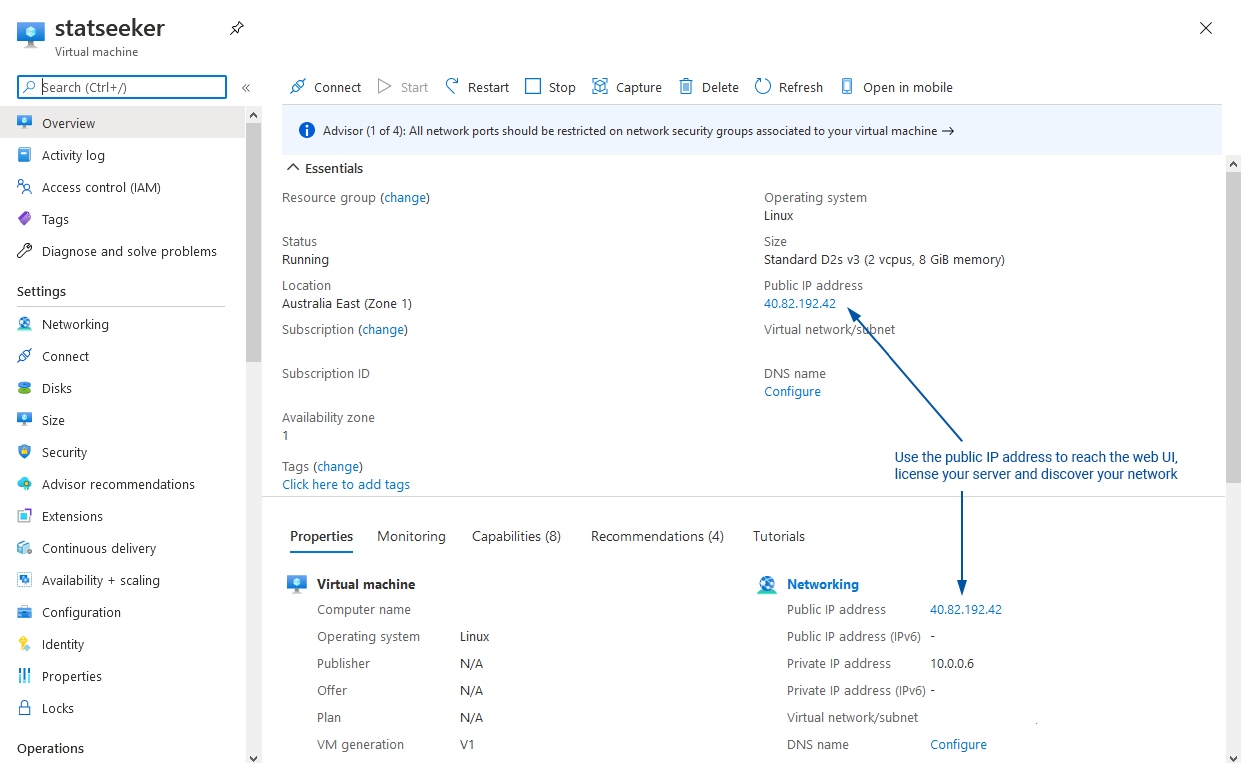
This will take you to the VM page for your new Statseeker server. To complete the installation, license your server and discover your network:
- Use your browser to hit the public IP (https) of the server
Server Licensing and Network Discovery
By default, the Statseeker web server will use HTTPS in conjunction with a self-signed certificate. Modern browsers will view self-signed certificates as potentially suspect and post an alert prior to loading the Statseeker interface for the first time. To suppress any future alerts for that specific certificate:browser combination:
- Follow the browser prompts to acknowledge the risk and add an exception for the certificate
For details on how to upload and use alternative SSL certificates, or configure the server to use HTTP instead, see Web Server Configuration.
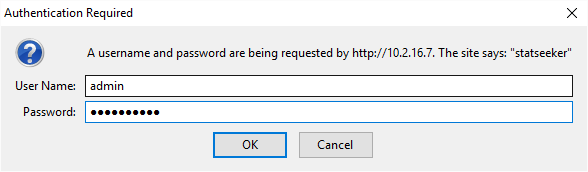
You will then be prompted with a login screen.
- User Name = admin
- Password = the default password is statseeker, this can be updated from the Admin Tool (see Editing Users) or on the server CLI with (see ssadmin)
Once logged in to the web interface, you will be prompted with the Statseeker License configuration screen.
- Enter your Server ID and select Download a new Key
It may take a minute or two to obtain your license key.
- Select the checkbox to accept the Statseeker license
- Select Save to activate the license key
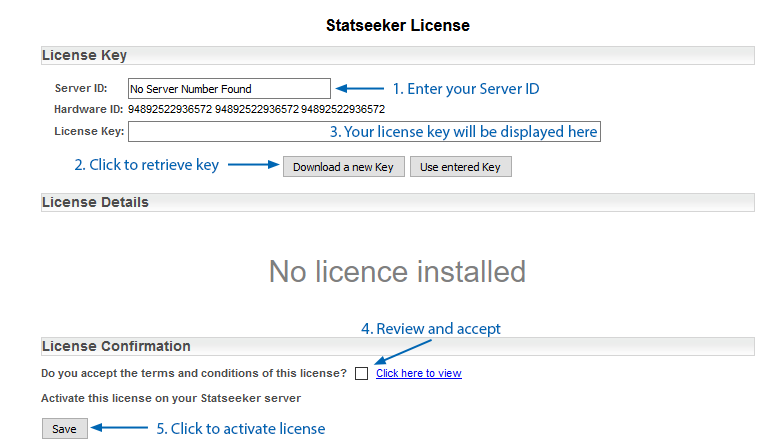
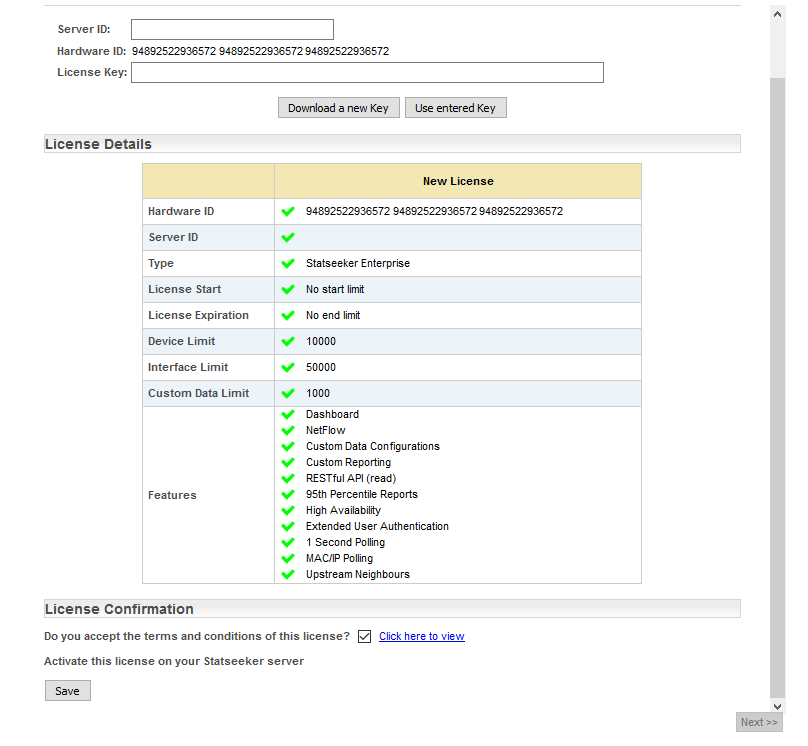
The screen will update to display the license details.
- Click Next
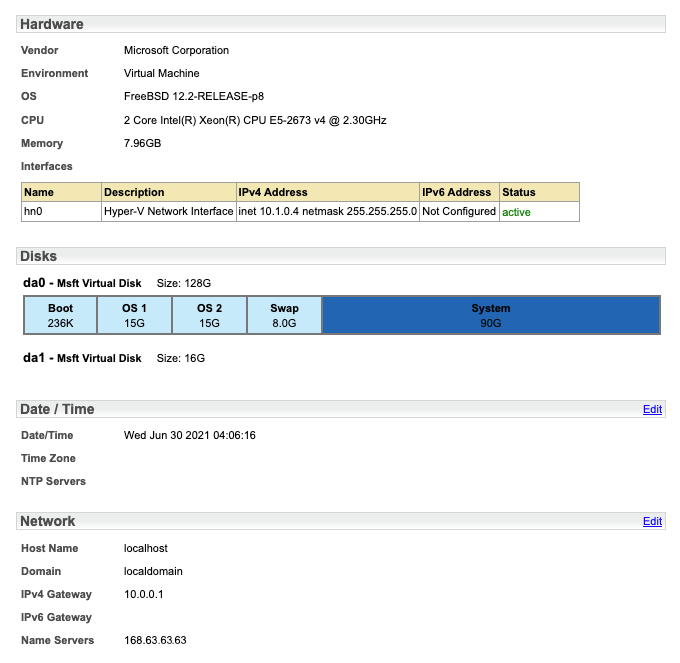
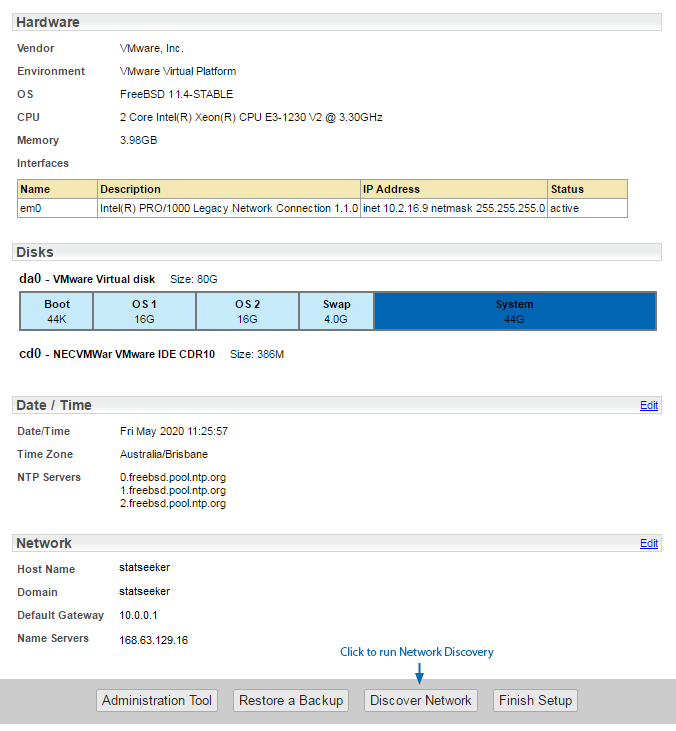
You will now be presented with the Server Summary screen, containing a range of details pertinent to your Statseeker installation.
Edit Server Date/Time
To edit the server date/time settings:
- Click the associated Edit link on the Server Summary page
- Use the calendar control to edit the date and/or time
- Use the drop-downs to modify the timezone for the server
- Click Save when done

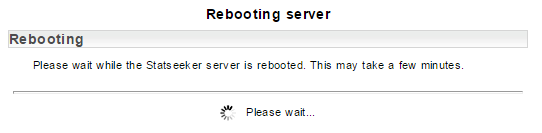
The configuration changes will be saved, and the server will be restarted to apply those changes.
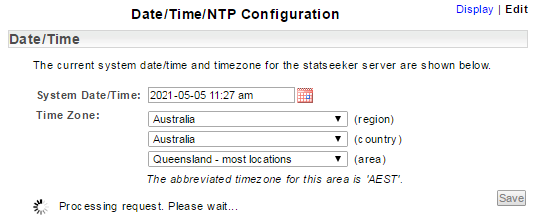
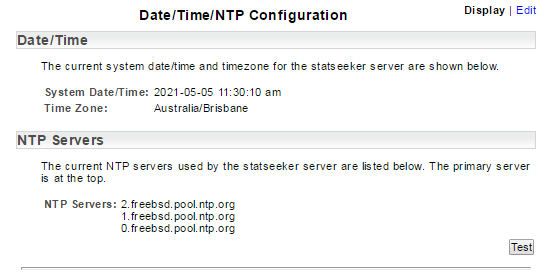
Once the changes have been applied you will be returned to the Date/Time/NTP Configuration screen (in Display mode) to confirm that the changes have been applied correctly.
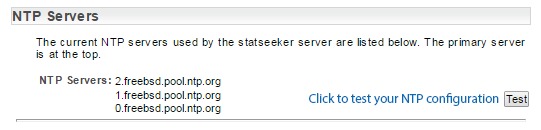
Edit NTP Configuration
To edit the NTP server settings:
- Click the associated Edit link on the Server Summary page
- Enter the address of the NTP server to use
- Click the associated Delete button to remove unwanted NTP server entries
- Click Save when done
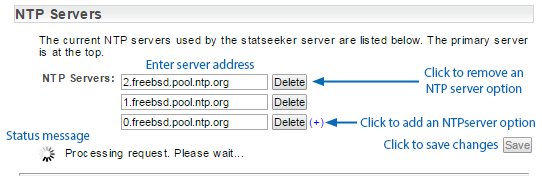
When you click Save Statseeker will attempt to contact the specified NTP servers and:
- Inform you if it is unable to receive a response from the NTP server, no changes have been applied at this point
- If it receives a valid response from the NTP server, apply the changes and return the Date/Time/NTP Configuration screen (in Display mode) and enable a Test button that can be used to confirm the validity of the current configuration.
Run Network Discovery
Statseeker’s network discovery process is used to add networked devices, interfaces, and other SNMP enabled components on your network to Statseeker. Statseeker can then collect configuration information and timeseries data from those devices to be used for polling, reporting, and alerting purposes. There are several methods that can be used to direct the discovery process towards the devices on your network that you want Statseeker to report on:
- Discover Using Ranges (IPv4) – specify one or more IP address ranges and discover all devices responding to SNMP within that range
- Discover Using Hosts (IPv4/IPv6) – add and entry for the device to the hosts file, and run a Discover Using Hosts
- Add Single Device (IPv4/IPv6) – use the Add Single Device option to individually add IPv6 devices
- Add SNMPv3 Device (IPv4/IPv6) – single or batch addition of SNMPv3 devices
- Ping-Only (IPv4/IPv6) – add an IPv6 device to be monitored via ping, but not SNMP
For details on these discovery methods, see Statseeker Network Discovery.
IPv6-Only Networks
The Discovery option available from the installation screen is limited to Discovery Using Ranges, so it is not compatible for IPv6-only networks. For IPv6-only networks:
- Select Finish Setup
- Select the Admin Tool from the main navigator and discover your network using one of the other discovery options, see Statseeker Network Discovery for details.
IPv4 Network Discovery
- Click Network Discovery
- Click Start Discovery

- Enter the SNMP Community Strings for the devices that you want Statseeker to discover. Multiple community strings may be specified, one per line.
- Define the Network Discovery Ranges that you wish Statseeker to query

Once the discovery process is active and running, you will be presented with an in-product video highlighting the discovery process. There is a progress wheel in the bottom left-hand corner of the screen that will indicate when the discovery process is complete.
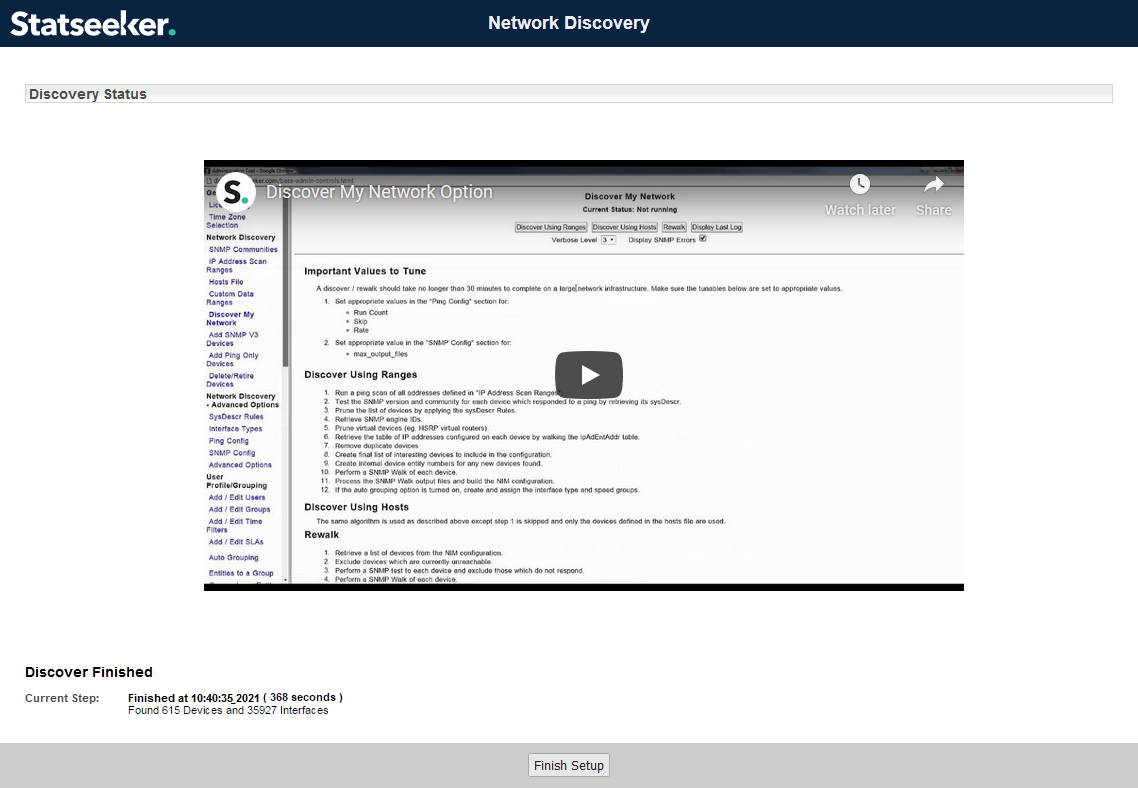
- Once the discovery process has completed, click Finish Setup
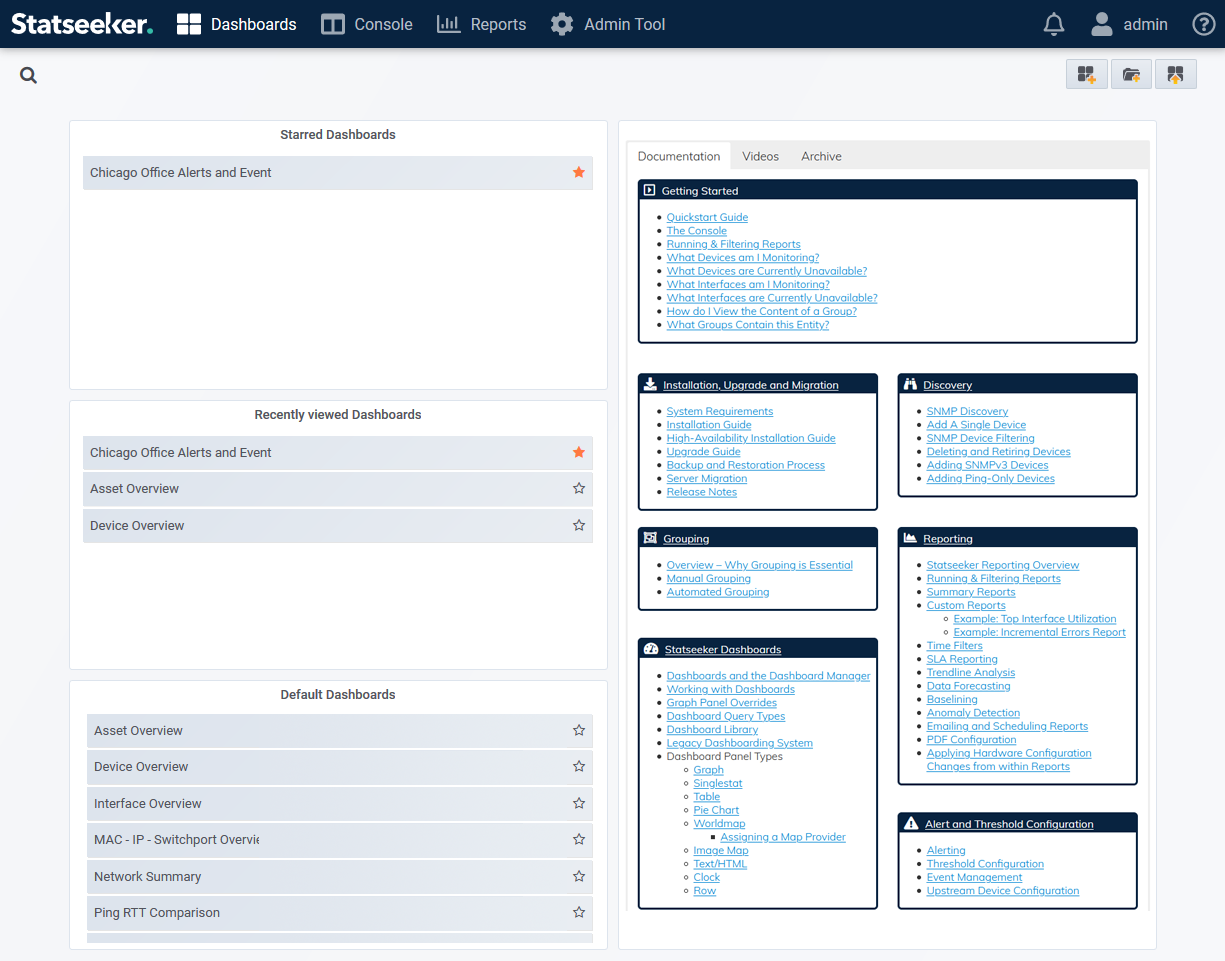
The Statseeker Dashboard Homepage will be displayed providing access to the default dashboards as well as a news panel detailing recent updates with links to associated documentation and videos. The main Statseeker Console and reporting panels are available from the main navigator.