
Index
- Overview
- Important Notes
- Prerequisites
- Backup Current Installation
- Install Primary Server
- Install Secondary Server
- License the Installation
- Restore from your Backup
Overview
The migration process from a non-HA installation to an HA installation is broken down into 3 steps:
- A backup of your current installation
- A fresh install on the two systems comprising the HA installation
- Restore from the backup
Important Notes
Unsupported Configurations
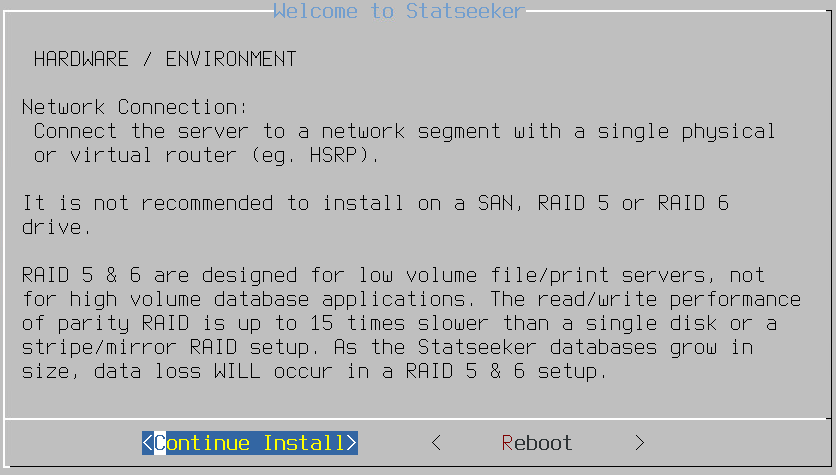
Statseeker does NOT support the following configurations for physical (non-VM) installations:
- Raid 5
- Raid 6
- SAN Drives
Installation HDD
- All data on the hard disk will be deleted during a new install
- See System Requirements for more information on HDD requirements
User Accounts
The installation process will create the following administrative system accounts:
- admin – the web user administrator account
- statseeker – the system user account used by the Statseeker application
- root – the superuser account in the backend operating system
You will be prompted to provide the root user password during the installation process. This password will become the default password for both the admin and statseeker accounts. This password can be changed after the installation process via:
- The command line ssadmin tool
- The web interface in the Administration Tool, see Admin Tool > Statseeker Administration > OS Configuration
Prerequisites
- A current Statseeker installation
- A license key that is compatible with a Statseeker High-Availability installation, contact Customer Service to ensure that you have a suitable key
- A Statseeker High-Availability installation image/iso, contact Customer Service for access to the installation image
System Requirements
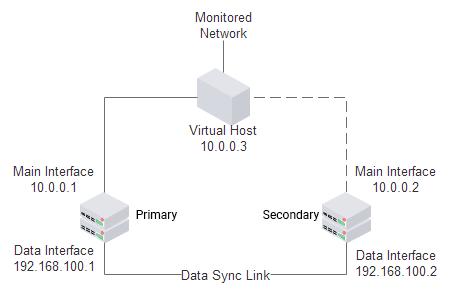
Ensure that both prospective HA servers meet the System Requirements. In addition, an HA installation requires that each server have a least two network interfaces and that are connected via a dedicated high-speed connection for the HA data sync link.
Installation Media
Contact Customer Service for access to the Statseeker installation ISO image file appropriate for your HA license. Once this file is downloaded, depending on the destination hardware, use CD/DVD writing software to open this ISO image file and burn the contents to a CD/DVD disc or copy the iso to a USB drive.
Configuration Information
You will also need to provide, or define, the following information during the install process:
- The root user password for the server
- A host name for the server
- A domain name suffix for the server
- Static IP, Netmask, and Default Gateway addresses for the server
- The IP address of your Domain Name Server
- The SNMP read access community string to your devices (routers, switches, servers, etc.)
Backup Current Installation
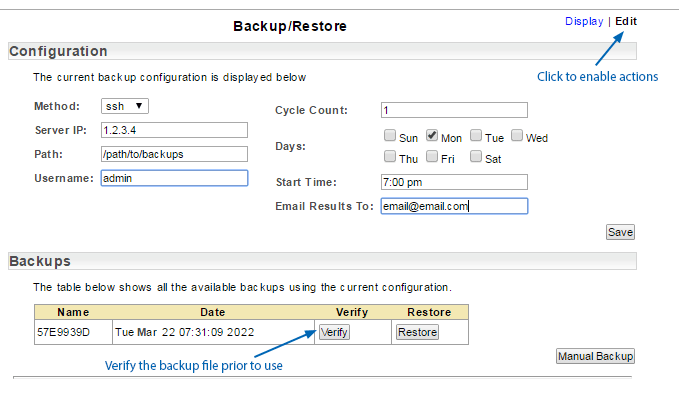
For assistance with backing up your current Statseeker installation, please refer to Backup and Restore
Once the backup process is complete:
- Verify the backup
- Ensure that the verified backup is not being stored on any of the prospective Statseeker High-Availability servers, as all data on those servers will be erased during the installation process
Install Primary Server
Prepare the server for installation:
- Adjust the server BIOS settings
- Configure the BIOS time and time zone as desired
- Set the boot sequence of the first boot device to CD/DVD disc and the secondary boot device to the hard disk
- Connect the server to your LAN as desired
- Place/Mount the CD/DVD disc into the drive of the server
Begin the installation process:
- Boot the server from the Statseeker Installation CD/DVD disc
The FreeBSD welcome screen will be displayed.
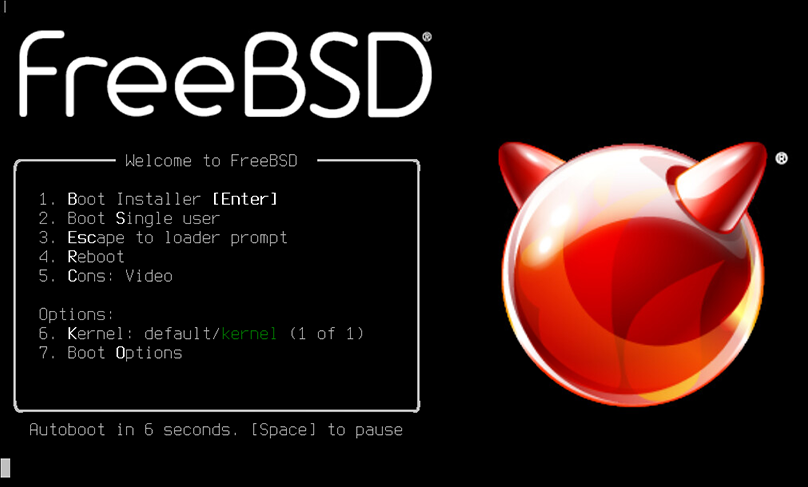
- Press Enter to continue with the installation
- Use the arrow keys to navigate within these dialogs
- Use the spacebar to select an item (when specifying the HA server role)
- Use the Tab key to move between the data-entry section and the OK/Cancel confirmation section
- Use the Enter key to confirm the OK/Cancel
The Statseeker Welcome screen is displayed.
- Press Enter
The High-Availability Alert screen is displayed
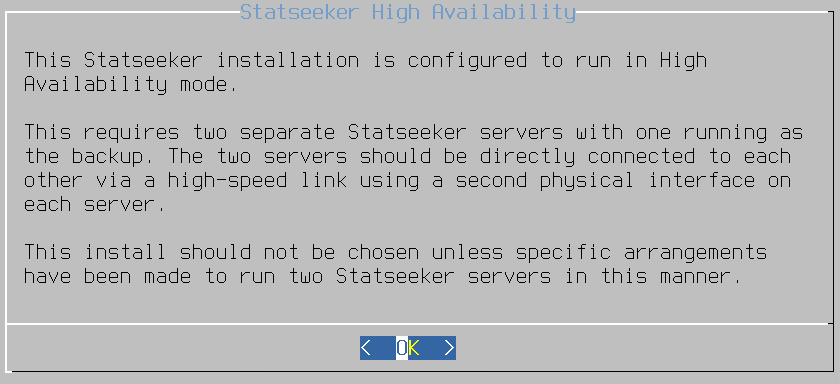
- Press Enter to continue with the installation
If you have multiple hard disks, the Installation Disk Selection screen is displayed.
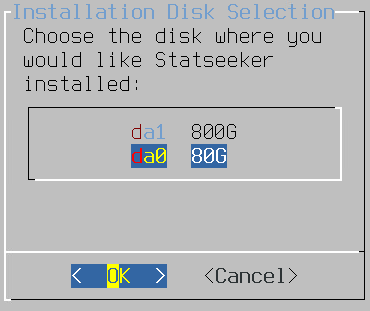
- Select the disk you want to use, select OK, and press Enter
Next, we have a notice regarding disk partitioning.
And finally the data wipe alert is displayed; continuing with the installation will delete all data on the specified hard disk.

- Press Enter to continue with the installation
The HA Role Selection screen is displayed
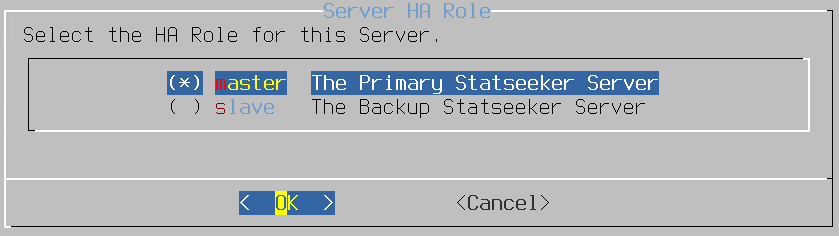
- Ensure that the Primary role is selected and hit Enter
The HA Config Summary screen is displayed, indicating that the primary\master server data-sync interface is to be configured.
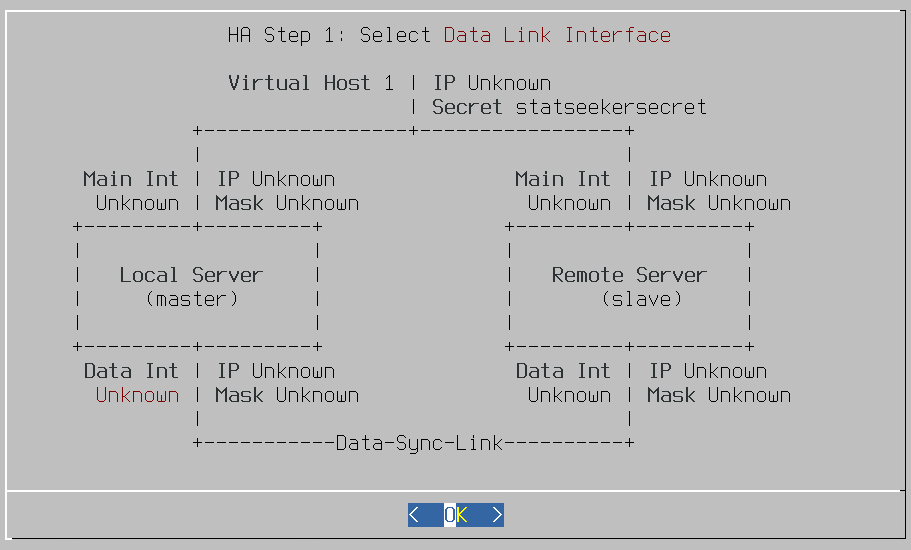
- Press Enter
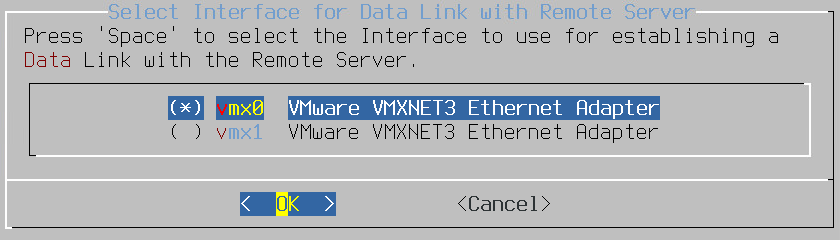
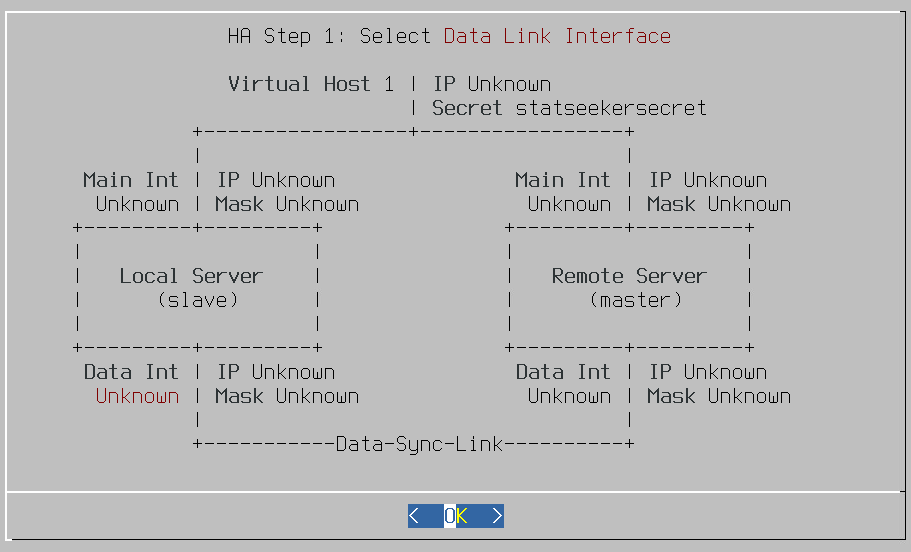
- Select the interface to be used for the data-sync link
- Press Enter
The HA Config Summary screen is displayed, indicating that the primary server's data-sync interface IP is to be configured.
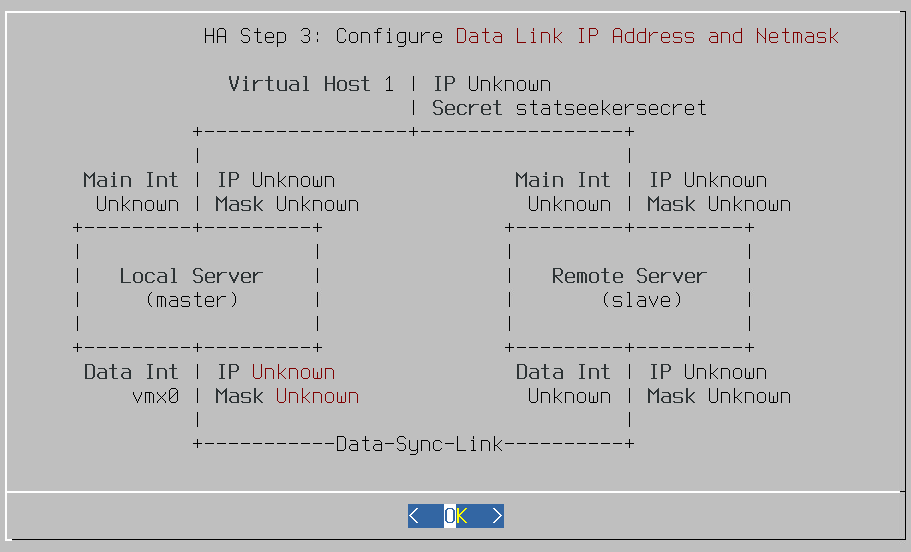
- Press Enter
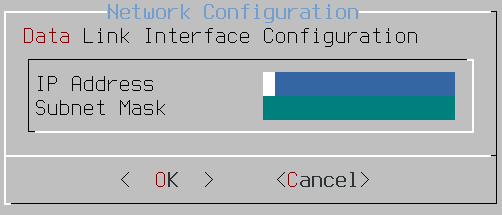
- Specify the IP and subnet mask to be used and press Enter
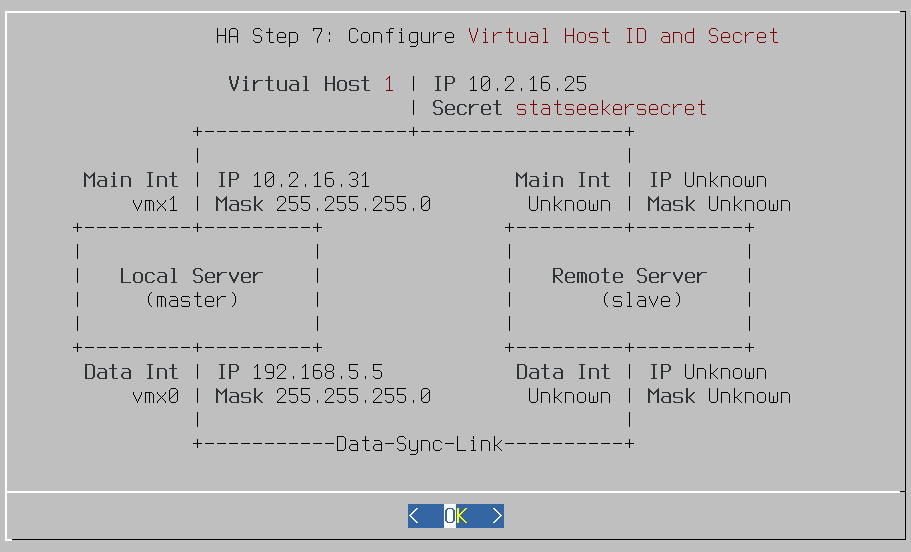
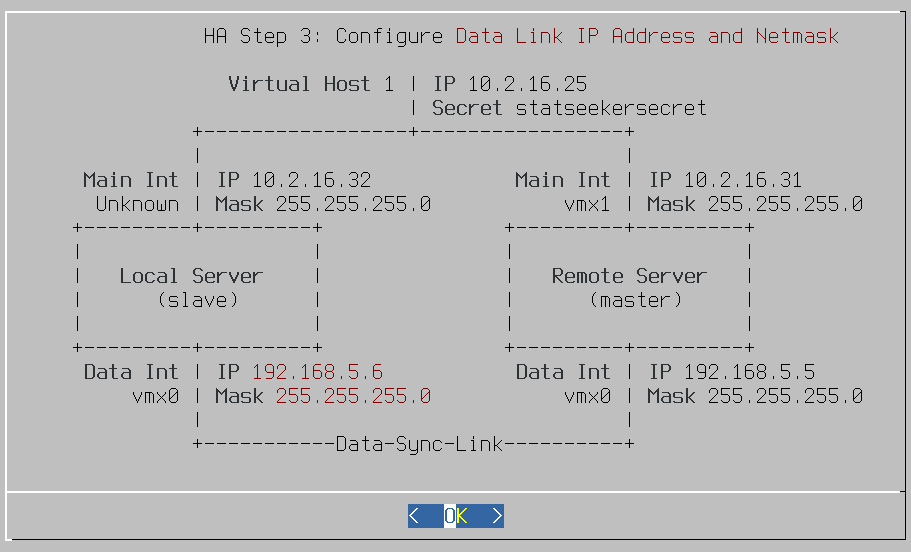
- Statseeker will reference the IP address assigned to the primary server's data link interface, increment this by one, and assign the new value as the IP address for the secondary server's data link interface. Example:
- Primary Server (manually assigned): 192.168.5.5
- Secondary Server (automatically assigned): 192.168.5.6
- The data-sync link interfaces should be configured on a different subnet to the rest of your network. See the image below for an example.
The HA Config Summary screen is displayed, indicating that the primary server main interface is to be configured.
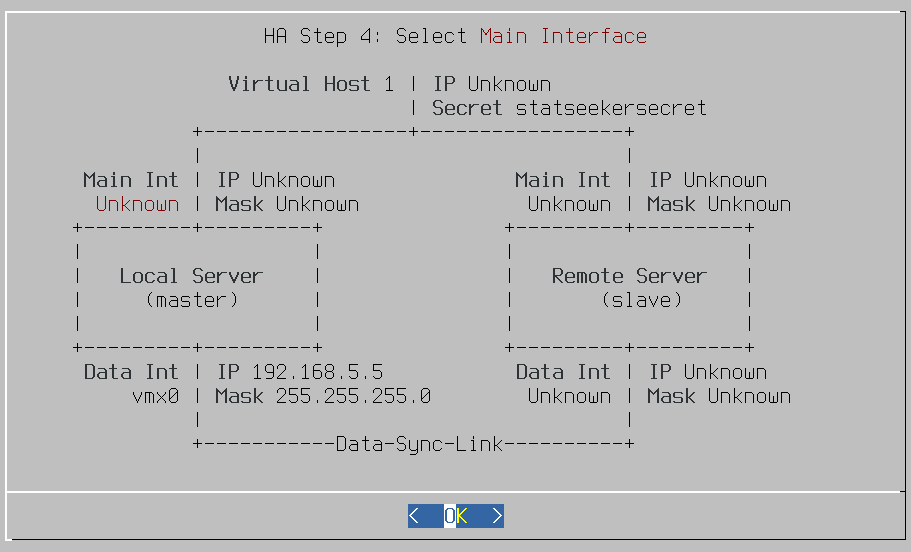
- Press Enter
- Statseeker will reference the IP address assigned to the primary server's main interface, increment this by one, and assign the new value as the IP address for the secondary server's main interface. Example:
- Primary Server (manually assigned): 10.2.16.31
- Secondary Server (automatically assigned): 10.2.16.32
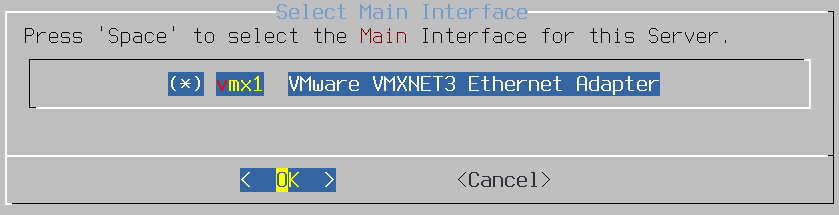
- Select the interface to be used for the link to the rest of the network
- Press Enter
The HA Config Summary screen is displayed, indicating that the primary server main interface IP is to be configured.

- Press Enter
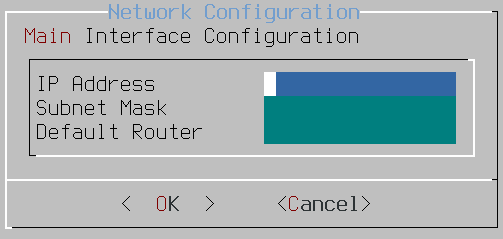
- Specify the IP and subnet mask to be used and press Enter
The HA Config Summary screen is displayed, indicating that the virtual host IP is to be configured.
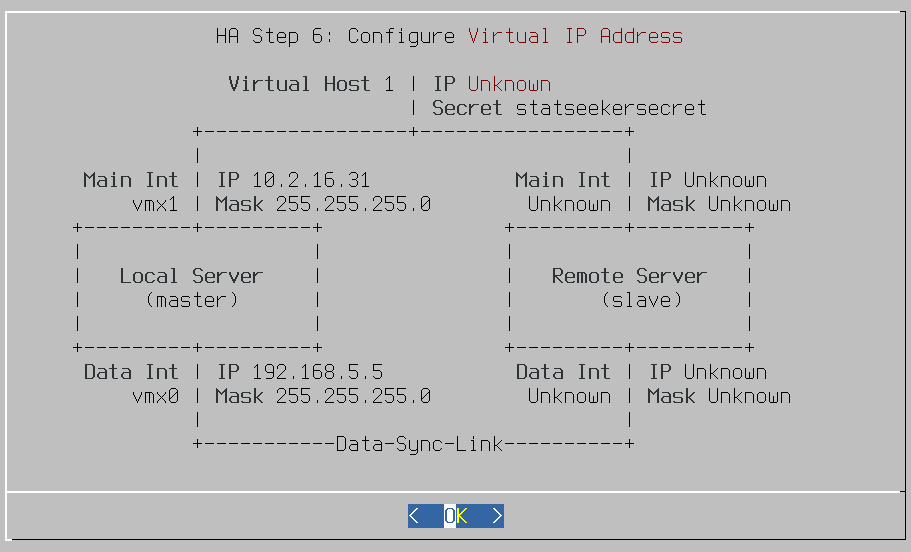
- Press Enter
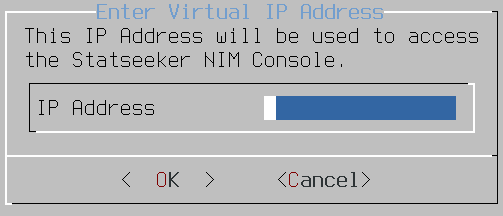
- Specify the IP to be used and press Enter
The HA Config Summary screen is displayed, indicating that the virtual host authentication string is to be configured.
- Press Enter
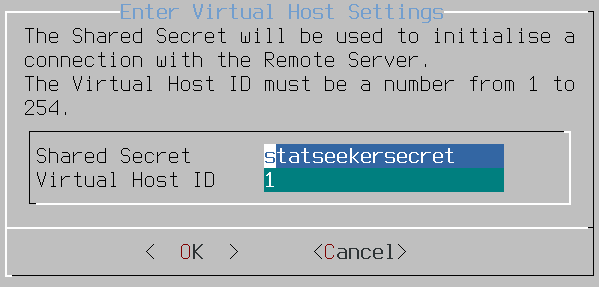
- Specify the authentication string to be used and press Enter
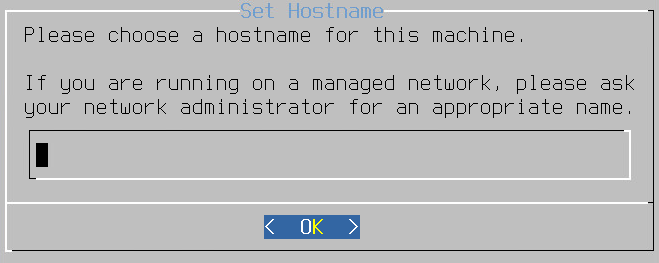
- Specify the hostname to be used for the primary server and press Enter
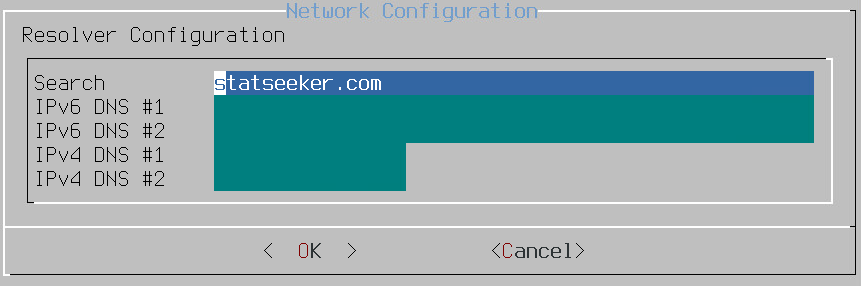
- Specify the domain and DNS servers to be used for the primary server and press Enter
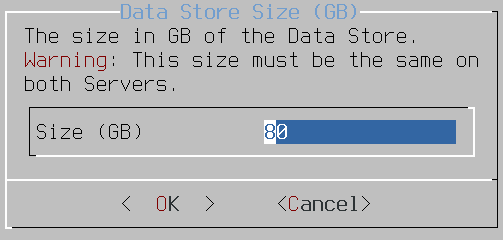
- Specify the size of the data-store and press Enter
Installation will continue.

- Select the time zone region
- Select the country within the region
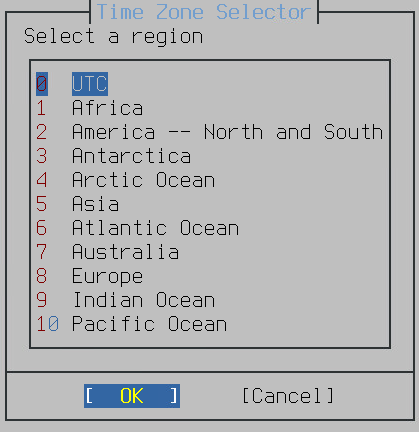
- Select the time zone
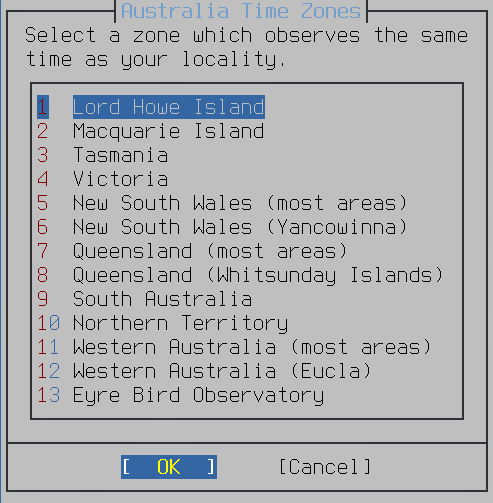
- Select Yes to confirm the time zone configuration

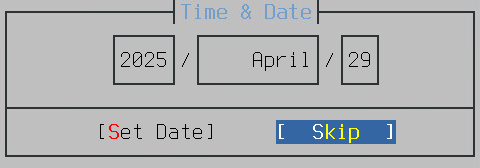
The Date configuration screen is presented, either Skip, or:
- Configure the month, year, and day-of-month using the arrow keys and click Enter
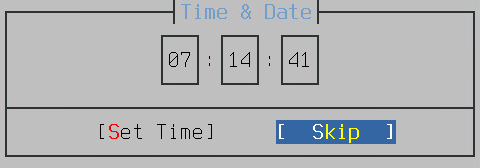
The Time configuration screen is presented, either Skip, or:
- Configure the time using the arrow keys and click Enter
A prompt will be displayed asking you to set the password for the server root account.
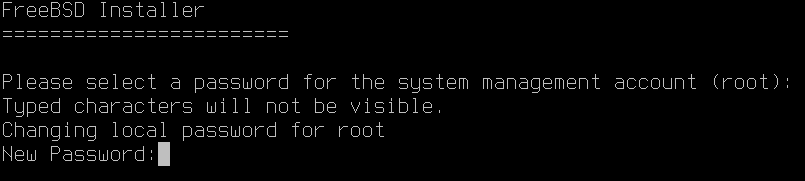
- Enter the password and press Enter
- Repeat this to confirm the password
Statseeker will now install all required packages and reboot. When installation is complete, a login prompt will be displayed.
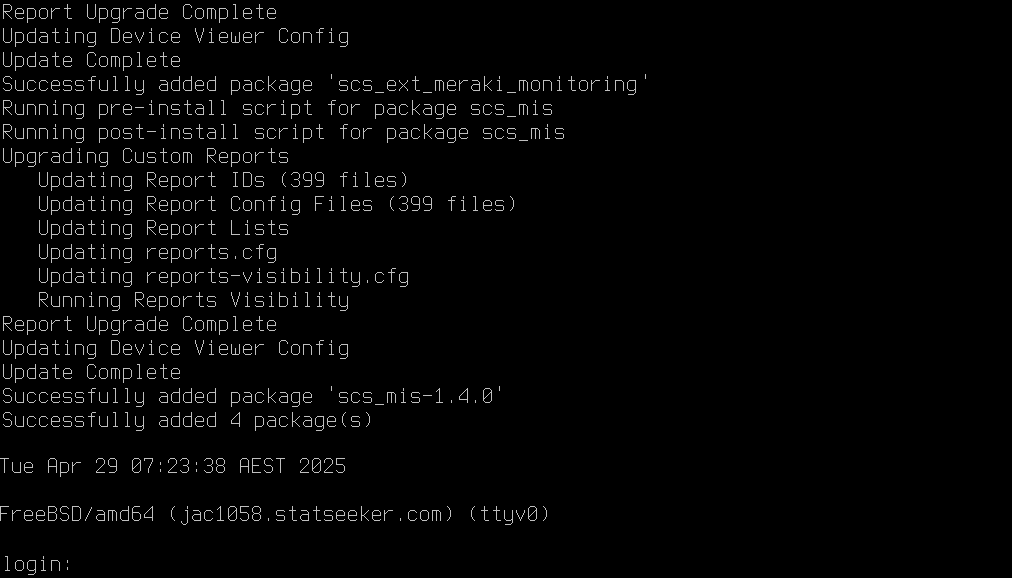
- Do not log in. Move on to the HA Secondary server installation.
Install Secondary Server
Begin the installation of the secondary server in exactly the same manner as the installation of the primary server.
The Statseeker Welcome screen is displayed.
- Press Enter
The High-Availability Alert screen is displayed
- Press Enter to continue with the installation
If you have multiple hard disks, the Installation Disk Selection screen is displayed.
- Select the disk you want to use, select OK and press Enter
Next, we have a notice regarding disk partitioning.
And finally the data wipe alert is displayed; continuing with the installation will delete all data on the specified hard disk.
- Press Enter to continue with the installation
The HA Role Selection screen is displayed
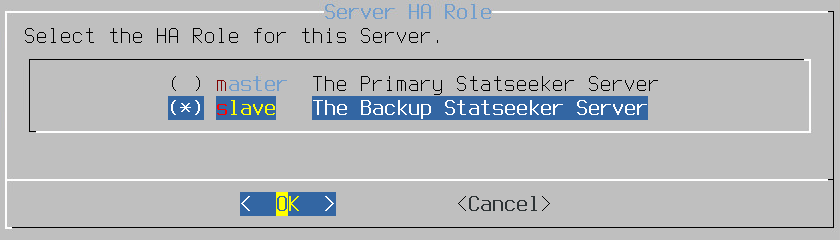
- Ensure that the Secondary role is selected (down-arrow, then spacebar to select) and hit OK
The HA Config Summary screen is displayed, indicating that the secondary server data-sync interface is to be configured.
- Press Enter
- Select the interface to be used for the data-sync link
- Press Enter
The HA Config Summary screen is displayed, indicating that the IP of the primary server data-sync link interface is required.
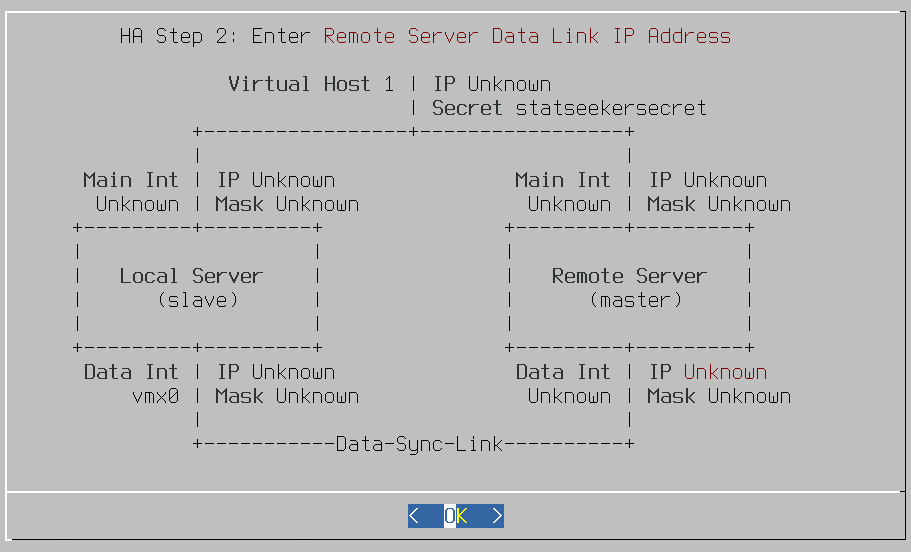
- Press Enter
Statseeker then prompts you for the IP to connect to the Primary server - this is the Data Link Interface
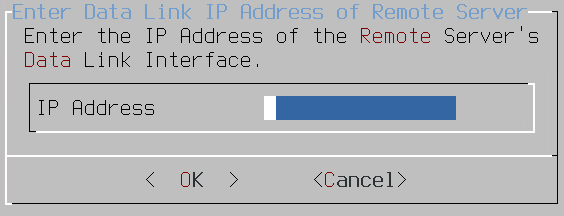
- Specify the IP address previously assigned to the interface used for the data-sync link on the primary server
- Press Enter
You will then be prompted for the password assigned during the primary server installation process.

- Enter the password that was specified for the root account on the primary server and press Enter
SSH keys will be exchanged for communication between the primary and secondary servers, then the installation process will test this link and pull configuration data from the primary server to assist with automatically configuring the secondary server. The HA Config Summary screen will be displayed, detailing the automatic configuration assigned to the secondary server.
The installation process will proceed as per that used when configuring the primary server:
- The HA Config Summary screen will be displayed before each step, indicating the next setting to be configured
- The configuration screen will be displayed and will be pre-populated as per the automated configuration
- Step through these settings, editing the configurations if required, and pressing Enter to confirm
Once the HA-specific configuration options are complete, the installation process will move on to the remainder of the secondary server configuration.
- Specify the hostname to be used for the secondary server and press Enter
- Specify the domain and DNS servers to be used for the secondary server and press Enter
- Specify the size of the data-store to be used and press Enter - this must be the same as was specified for the primary server
Installation will continue.
The server time zone prompt is displayed; both servers must be set to the same timezone.
- Select the time zone region
- Select the country within the region
- Select the time zone
- Select Yes to confirm the time zone configuration
The Date configuration screen is presented, either Skip, or:
- Configure the month, year, and day-of-month using the arrow keys and click Enter
The Time configuration screen is presented, either Skip, or:
- Configure the time using the arrow keys and click Enter
A prompt will be displayed asking you to set the password for the server root account.
- Enter the password and press Enter
- Repeat this to confirm the password
Statseeker will now install all required packages and reboot. When installation is complete, a login prompt will be displayed.
- Do not log in. Move on to the Web Installation Wizard.
Web Installation Wizard
Once Statseeker is installed on both servers, you can access the web interface, to do this:
- Enter the previously specified virtual hostIP address in your browser address bar
You will then be prompted with a login screen.
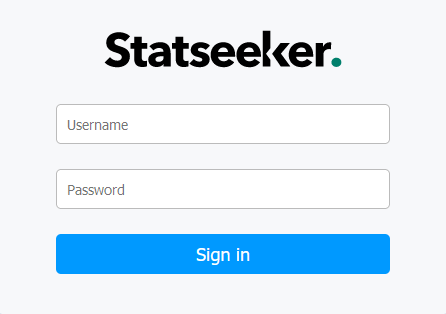
- Select Sign in with username/password
- User Name - admin
- Password - the root user account password as specified during installation
Licensing
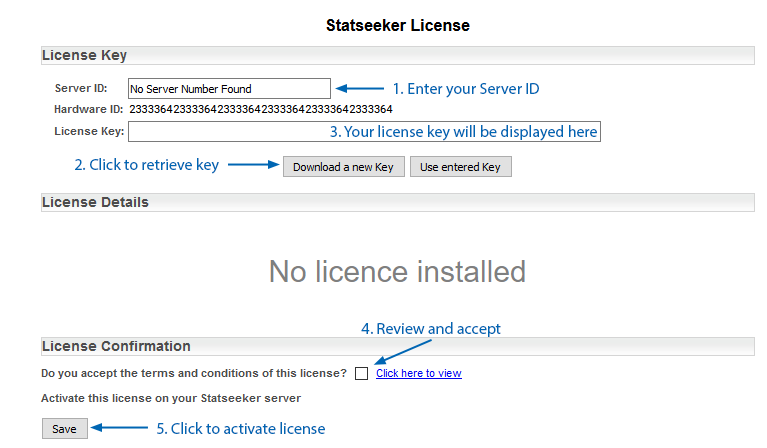
Once logged in to the web interface, you will be prompted with the Statseeker License configuration screen.
- Enter your Server ID and select Download a new Key
It may take a minute or two to obtain your license key.
- Select the checkbox to accept the Statseeker license
- Select Save to activate the license key
The screen will update to display the license details.
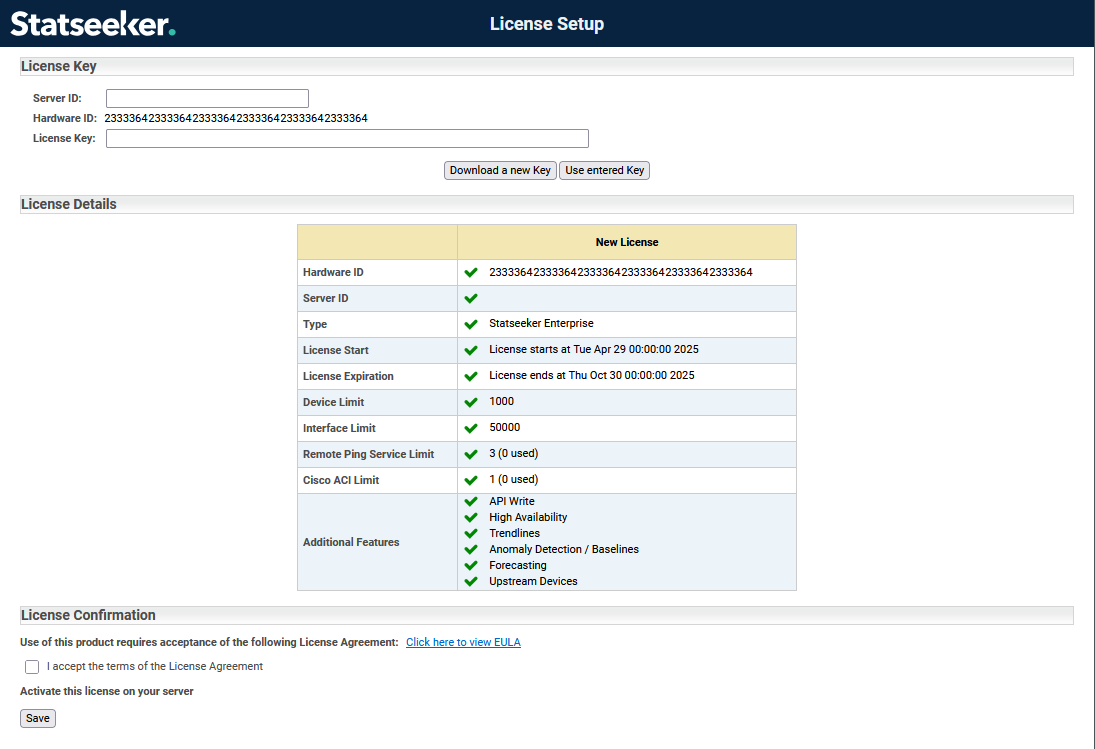
- Select the tick box to accept the Statseeker license
- Select Save to activate the license key
- Click Next
Restore from your Backup
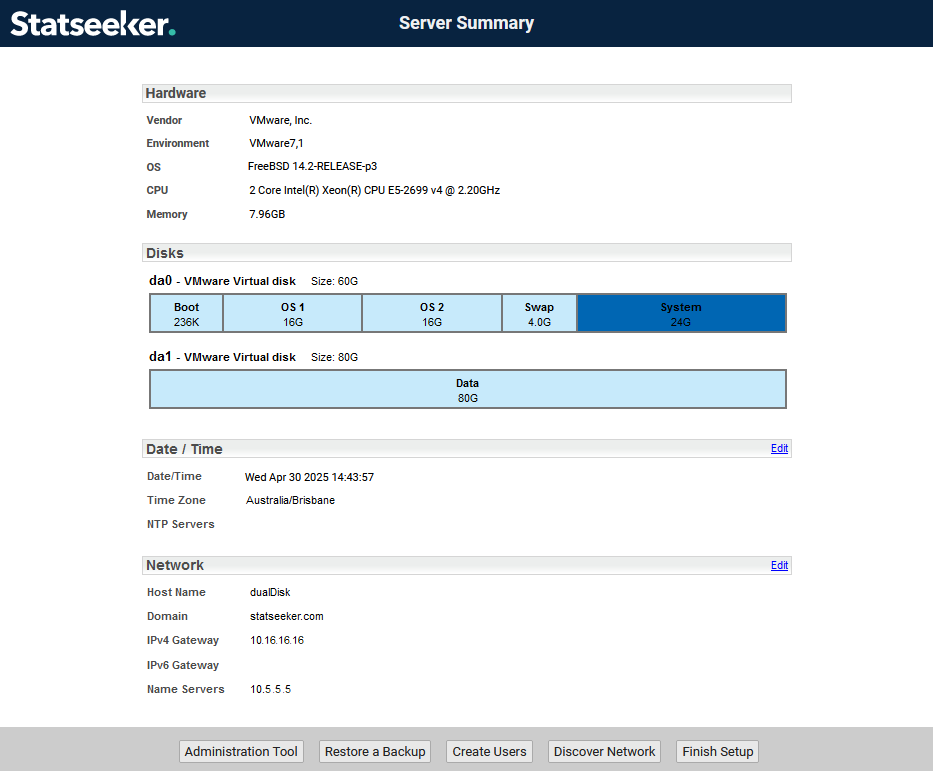
From the Server Summary screen:
- Select Restore a Backup
- Click Next
You will now be prompted to select your method of retrieving the backup file.
- Select the Method
- local - the backup needs to be located in the specified directory on the local machine
- ftp/sftp - Statseeker will open an ftp/sftp connection to the specified backup repository
- ssh - Statseeker will open an SSH connection to the specified backup repository
- Specify the backup location and any credentials required to access that path as required by the selected Method
- Click Save
The page will update, displaying a list of backup files found at the specified location.
- Select one of the stored backups and click Verify
This will allow you to confirm that the backup data is valid prior to attempting to restore from the data.
- Once the backup data has been verified, click Restore
A confirmation dialog will be displayed detailing the backup data selected for the restore process.
- Click OK to begin the restore process
A dialog will be displayed informing you when the restoration process has completed.
- Click OK to close the dialog
The restoration process has completed and your new Statseeker High-Availability Installation is online, monitoring and reporting on your network.