Index
Overview
This document details the requirements and process used to prepare your environment for a Statseeker High-Availability (HA) installation via Dell’s iDRAC server management platform.
This document does not address the Statseeker client installation or configuration to be used when creating a Statseeker HA installation.
- For details on how to install and configure Statseeker HA, see Statseeker High-Availability Installation Guide
- For details on migrating your existing non-HA installation to a Statseeker HA installation, see Non-High-Availability to Version 5.x High-Availability Upgrade Guide
Requirements
Hardware Requirements
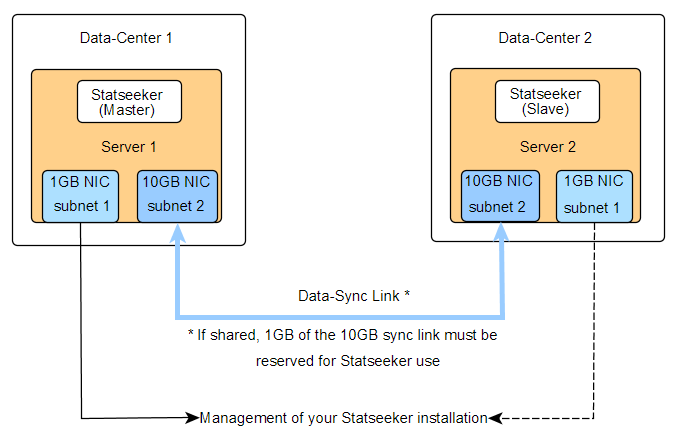
This installation method requires two iDRAC 8 monitored Dell PowerEdge Servers. The two servers must have an identical specification and reflect the requirements of the size of the network to be monitored.
| MonitoredNetwork | ServerRequirements | ||||
| Size | Interface Count | CPU Cores | Memory | Hard Drive | NetworkConnection |
| Small | 20,000 | 2 | 8GB | 500GB | 1 x 1Gb NIC1 x 10Gb NIC |
| Medium | 250,000 | 4 | 32GB | 2TB | |
| Large | 1 Million | 8 | 128GB | 5TB | |
It is also useful to know if the raid controller supports the MegaRAID Firmware Interface (mfi) or MegaRAID SAS HBA (mrsas) driver under FreeBSD.
Statseeker Requirements
Each Statseeker installation must be:
- A Statseeker High-Availability server installation
- Licensed as a Statseeker High-Availability installation
- The same version
Contact Customer Service for assistance with acquiring the correct Statseeker installation media/file and license details appropriate for your installation.
Network Configuration Requirements
Each server must feature two NICs for Statseeker’s use:
- 1Gb NIC for managing your Statseeker installation
- 10Gb NIC for the Statseeker HA Data-Sync
- The IP addresses for these two NICs should be on separate subnets
The connection between the servers must be a high-speed dedicated connection. If this link is to be shared among tenants, then the link must have Quality of Service policies in place ensuring that a minimum of 1GB/s is reserved for Statseeker Data-Sync traffic.
iDRAC Configuration
Configure iDRAC on both servers but assigning iDRAC IP addresses and login credentials. Instructions for doing this may vary across hardware so refer to the Dell Knowledge Base for detailed instruction relevant to your environment.
- Booting the server and pressing F2 while on the system boot screen to access System Setup
- Select iDRAC Settings from the System Setup menu
From your remote computer:
- Login in to one of the servers using a web browser with the IP address and credentials that you just created
- Select Server from the side navigator
- Ensure that you are on the Properties > Summary tab
- In the Virtual Console Preview panel, select Launch
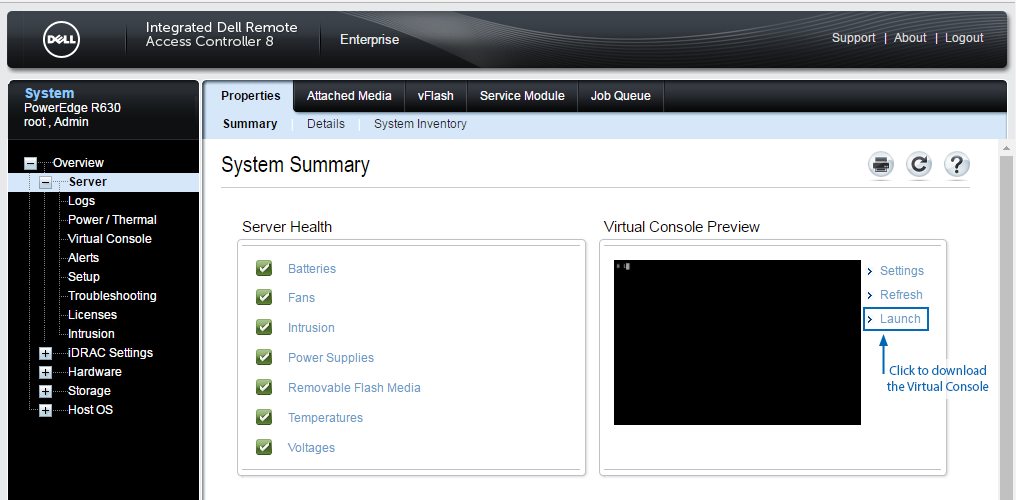
This will download the iDRAC Remote Console client, a file called viewer.jnlp.
- Once downloaded, run viewer.jnlp
Depending on your local system, you may be prompted for a Java installation or update, proceed with these as required to be able to run viewer.jnlp.
sudo apt-get install icedtea-plugin- When prompted, select Trust the connection to proceed
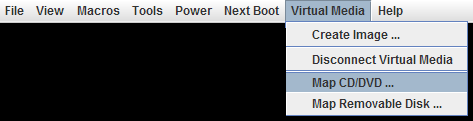
The console will be displayed in a new window.
- From the Virtual Media menu, select Map CD/DVD
- Click Browse, then locate and select your Statseeker HA ISO file
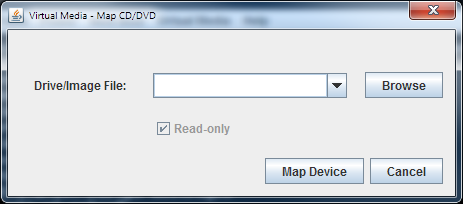
You can confirm that you have successfully mapped the drive and mounted the image by returning to the Virtual Media menu.

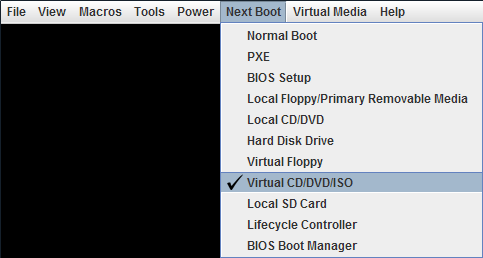
- From the Next Boot menu, select Virtual CD/DVD/ISO
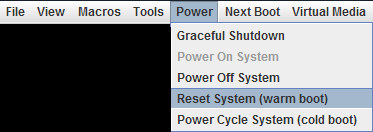
- Reboot the server by selecting Reset System (warm boot) from the Power menu
When the system loading screen is displayed:
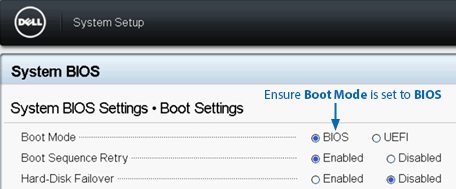
- Press F2 to enter the System Settings
- Select System BIOS Settings > Boot Settings
- Ensure that Boot Mode is set to BIOS
- Select Back and then Finish and Finish once again
- Click Yes to confirm that you want to exit the System Settings
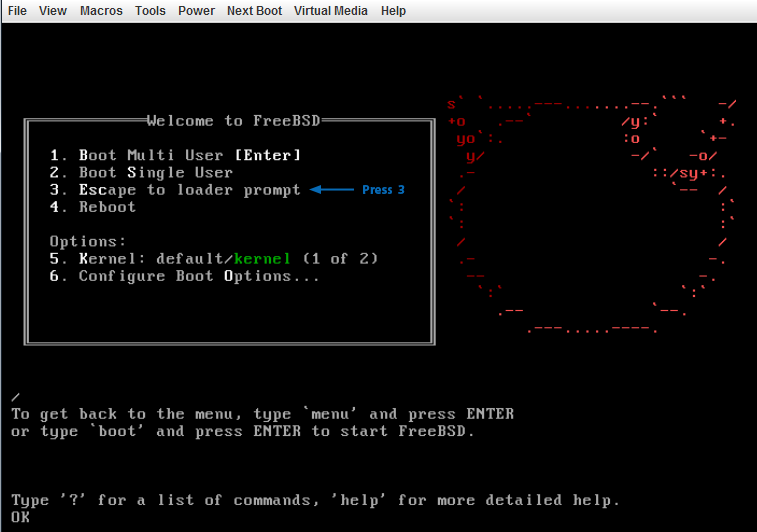
Depending on your server you may need to force the use of a specific raid controller driver by FreeBSD. While many cards are supported by the default FreeBSD driver, mfi, some are only supported by the mrsas driver. If you need to specify the use of the mrsas driver then, when the FreeBSD boot screen is displayed:
- Press 3 Escape to loader prompt
- Enter set hw.mfi.mrsas_enable="1"
- Then enter boot
Once the server boots from the Statseeker HA Installation ISO, the installation process will begin.
Install Statseeker High-Availability
Install Statseeker High-Availability on each of the servers by following the directions in the Statseeker High-Availability Installation Guide.