
Index
- Overview
- Virtual Machine Snapshots
- Configuring Backups
- Testing the Backup Configuration
- Running a Manual Backup
- Stopping a Running Backup Process
- Scheduling Automated Backups
- Cancelling Scheduled Backups
- Restoring Statseeker from a Backup
- SSH Authentication: Destination Server Host Key Changes
Overview
Statseeker supports local and remote backup regimes. Backups may be initiated manually and configured to run automatically on a schedule.
- It is strongly recommended that a local backup configuration only be used as a temporary measure. In the event of a disk failure, not only will you lose your existing Statseeker installation, but also all backup data. DO NOT store your Statseeker backup files on your Statseeker server.
- Be sure to copy any locally stored backup files from the Statseeker server prior to performing an upgrade or fresh installation on the server
- Only restore backups of the same version as the current server – backup files from other versions may not have the required data structure to work correctly with your Statseeker server.
- Only restore backups onto clean servers:
- The server is a fresh install
- The server has been reset via ssadmin, see ssadmin: Reset for details
Virtual Machine Snapshots
If you are running Statseeker on a VM, it is strongly advised that you do not use VM snapshots as an alternative to creating Statseeker backups.
If you must rely on a snapshot for backup and restoration purposes, then it is imperative that you DO NOT snapshot a live (running) Statseeker server. Instead, cleanly shut down the server prior to creating the snapshot. Failure to do so can result in database corruption, leading to everything from data loss to a dead server.
To shut down the server correctly:
- Log in to your Statseeker server via SSH or directly
- From the command prompt, enter ssadmin and enter the root user password if prompted
This will display the ssadmin menu, offering access to the different areas of functionality.
- Select 8. Operating System
- Select 3. Shutdown Server
- Monitor the Statseeker server state in the VM host, and once it has shut down, create the snapshot
Configuring Backups
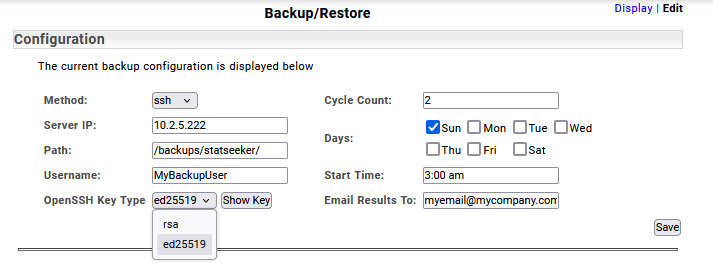
To configure backups for your Statseeker server:
- From Administration, select Statseeker Administration > Backup/Restore
- Click Edit (top-right)
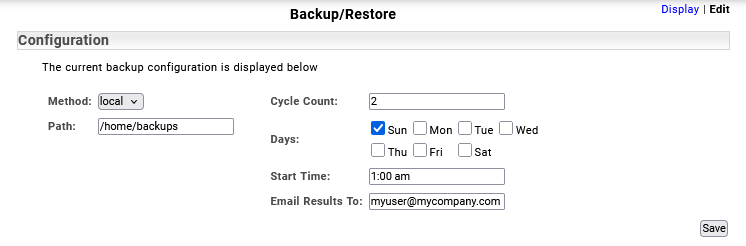
- Select the Method
LocalLocal backups are stored on the Statseeker server. This is not recommended as a long-term backup solution.
- Create a backup directory on the destination server
- The backup process will run as the server’s statseeker user. Configure the directory owner and permissions to ensure that this user has read, write, and delete permissions for the directory and its content.

In the Backup/Restore configuration:
- Specify the Path to access the backup directory
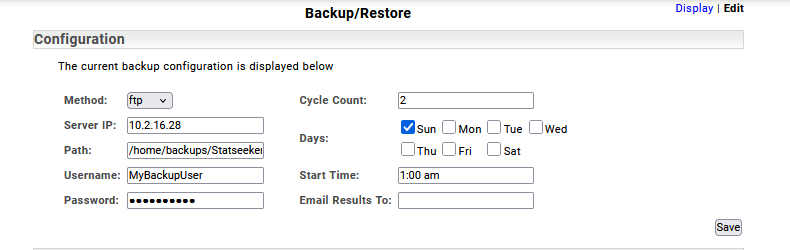
FTPStatseeker will open an ftp connection and write the backup file directly to the specified directory on the destination server.
- Create a backup directory on the destination server
- Configure the directory owner and permissions – the backup process requires read, write, and delete actions performed in the directory. The backup configuration will specify a user account that will be used to log in to the destination server and perform these actions.
- Configure the backup in Statseeker, specifying the Server IP, Path, and Username for a destination server user account with read, write, and delete permissions to that directory and its content
SFTPSFTP backups allow you to configure a secure backup process to a remote server on your network. This method requires:
- That the destination server is configured to allow SFTP connections
- If authenticating with the remote server via username:password – the credentials for a valid user on the remote server
- If authenticating with the remote server via SSH – that the destination server has a copy of the public key for the SSH certificate being used by the Statseeker server, and the username of a valid user on the remote server
To configure an SFTP backup:
- Create a backup directory on the destination server
- Configure the directory owner and permissions as needed. The backup process requires read, write, and delete actions performed in the directory. The backup configuration will specify a user account that needs to log in to the destination server and perform these actions.
- Configure the backup in Statseeker, specifying the Server IP, Path, and Username for a destination server user account with read, write, and delete permissions to that directory and its content
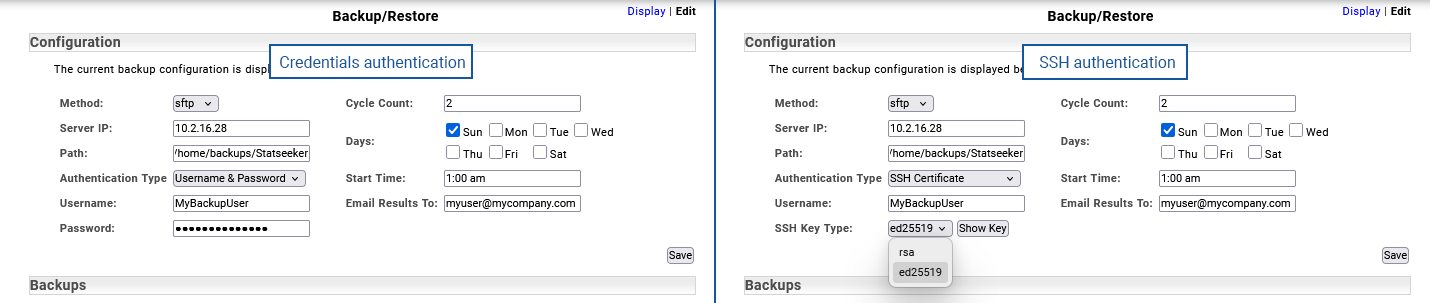 Using SSH Authentication
- Specify the OpenSSH Key Type to use
OpenSSH Key Type:
To determine the OpenSSH key type supported by the destination server, run the following on that server’s CLI:
- Linux Servers: ssh -Q key | grep -E ‘rsa|ed25519’
- Windows Servers: ssh -Q key | findstr “rsa ed25519”
The output from this will list the supported key types. No output indicates that neither key type is supported, this is extremely unlikely. In this instance, check your input command.
- Ensure the destination server has an /.ssh/authorized_keys file, if not create it
Note: the process presented below illustrates configuring the backup to a Unix/Linux server. The process and steps presented are also applicable to configuring the backup to target a Windows server, but the CLI commands will vary.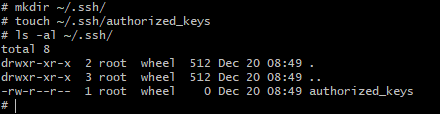
The Show Key option:
- Displays the current SSH key of the specified type, or indicates that there is no key of that type currently installed on the server
- Provides the option to re-generate the key as needed
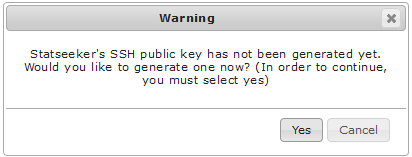
If your Statseeker server does not currently have an SSH Key of the type specified installed, you will be prompted to generate a new SSH key.
Clicking Yes will generate and display the key
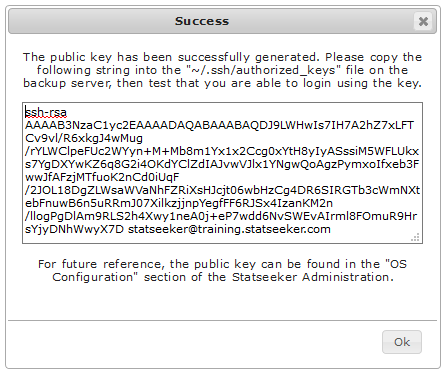
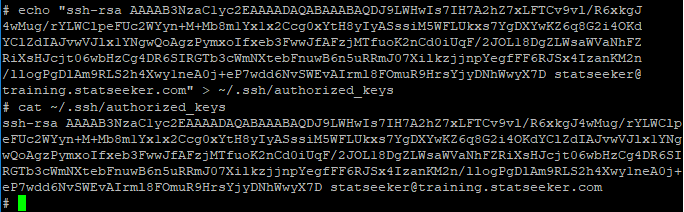
- Copy the key and append it to the authorized_keys file
SSH (DEPRECATED)Note:- SSH backups are deprecated and will be removed in a future version. It is advised that SSH backup configurations be migrated to SFTP (with SSH Authentication)
- The process presented below illustrates configuring the backup to a Unix/Linux server. The process and steps presented are also applicable to configuring the backup to target a Windows server, but the CLI commands will vary.
To configure the backup:
- Create a backup directory on the destination server
- Configure the directory permissions as needed
- Ensure the destination server has an /.ssh/authorized_keys file, if not create it
- Configure the backup in Statseeker, Server IP, Path, and Username for a destination server user account with read, write, and delete permissions to that directory and its content
- Specify the OpenSSH Key Type to use
OpenSSH Key Type:
To determine the OpenSSH key type supported by the destination server you can run the following on that server’s CLI:
- Linux Servers: ssh -Q key | grep -E ‘rsa|ed25519’
- Windows Servers: ssh -Q key | findstr “rsa ed25519”
The output from this will list the supported key types. No output indicates that neither key type is supported, this is extremely unlikely. In this instance check your input command.
The Show Key option:
- Either displays the current SSH key of the specified type or indicates that there is no key of that type currently installed on the server
- Provides the option to re-generate the key as needed
If your Statseeker server does not currently have an SSH Key of the type specified installed, you will be prompted to generate a new SSH key.
Clicking Yes will generate and display the key
- Copy the key and append it to the authorized_keys file
- Specify the Cycle Count (the number of backups to keep)
- If saving the latest backup would result in the number of stored backups exceeding the Cycle Count, then the oldest backup will be deleted after saving the latest backup (Statseeker requires that the backup repository have enough space to contain Cycle Count + 1 backups)
- If there is insufficient storage space on the backup destination, then the backup will fail. Set the Path and Cycle Count to satisfy both your backup requirements and your storage constraints.
- Click Save
The backup configuration will be saved, and the form returned to the non-editable Display mode.
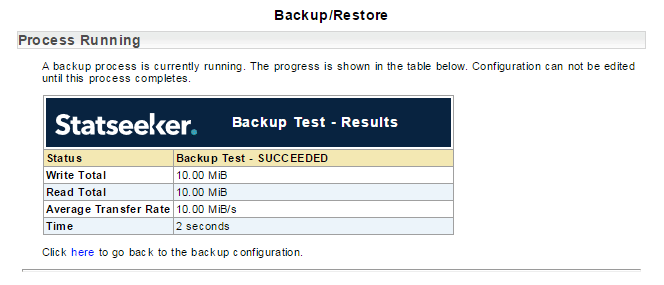
Testing the Backup Configuration
You can test the configuration to ensure that the credentials supplied are valid and provide the required permissions to the destination directory.
- Click Test
- Select a size for the test backup and click Test
The backup configuration will be tested, and the results displayed.
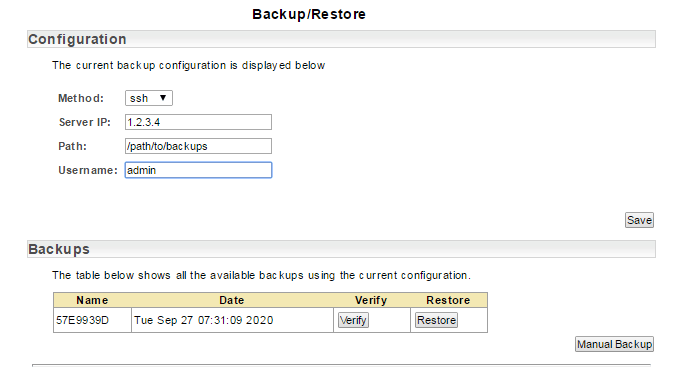
Running a Manual Backup
To manually initiate a backup:
- Click Edit
- Click Manual Backup
- Click Yes
The backup will begin, and the progress will be displayed. Once the backup is complete, Verify the backup file.
Scheduling Automated Backups
To schedule the backup process:
- From Administration, select Statseeker Administration > Backup/Restore
- Click Edit (top-right)
- Use the checkboxes to specify on which days the backup should be performed
Clicking in the Start Time field will display a time-selector
- Specify a Start Time using the selector or manually enter a time
- Optionally enter an email address to receive notifications resulting from the automated backup process.
- Click Save
Stopping a Running Backup Process
Administration offers the ability to stop a running Backup process.
- From Administration, select Statseeker Administration > Backup/Restore
- Click Edit (top-right)
Progress through the currently running backup process will be displayed, along with the option to stop this process. The process cannot be resumed once halted, but can be restarted manually or according to the configured backup schedule.
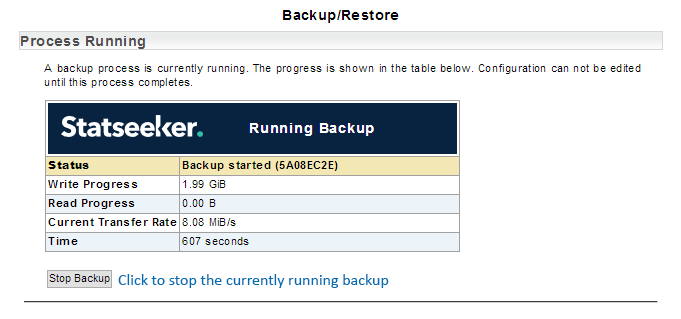
- Click Stop Backup to halt the backup process.
Cancelling Scheduled Backups
Future scheduled backups can be cancelled by either setting the backup method to None or updating the existing backup schedule to remove the assigned days.
- Select Administration > Statseeker Administration > Backup/Restore
- Click Edit (top-right)
- Either:
- Set the Method to None, the previous backup configuration is retained and can be returned to in the future if needed
- Or retain the specified Method, and use the checkboxes to remove (uncheck) all specified Days
- Click Save
Restoring Statseeker from a Backup
To restore Statseeker from a previously created backup:
- From Administration, select Statseeker Administration > Backup/Restore
The Backups section lists the existing backup files.
- Click Edit (top-right)
- Select one of the stored backups and click Verify – this will allow you to confirm that the backup is valid prior to attempting to restore from the backup data

- Only restore backups of the same version as the current server – backup files from other versions may not have the required data structure to work correctly with your Statseeker server.
- Only restore backups onto clean servers:
- The server is a fresh install
- The server has been reset via ssadmin, see ssadmin: Reset for details
- System settings / SSL certificates – Keep current configuration – maintains (does not overwrite with configuration found in the backup) the existing configuration for web and email servers, and NTP
- System settings / SSL certificates – Restore from backup – overwrite existing configurations for web and email servers, and NTP with that found in the backup
- Once the backup data has been verified, click Restore
A confirmation dialog will be displayed detailing the backup data selected for the restore process.
- Click OK to begin the restore process
A dialog will be displayed when the restoration process has completed.
- Click OK to close the dialog
SSH Authentication: Destination Server Host Key Changes
When configuring secure backup using SSH/SFTP, Statseeker adds a host ‘fingerprint’ for the backup destination server to a ‘known hosts’ file. This fingerprint is used to verify the server’s identity during future connections, ensuring that Statseeker connects to the same server as before.
- Upgrading the destination server’s operating system often results in the locally stored host key fingerprint in Statseeker no longer matching the destination server’s key
- As a result, Statseeker’s backup process will fail when attempting to connect to a destination that fails this fingerprint check
To resolve this issue, please refer to the Managing SSH Host Key Changes guide.