
Index
- Overview
- Adding an IP Address Range Configuration
- Editing an IP Address Range Configuration
- Enabling\Disabling IP Address Range Configuration
- Deleting an IP Address Range Configuration
Overview
IP address ranges are used to define the targets of the Discovery and Rewalk processes. These ranges are defined in Statseeker as an IP Address Range configurations, each configuration consisting of:
- One or more Include rules, defining which IP addresses to include
- Optionally, one or more Exclude rules (Exclude rules override the output of an Include rule)
When a Discovery or Rewalk process is run, any number of IP Range Configurations can be assigned as the targets of that process. For more details on the Discovery or Rewalk processes, see The Discovery Process.
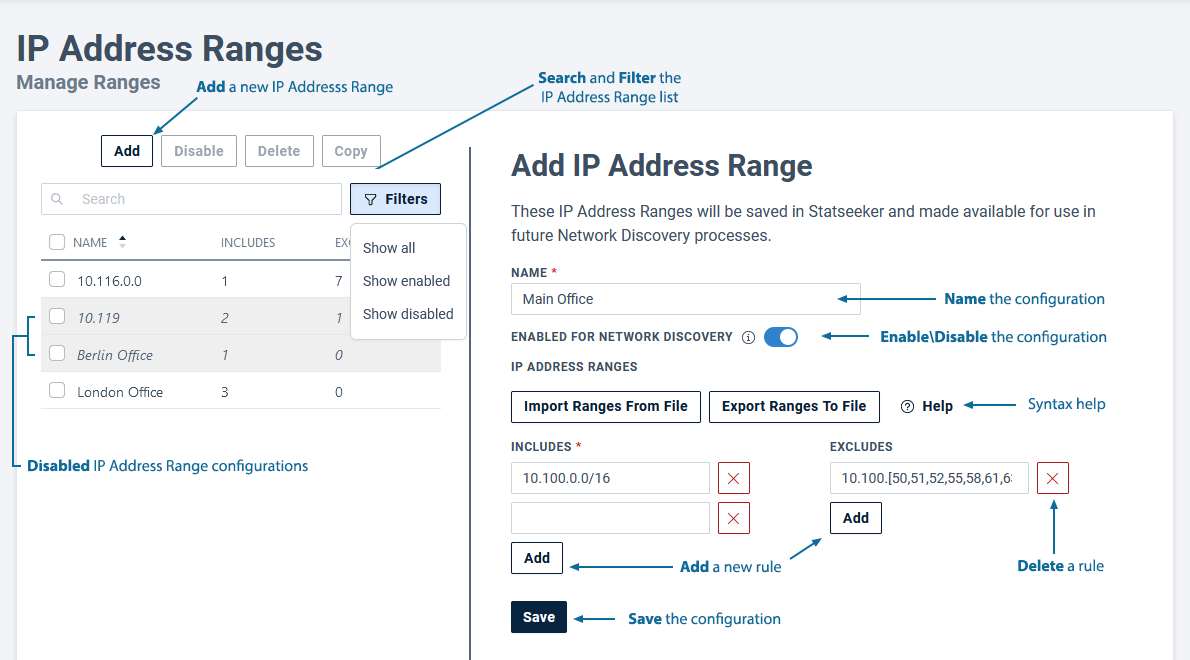
Adding an IP Address Range Configuration
To add a new IP Address Range Configuration:
- Select Administration > Network Discovery > IP Address Ranges
- Click Add
- Name the configuration, this value is referenced when assigning IP Range Configurations to Discovery and Rewalk processes
- Optionally, switch Enabled for Network Discovery to off, excluding the configuration from default Discovery process
Note: the Enabled for Network Discovery is On\Enabled by default. A default Discovery process will utilize all Enabled IP Address Range configurations, ignoring any Disabled configurations. A Discovery process can be customized to only use specific IP Address Range configurations resulting a more focused (and potentially quicker) process.
- Specify an Include rule
- Optionally specify additional Include rules, click the Add button to display a new IP address range field
- Optionally, define one or more Exclude rules
- Click Save
IPV4 Address Range Syntax
IP Address Range Format
{NetworkAddress[/Netmask] or NetworkPattern}
Examples:
- 10.2.*.*, resolves to all addresses in the range 10.2.0.0 - 10.2.255.255
- 10.13.0.0/16, resolves to all addresses in the range 10.13.0.0 - 10.13.255.255
- 10.80.0.0/255.255.255.0, resolves to all addresses in the range 10.80.0.0 - 10.80.0.255
- 10.7.4.[100-250], resolves to all addresses in the range 10.7.4.100 - 10.7.4.250
- 10.8.[3-5].[1,2,8], resolves to the following addresses:
- 10.8.3.1
- 10.8.3.2
- 10.8.3.8
- 10.8.4.1
- 10.8.4.2
- 10.8.4.8
- 10.8.5.1
- 10.8.5.2
- 10.8.5.8
When defining IP ranges in Include / Exclude rules, adhere to the following guidelines:
- IP network ranges must fall on a natural subnet boundary
- An exclude range will override the corresponding include range (if both are present)
- Do not include massively large network ranges (eg.0.0.0.0/0), as this will result in a very slow Discovery process
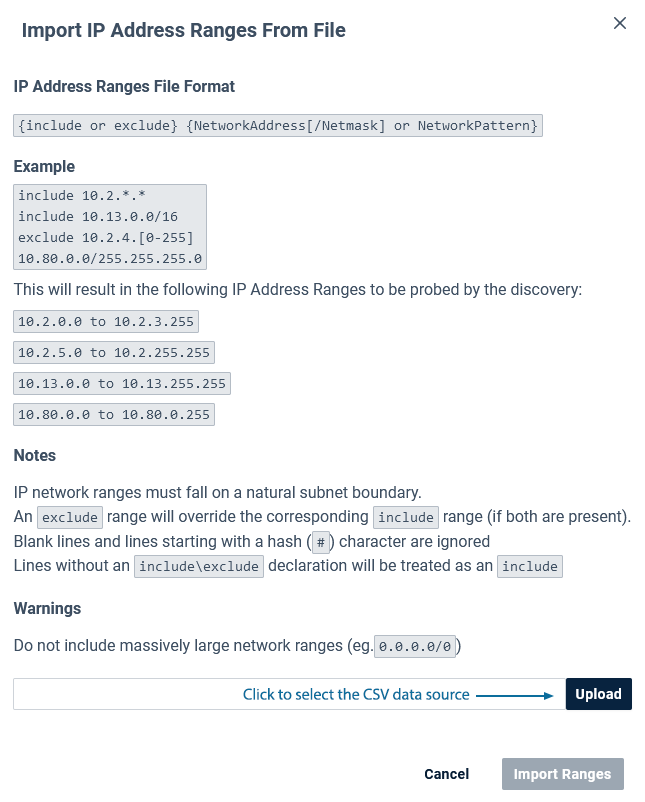
Importing and Exporting IP Address Ranges
IP Address Range configurations can also be managed externally and imported into Statseeker. The IP ranges file content should conform to the following requirements:
- A single include or exclude rule per line with the format:
- {include or exclude} {NetworkAddress[/Netmask] or NetworkPattern}
- IP network ranges must fall on a natural subnet boundary
- An exclude range will override the corresponding include range (if both are present)
- Blank lines and lines starting with a hash (#) character are ignored
- Lines without an include\exclude declaration are treated as an include
Example:
include 10.2.*.*
include 10.13.0.0/16
exclude 10.2.4.[0-255]
10.80.0.0/255.255.255.0
Importing a range configuration will remove all existing include\exclude rules and repopulate the configuration with the content of the file.
To import an IP Address Range configuration:
- Select Administration > Network Discovery > IP Address Ranges
- Click Add
- Name the configuration, this value is referenced when assigning IP Range Configurations to Discovery and Rewalk processes
- Optionally, switch Enabled for Network Discovery to off, excluding the configuration from default Discovery process
Note: the Enabled for Network Discovery is On\Enabled by default. A default Discovery process will utilize all Enabled IP Address Range configurations, ignoring any Disabled configurations. A Discovery process can be customized to only use specific IP Address Range configurations resulting a more focused (and potentially quicker) process.
- Click Import Ranges from File
- Click Upload and select the file
- Click Import Ranges
Exporting an IP Address Range Configuration
An existing IP Address Range configuration can be exported for management\editing externally:
- Select Administration > Network Discovery > IP Address Ranges
- Click to select the required IP Address Range configuration and click Export Ranges to File
The configuration will be converted to the supported syntax and saved to the default location for the client system.
Editing an IP Address Range Configuration
To edit an existing IP address Range configuration:
- Select Administration > Network Discovery > IP Address Ranges
- Select the required IP Address Range configuration to open for editing
- Update the configuration as needed and click Save
Enabling\Disabling IP Address Range Configurations
To Enable\Disable existing IP address Range configurations:
- Select Administration > Network Discovery > IP Address Ranges
- Use the checkboxes to select IP Address Range configurations in the Manage Ranges list
- If only Disabled configurations are selected, then the Enable button is active
- If any of the selected configurations is Enabled, then the Disable button is active
- Click Enable\Disable as appropriate for the selected configurations
The selected configurations will be enabled\disabled, as directed by the selected action.
Deleting an IP Address Range Configuration
- Select Administration > Network Discovery > IP Address Ranges
- Use the checkboxes to select IP Address Range configurations in the Manage Ranges list
- Click Delete and confirm the action when prompted