Index
- Overview
- Authentication Token Settings
- File Authentication
- LDAP Authentication
- RADIUS Authentication
- SAML Driven Single-Sign-On Service
- Identity Provider (IdP) Integrations:
Overview
Statseeker offers token-based authentication, with users being authenticated via the following methods:
- File – authenticated directly with Statseeker server. The Statseeker admin account (an Apache user account used to manage the Statseeker installation), uses the file authentication method.
- LDAP – use your existing Active Directory/LDAP authentication to manage access to Statseeker
- RADIUS – use your existing RADIUS server to manage access to Statseeker
- SAML – a SAML 2.0 driven single sign-on service, using your existing SAML Identity Provider (Okta, Azure AD, Auth0, etc.) implementation
Restrictions
- The Statseeker admin user account will always use File authentication, but additional ‘admin-level’ user accounts can be created and used in preference to this standard server account
- Only one external authentication mechanism ( LDAP or RADIUS or SAML ) can be used with Statseeker at any one time, basic “File” authentication is always available and can be applied on a per user basis
- If LDAP, RADIUS or SAML is in use, the Statseeker webserver must be configured to use HTTPS (HTTPS is enabled by default on all Statseeker installations)
- Statseeker does not support SAML authentication to the Statseeker API
Authentication Token Settings
- When employing File, LDAP or RADIUS authentication, Statseeker manages the token TTL (time-to live) and refresh periods, for details on:
- Setting system-wide default values, see Web Server Configuration > Authentication Token Settings
- Setting user specific overrides to default token TTL and refresh periods, see Editing Users and Updating User Preferences
- When employing SAML authentication, the token settings are configured and managed on the Identity Provider side of the integration, and the token settings defined in Statseeker’s Web Server configuration are only applied to those accounts configured to use File authentication, such as the default Statseeker admin account
File Authentication
The file authentication method requires that the Statseeker user record specify a username and password, and that the Authentication Method be set to File.
The Statseeker admin user account employs file authentication and cannot be configured to use an alternate authentication method. Additional admin-level user accounts can be created and used in preference to the default admin account.
LDAP Authentication
Statseeker LDAP configuration allows you to use your existing Active Directory/LDAP authentication to manage access to the Statseeker web interface. This is done by:
- Configuring Statseeker’s access to your LDAP server
- Creating a user account in Statseeker
- Specifying that the user be authenticated via LDAP rather than Statseeker
The LDAP service will only provide authentication to access Statseeker, authorization to view and access functionality within Statseeker will still be handled by Statseeker’s User/Group configuration.
Limitations
Statseeker:
- Does not support LDAP group configuration statements/Active Directory group configurations
- May not support some LDAP clustered environment configurations or active directory global catalogue server configurations
- Requires that the LDAP server allow anonymous binds
- Requires domain trusts to be configured to support multiple Active Directory domains
Configuring LDAP Authentication
To configure Statseeker for user authentication via LDAP:
- Go to Administration > Statseeker Administration > User Authentication
- Click Edit
- Click the LDAP radio-button
- Specify the LDAP Server via a hostname or IP address
- Specify the Port for the LDAP server, typically this is 389 for unsecured and StartTLS configurations and 636 when implementing SSLTLS (LDAPS)
- Specify the Base_DN, the distinguished name/container for the organizational unit containing your users
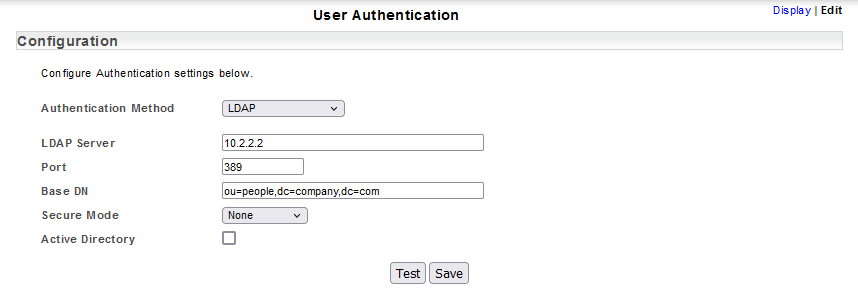
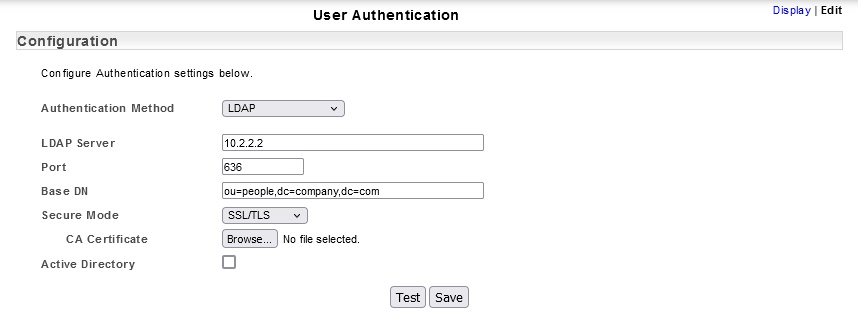
- If you are implementing secured Secure LDAP communications(LDAPS/SSLTLS or LDAP+StartTLS), then select the appropriate the format from the dropdown:
- none: unsecured
- SSLTLS: LDAP over SSL (LDAPS) connection
- StartTLS: LDAP over TLS connection
Selecting either of the secured options will display the option to import the CA Certificate associated with your LDAP configuration.
- Select Add Trusted CA Certificate
- Browse to the location of the certificate file, select the file and click Open
The file will be imported and verified as a valid CA Certificate file.
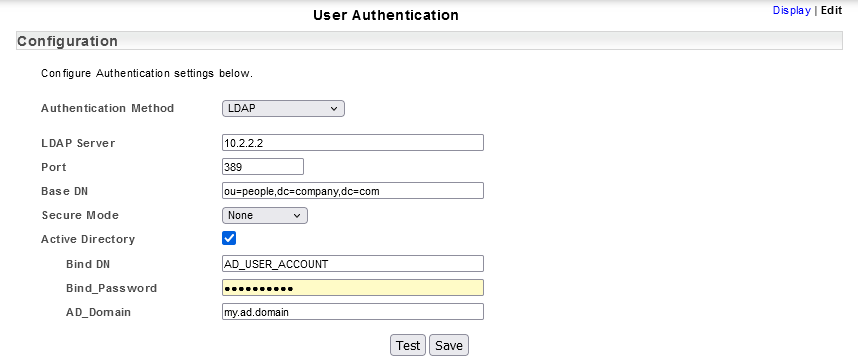
If you are connecting to an Active Directory server then:
- Select Active Directory checkbox
- Specify the Bind_DN, the active directory account user to search the LDAP directory and Bind_Password for this account
- Specify the AD_Domain (the active directory domain name)
This will display the additional fields required for Active Directory configuration.
- Click Save
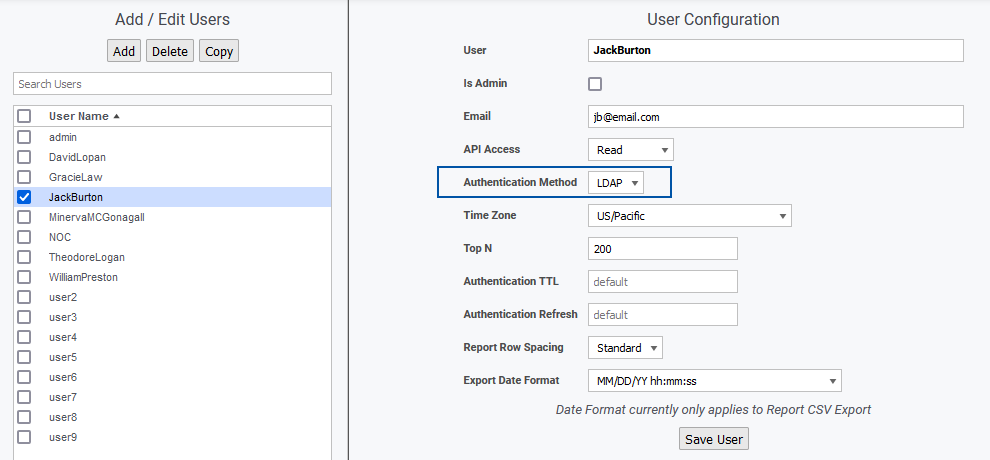
Enabling LDAP Authentication for a User
To enable LDAP authentication for a Statseeker user:
- Go to Administration > User Profiles/Grouping > Add/Edit Users
- Select the user and click Edit
- Set the Authentication Method to LDAP
RADIUS Authentication
Statseeker RADIUS configuration allows you to use your existing RADIUS server to manage access to the Statseeker web interface. This is done by:
- Configuring Statseeker’s access to your RADIUS server
- Creating a user account in Statseeker
- Specifying that the user be authenticated via RADIUS rather than Statseeker
The RADIUS server will only provide authentication to access Statseeker, authorization to access visibility and functionality within Statseeker will still be handled by Statseeker’s User/Group configuration.
Configuring RADIUS Authentication
To configure Statseeker for user authentication via RADIUS:
- Go to Administration > Statseeker Administration > User Authentication
- Click Edit
- Click the RADIUS radio-button
- Specify the RADIUS Server via a hostname or IP address
- Specify the Port for RADIUS server communications, typically this is 1812
- Specify the Shared Secret, for communication with the RADIUS server
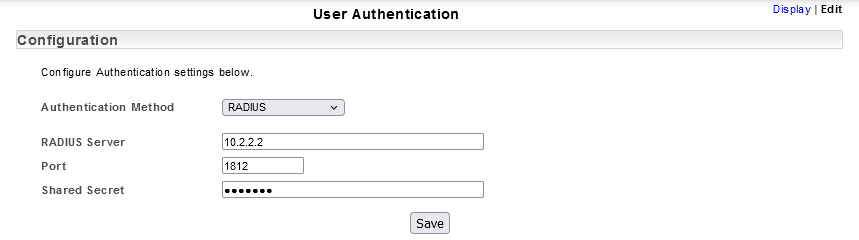
- Click Save
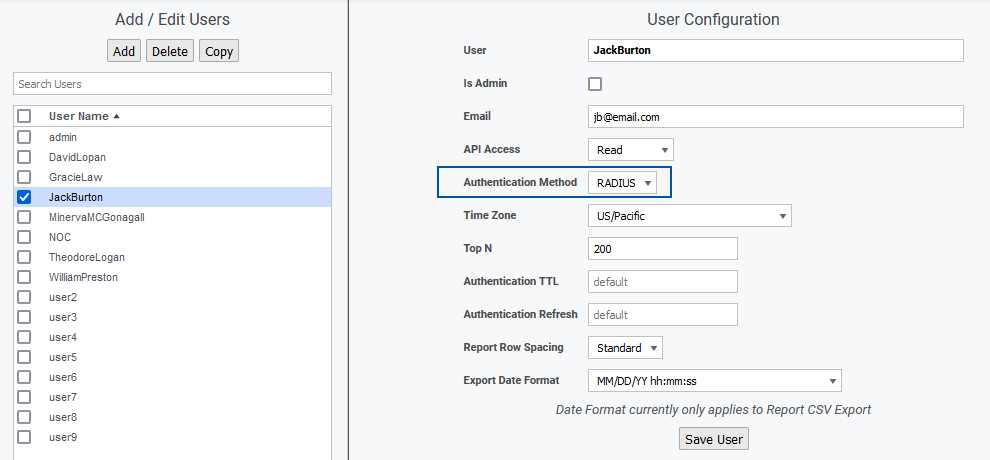
Enabling RADIUS Authentication for a User
To enable RADIUS authentication for a Statseeker user:
- Go to Administration > User Profiles/Grouping > Add/Edit Users
- Select the user and click Edit
- Set the Authentication Method to RADIUS
SAML Driven Single-Sign-On Service
You can pass Statseeker user authentication off to any SAML driven single sign-on service (identity provider).
Statseeker’s SAML authentication can be used with a wide range of identity providers. While the specifics may vary between solutions, the general requirements are fairly ubiquitous:
- Statseeker Server Configuration requirements:
- Your identity provider’s SAML identifier
- The XML metadata file from your identity provider
- A reference which maps to the Statseeker user’s username, as provided in the ‘successful authentication’ response from the identity provider
- Identify Provider configuration requirements:
- SAML identifier (https://{your Statseeker server URL}/shibboleth)
- Callback URL (https://{your Statseeker server URL}/Shibboleth.sso/SAML2/POST)
There may be additional, integration-specific settings that are required by your identity provider and their documentation will be able to guide you through those elements as needed.
- Your selected identity provider may require that the Statseeker server be accessible via the hostname. If you typically access the Statseeker server via IP, your server’s host name can be found from Administration, select Statseeker Administration > Network Configuration
- Statseeker usernames are case sensitive
- Some identity provider platforms will offer the ability to customize the login page with your application/company logo and employ SSL certificates to encrypt communication. These aspects of the configuration will not be detailed here, refer to your identity provider’s documentation for assistance as needed.
Okta IdP Configuration
Requirements
- Both Okta and Statseeker must contain user account records for your Statseeker users
Configuration
- Login to your company’s Okta account and select Admin
- Select Applications > Create App Integration
- Set Sign on method to SAML 2.0 and click Next

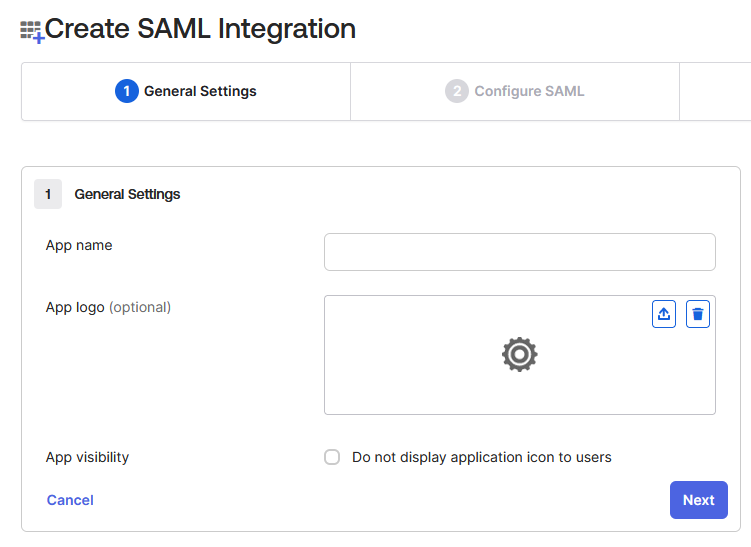
Under General Settings:
- Assign a name to the application profile and click Next
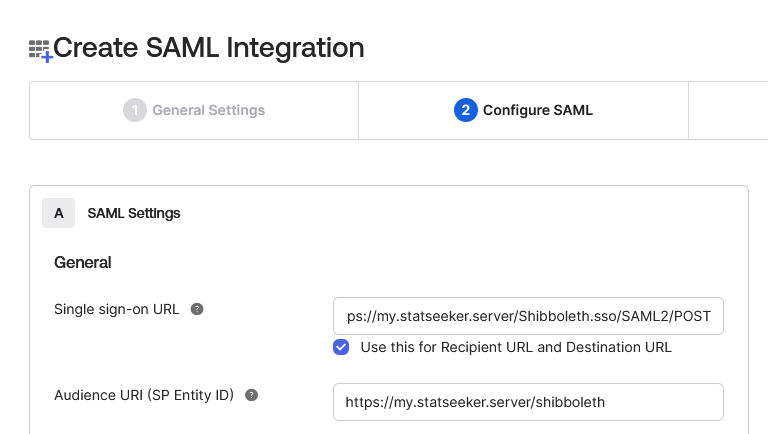
Under SAML Settings > General:
- Set Single sign on URL to https://{your statseeker URL}/Shibboleth.sso/SAML2/POST
- Set Audience URI (SP Entity ID) to https://{your statseeker URL}/shibboleth (this should match your Local Entity ID as shown in your Statseeker User Authentication configuration)
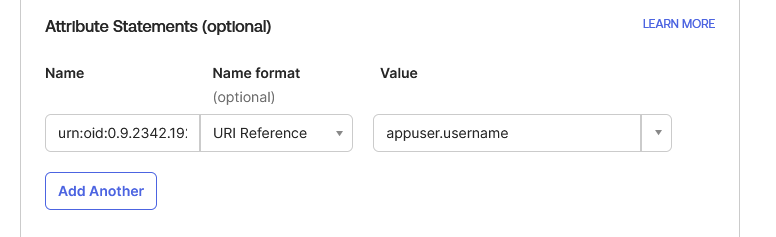
Under SAML Settings > Attribute Statements (Optional):
- Set Name to urn:oid:0.9.2342.19200300.100.1.1
- Set Name Format to URI Reference
- Set Value to appuser.userName
- Click Next and then Finish
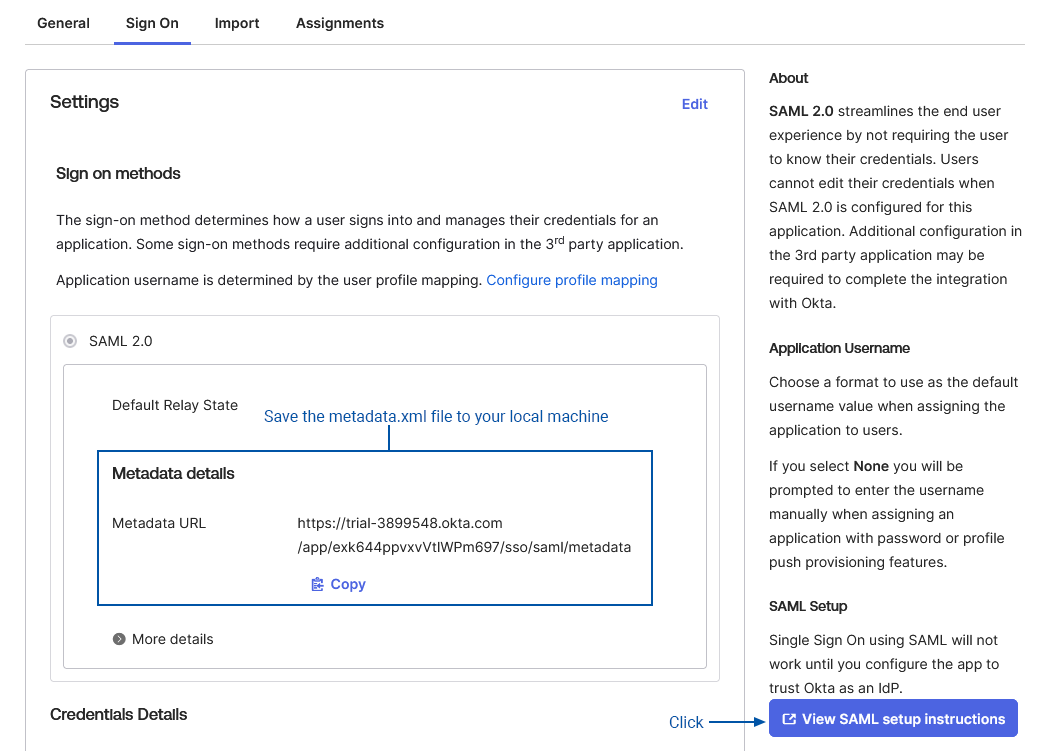
In the Sign On tab there will be a SAML 2.0 panel containing Metadata Details
- Copy the Metadata URL and load it in another tab of your browser
- This will load an XML file, save the content to your local machine
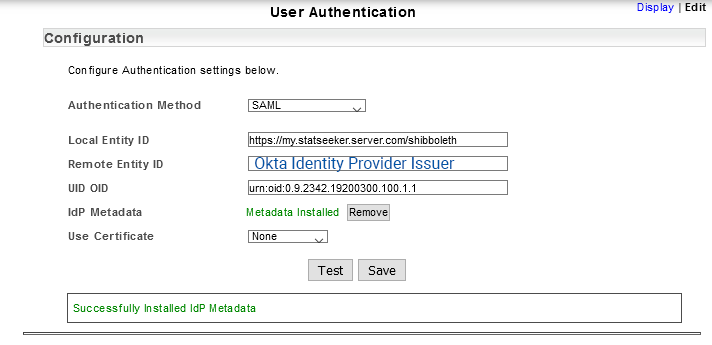
- Click View Setup Instructions and copy the Identity Provider Issuer value
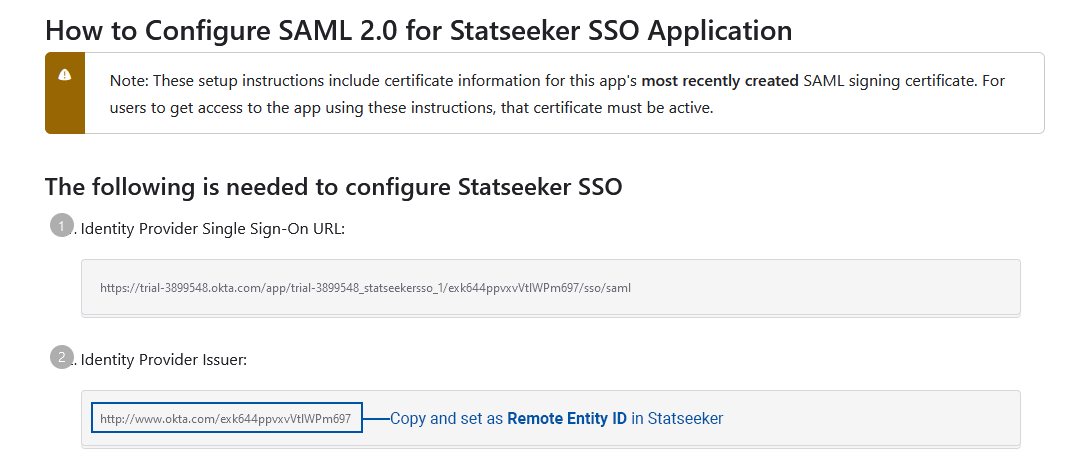
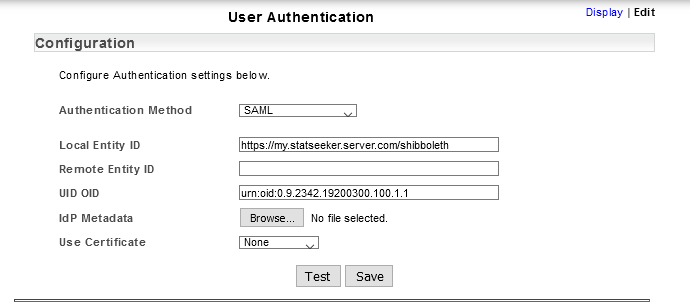
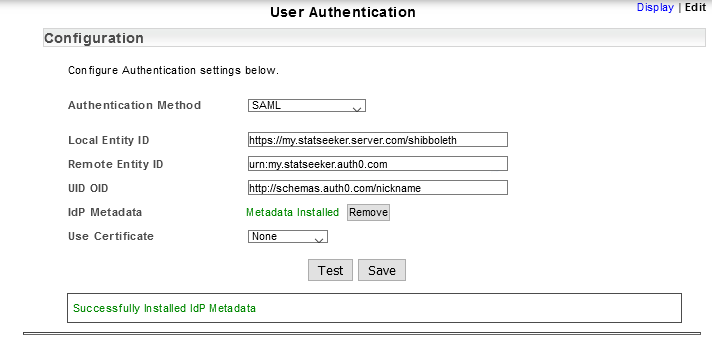
In Statseeker:
- Paste the Identity Provider Issuer as the Remote Entity ID
- Locate IdP Metadata and click Browse
- Select the previously downloaded metadata xml
Statseeker will install the metadata and display a status message once this process is complete.
- Click Save
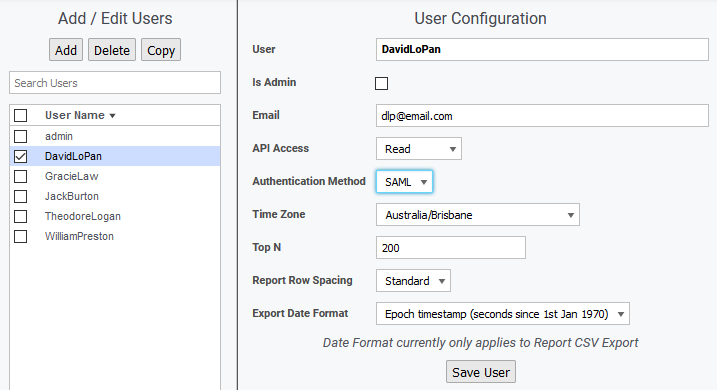
- Select Administration > User Profile/Grouping > Add / Edit Users
- Set each of your user accounts’ Authentication Method to SAML
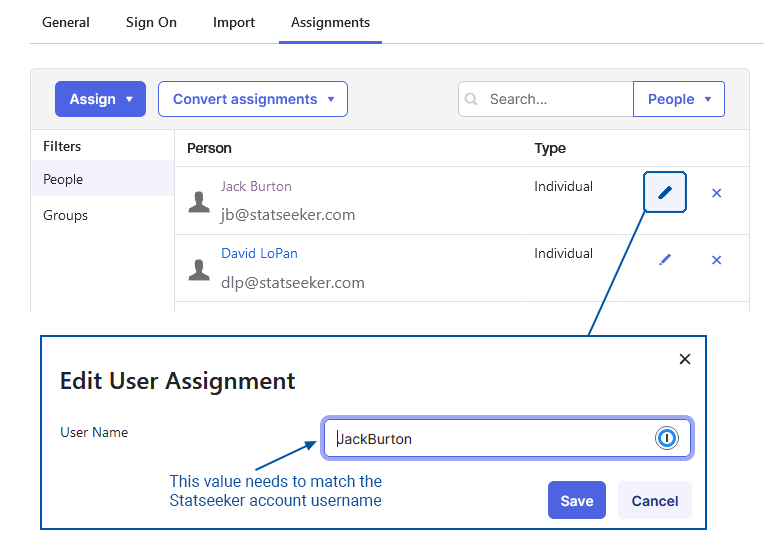
In your Okta application profile:
- Select the Assignments tab
- Click Assign > Assign to People/Groups as needed for your organization, assigning Okta users/groups access to Statseeker
- Use the edit button (
 ) to confirm that the username that will be passed to Statseeker matches the Statseeker account’s username, update as needed
Auth0 IdP Configuration
This configuration will require you to copy values between your Statseeker server and your Auth0 account, you cannot complete one side without referencing the other, so have them both available throughout the process.
Requirements
- Both Auth0 and Statseeker must contain user account records for your Statseeker users
- The Statseeker account User (name) must be a value found in the corresponding user account in Auth0 (firstname, nickname, etc.)
Configuration
- From within Statseeker, select Administration > Statseeker Administration > User Authentication
- Click Edit (top-right of the screen)
- Set Authentication Method = SAML
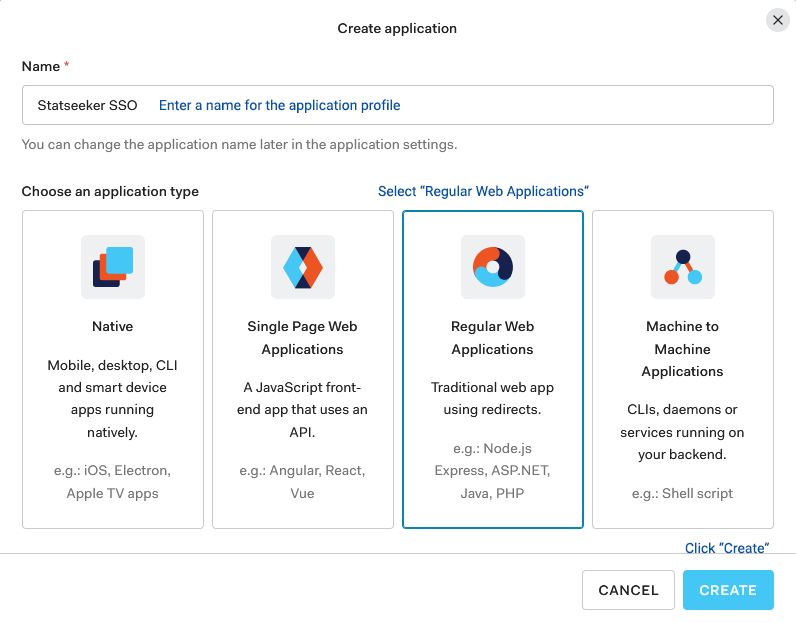
- Log into your Auth0 account, select Applications > Applications and click Create Application
- Enter a Name for your Statseeker application profile
- Select Regular Web Applications and click Create
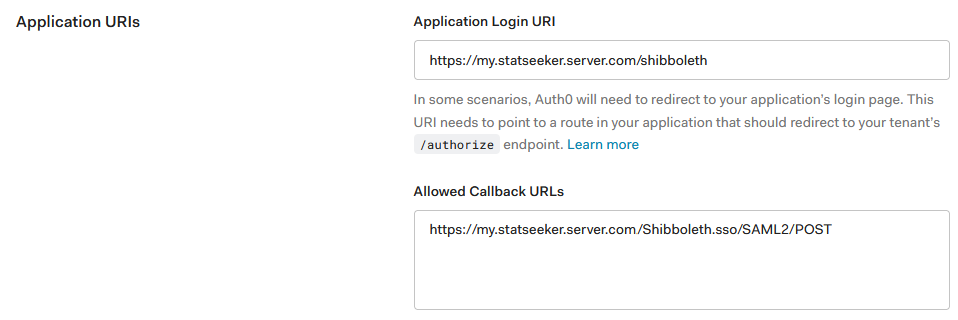
- Select Settings
- Scroll down to the section titled Application URIs
- Set Application Login URI to https://{your statseeker URL}/shibboleth (this should match your Local Entity ID as shown in your Statseeker User Authentication configuration)
- Set Allowed Callback URLs to https://{your statseeker URL}/Shibboleth.sso/SAML2/POST
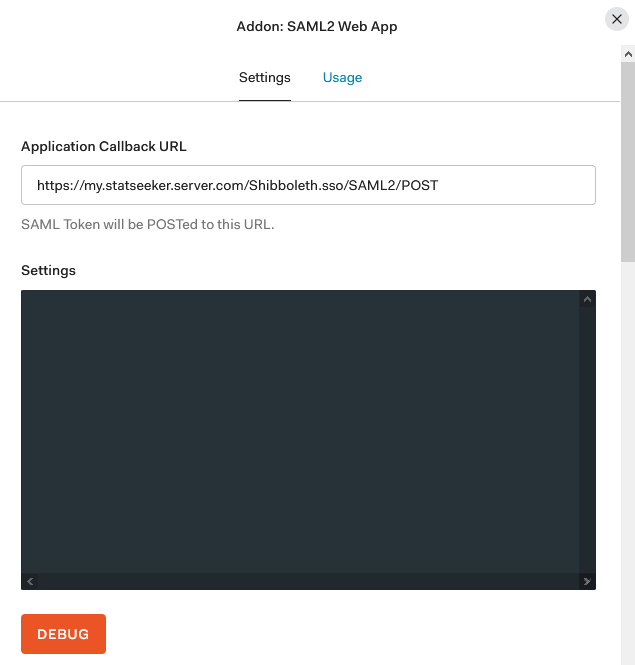
- Scroll back up to the top and select Addons
- Click SAML2 WEB APP
- In Usage tab there is an entry Issuer, copy this value to your Statseeker configuration as the Remote Entity ID
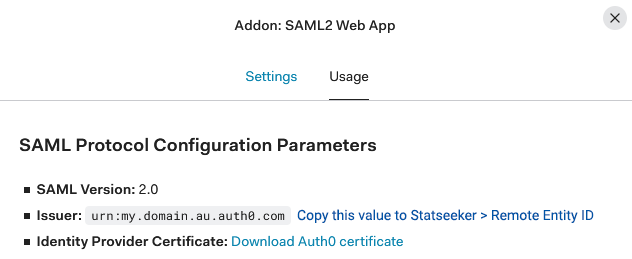
- Further down there is an option to download the Identity Provider Metadata, download this xml
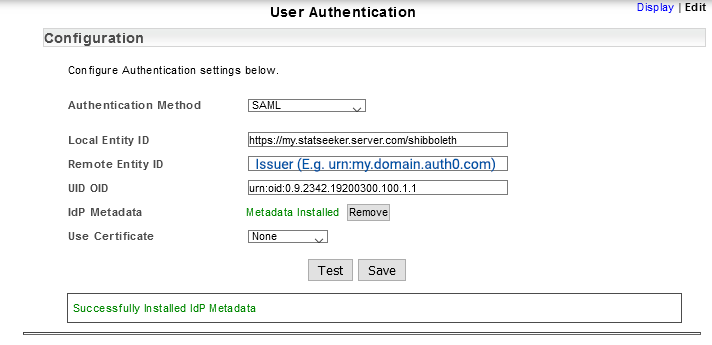
- In Statseeker, go to IdP Metadata in your User Authentication configuration and click Browse
- Select the downloaded xml
Statseeker will install the metadata and display a status message once this process is complete
- Click Save
- Select Administration > User Profile/Grouping > Add / Edit Users
- Set each of your user accounts’ Authentication Method to SAML
- In the Auth0 Addon: SAML Web APP window, select the Settings tab
- Click Debug
This will open a new browser tab containing a login prompt.
- Log in with a Statseeker user account (do not use the Statseeker admin account)
The SAML response message from the login attempt will be displayed.
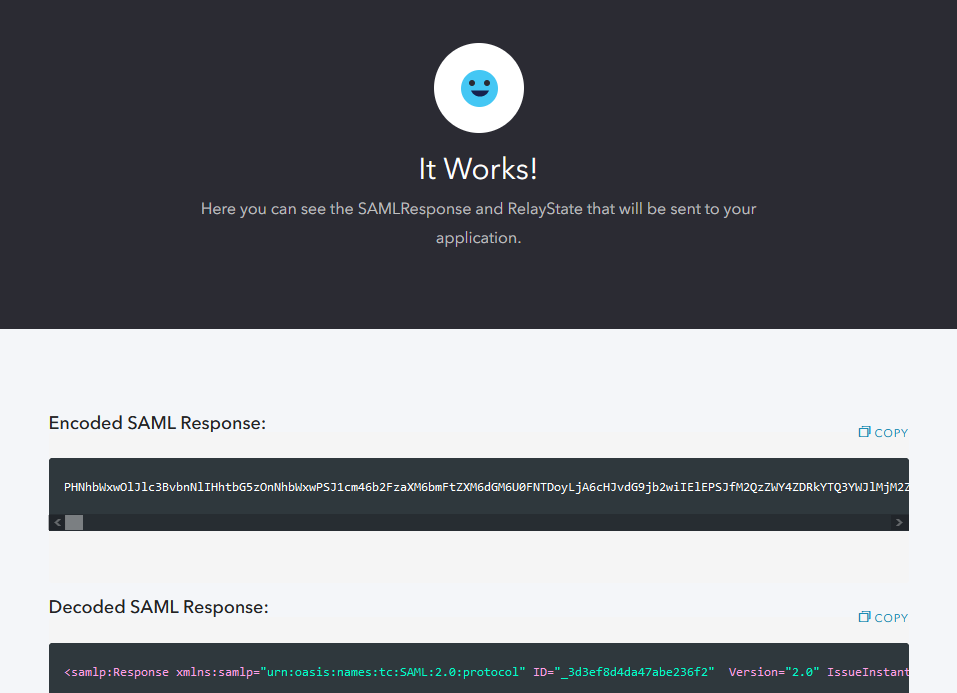
- Search the Decoded SAML Response for the user account’s Statseeker username
- The corresponding attribute Name should match the UID OID in your Statseeker User Authentication configuration, update the UID OID as needed and Save
Example
Logging in with a user account with the Statseeker User (name) of Mary.
The response node containing the accounts Statseeker username may vary depending on your Auth0 implementation. In our example the node was nickname.
<saml:Attribute Name="http://schemas.auth0.com/nickname" NameFormat="urn:oasis:names:tc:SAML:2.0:attrname-format:uri">
    <saml:AttributeValue xsi:type="xs:string">Mary</saml:AttributeValue>
</saml:Attribute>
We need to replace the current Statseeker UID OID with http://schemas.auth0.com/nickname.
JumpCloud IdP Configuration
This configuration will require you to copy values between your Statseeker server and your company’s JumpCloud account, you cannot complete one side without referencing the other, so have them both available throughout the process.
Requirements
- Both JumpCloud and Statseeker must contain user account records for your Statseeker users
- The Statseeker account User (name) must be a value found in the corresponding user account in JumpCloud (firstname, username, email-prefix, etc.)
Configuration
- Log into your JumpCloud account and select User Authentication > SSO
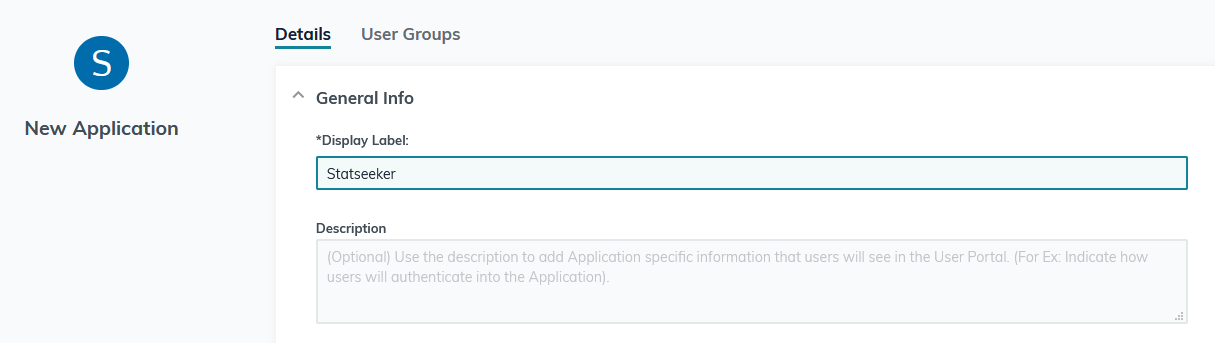
- Click the button to add a new application and select Custom SAML App
- Assign a Display Label (name) for your Statseeker to JumpCloud integration
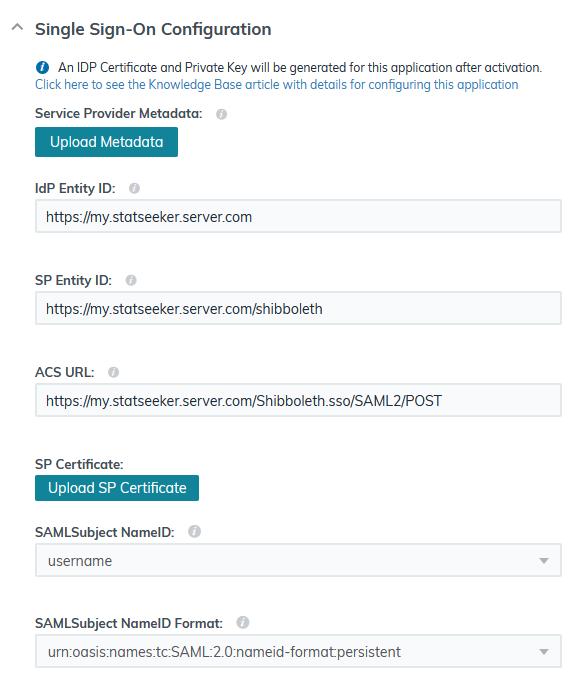
In the SSO tab:
- Set IdP Entity ID to a unique identifier, such as your Statseeker server’s domain name (you will need this value later when configuring Statseeker)
- Set SP Entity ID to https://{your statseeker URL}/shibboleth (this should match your Local Entity ID as shown in your Statseeker User Authentication configuration)
- Set ACS URL to https://{your statseeker URL}/Shibboleth.sso/SAML2/POST
- Set SAMLSubject NameID to the field in the JumpCloud user profile that contains the value which matches the Statseeker user account name (this may be username, as it is in our example, or a custom attribute configured in your JumpCloud user profiles)
- Set SAMLSubject NameID Format to urn:oasis:names:tc:SAML:2.0:nameid-format:persistent
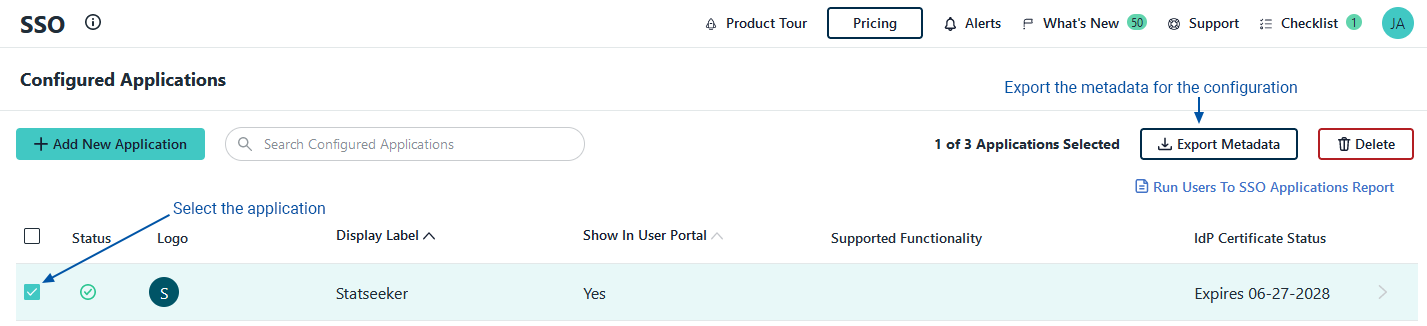
- Scroll to the bottom and click Activate
- Select the checkbox next your Statseeker application profile and click Export Metadata
- Save the metadata to your local machine
In Statseeker:
- Select Administration > Statseeker Administration > User Authentication
- Click Edit (top-right of the screen)
- Set Authentication Method = SAML
- Set Remote Entity ID to the Idp Entity ID in JumpCloud
- Set UID OID to urn:oasis:names:tc:SAML:2.0:nameid-format:persistent
- Go to IdP Metadata and click Browse
- Select the exported metadata file from JumpCloud
Statseeker will install the metadata and display a status message once this process is complete
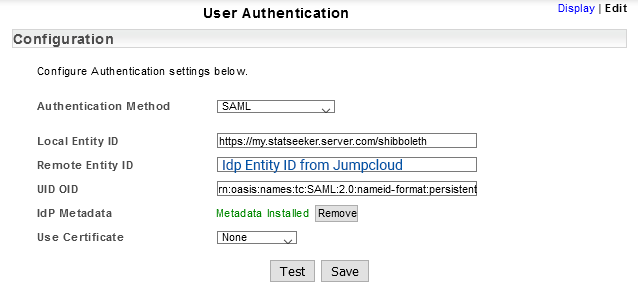
- Click Save
- Select Download SP Metadata and save the metadata to your local machine
- Return to JumpCloud, and select your Statseeker application profile
- Select the SSO tab
- Under Service Provider Metadata, click Upload Metadata and select your downloaded SP Metadata file from Statseeker
- Select the User Groups tab and assign the relevant users access to Statseeker
- Click Save
In Statseeker:
- Select Administration > User Profile/Grouping > Add / Edit Users
- Set each of your user accounts’ Authentication Method to SAML
OneLogin IdP Configuration
This configuration will require you to copy values between your Statseeker server and your company’s OneLogin account, you cannot complete one side without referencing the other, so have them both available throughout the process.
Requirements
- Both OneLogin and Statseeker must contain user account records for your Statseeker users
- The Statseeker account User (name) must be a value found in the corresponding user account in OneLogin (firstname, username, email-prefix, etc.)
Configuration
From within OneLogin:
- Select Applications > Add Application
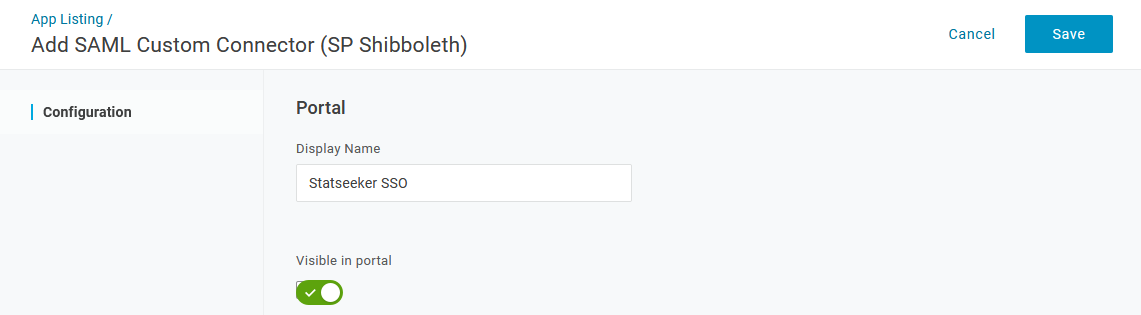
- In the search bar enter SAML Custom and select SAML Custom Connector (SP Shibboleth)
- Enter a Display Name and click Save
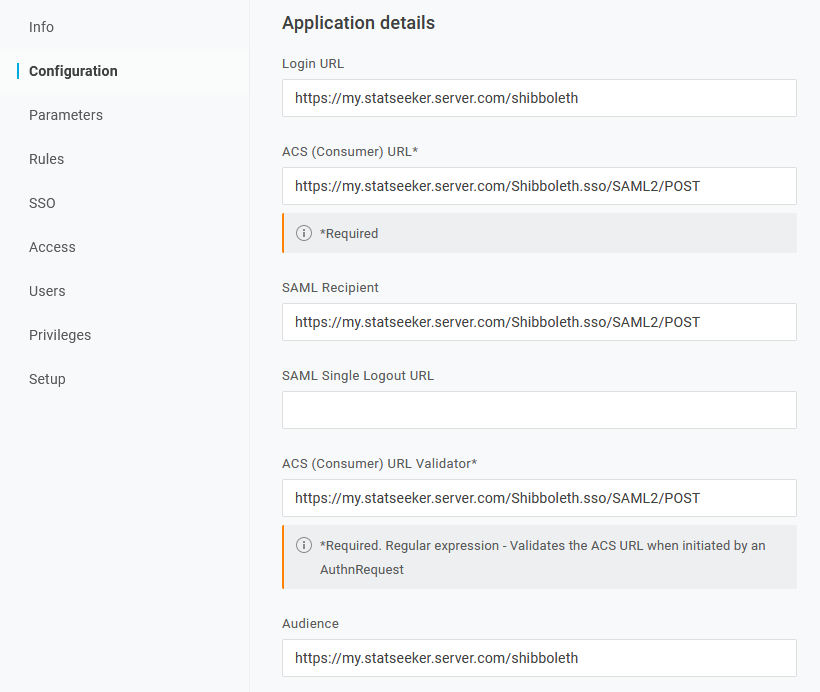
- Select Configuration
- Set Login URL and Audience to https://{your statseeker URL}/shibboleth (this should match your Local Entity ID as shown in your Statseeker User Authentication configuration)
- Set ACS (Consumer) URL, SAML Recipient and ACS (Consumer) URL Validator to https://{your statseeker URL}/Shibboleth.sso/SAML2/POST
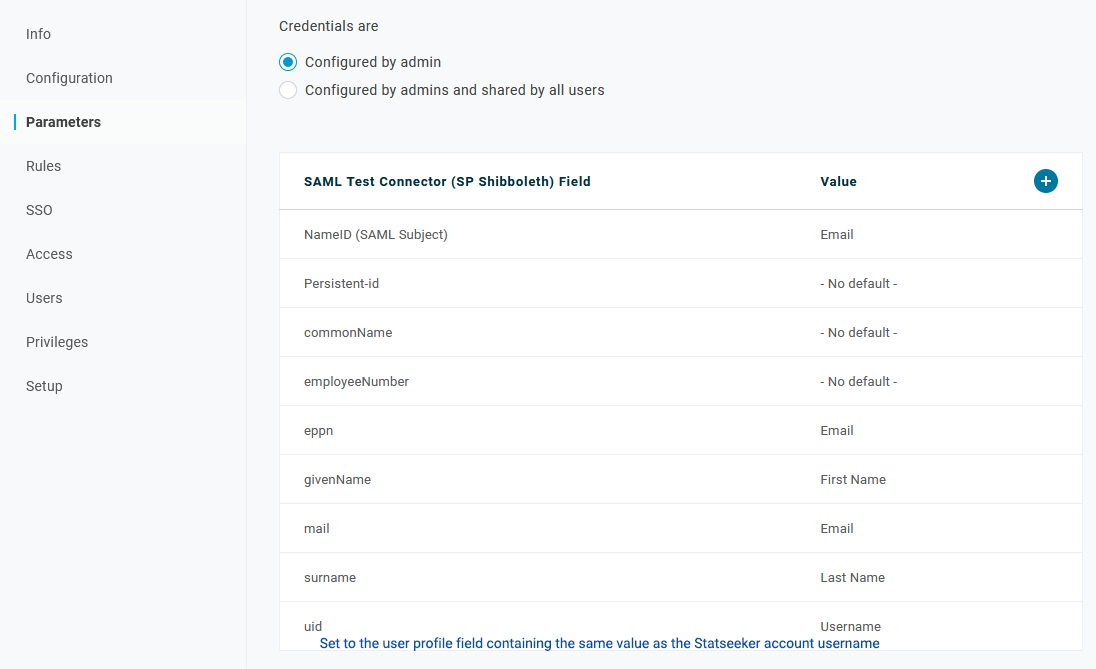
- Select Parameters
- Set uid to the field in the OneLogin User Profile which matches the Statseeker username (typically, this will be the Username or a custom attribute)
- Click Save
- Select SSO
- Copy the Issuer URL
- Click More Actions (top-right) and select SAML Metadata, save this file to your local machine
The configuration of the application profile is complete, to assign access to the application to your users:
- Select Users
- Click to select the user record and choose Applications
- Assign Roles and/or applications as needed and click Save User
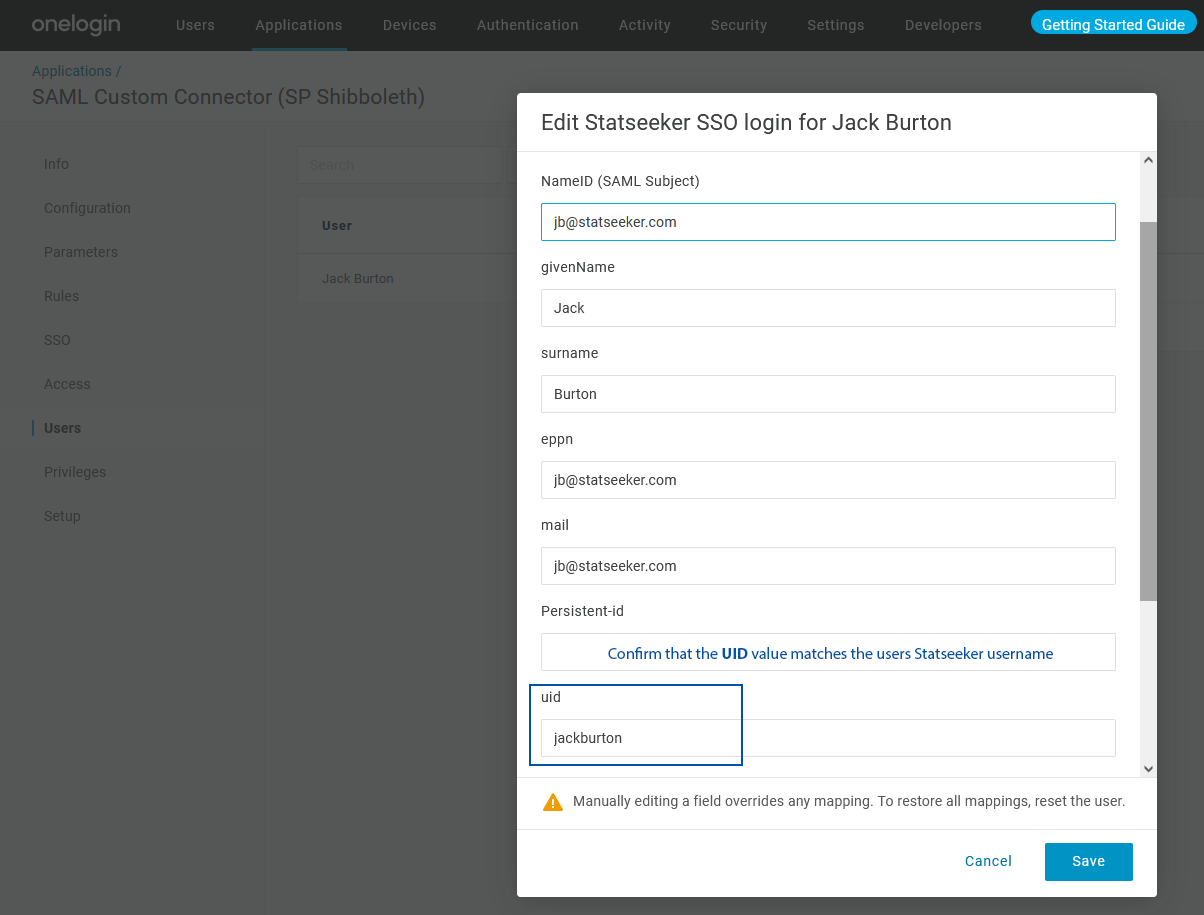
- Select Users, then the user account
- Scroll down to the UID field – the value here needs to match the user’s Statseeker account username
From within Statseeker:
- Select Administration > Statseeker Administration > User Authentication
- Click Edit (top-right of the screen)
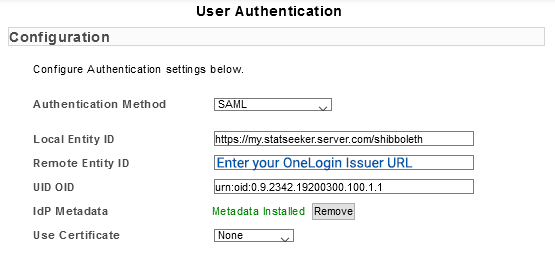
- Set Authentication Method = SAML
- Paste the OneLogin Issuer URL into Remote Entity ID
- Set UID OID to urn:oid:0.9.2342.19200300.100.1.1
- Go to IdP Metadata and click Browse
- Select the exported metadata file from OneLogin
Statseeker will install the metadata and display a status message once this process is complete
- Click Save
- Select Administration > User Profile/Grouping > Add / Edit Users
- Set each of your user accounts’ Authentication Method to SAML
Azure Active Directory IdP Configuration
This configuration will require you to copy values between your Statseeker server and your company’s Azure AD account, you cannot complete one side without referencing the other, so have them both available throughout the process.
Requirements
- You must be able to access your Statseeker server via the host name, if not, make the required changes within your network (e.g. DNS)
Note: your server’s host name can be found from Administration, select Statseeker Administration > Network Configuration
- Both Azure AD and Statseeker must contain user account records for your Statseeker users
Configuration
- From within Statseeker, select Administration > Statseeker Administration > User Authentication
- Click Edit (top-right of the screen)
- Set Authentication Method = SAML
From your Azure Portal:
- Select Azure Active Directory > Enterprise Applications
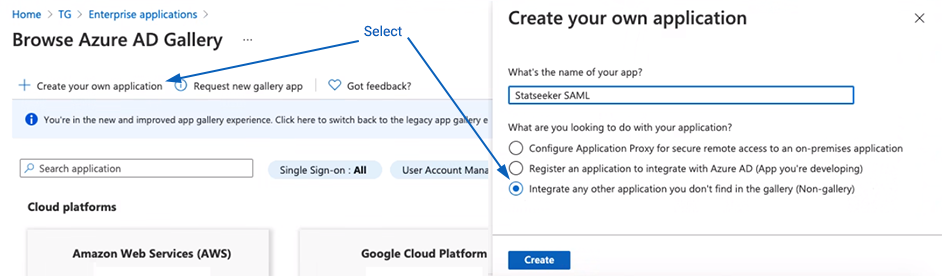
- Click New Application, then Create your own application
- Enter a Name for your Statseeker application profile
- Choose Integrate any other application (Non-gallery) and click Create
The overview for your new application will be displayed.
- From the navigation on the left, select Single sign-on and choose SAML as your sign-on method
- Go to Basic SAML Configuration an select Edit – this will open a panel to set the configuration
- Under Identifier (Entity ID), click Add identifier and set to https://{your statseeker URL}/shibboleth (this should match your Local Entity ID as shown in your Statseeker User Authentication configuration)
- Under Reply URL (Assertion Consumer Service URL), click Add reply URL and set to https://{your statseeker URL}/Shibboleth.sso/SAML2/POST
- Click Save

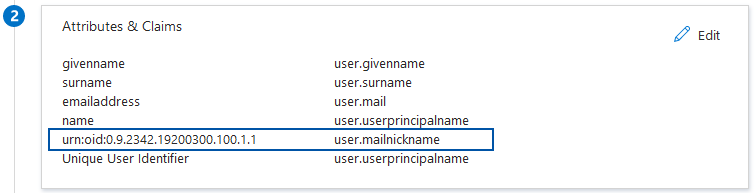
- Go to User Attributes & Claims and select Edit
- Select Add new claim
- Set Name to urn:oid:0.9.2342.19200300.100.1.1
- Set Source to a value which will return the user’s Statseeker username (see below)
The claim Source needs to result in a string which matches the Statseeker account username. Azure offers a range of likely Attribute options such as:
- Set Source to Attribute
- Select the attribute which matches the Statseeker account username:
- user.mail – “jack.burton@statseeker.com”
- user.mailnickname – “jack.burton”
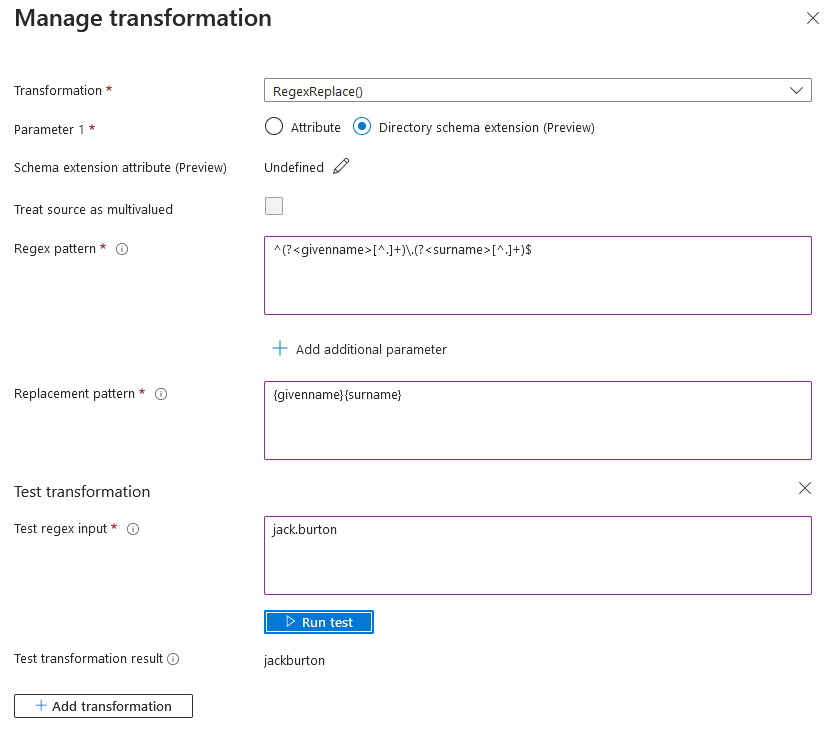
Azure also offers a Transformation option to produce a custom value.
- Set Source to Transformation
- Click the edit button

- Configure and test your data transformation
There are a range of options here, the example below utilizes RegEx matching rules to transform the users Azure user.mailnickname (jack.burton), to a value matching their Statseeker username (jackburton).
- Configure your Claim to return the user’s Statseeker username
- Click Save, then close the User Attributes & Claims panel
- Under SAML Certificates, download the Federation Metadata XML, saving it to your local machine
- Under Set up {your.application.name}, copy the Azure AD Identifier
From within Statseeker:
- Paste the copied Azure AD Identifier to Remote Entity ID
- Go to IdP Metadata and click Browse
- Select the Federation Metadata XML file exported from Azure AD
Statseeker will install the metadata and display a status message once this process is complete

- Click Save
- Click Download SP Metadata, saving it to your local machine
- Select Administration > User Profile/Grouping > Add / Edit Users
- Set each of your user accounts’ Authentication Method to SAML
Return to your Azure AD configuration.
- Click Upload metadata file and select your downloaded SP Metadata file from Statseeker
- Click Save and close the Basic SAML Configuration panel
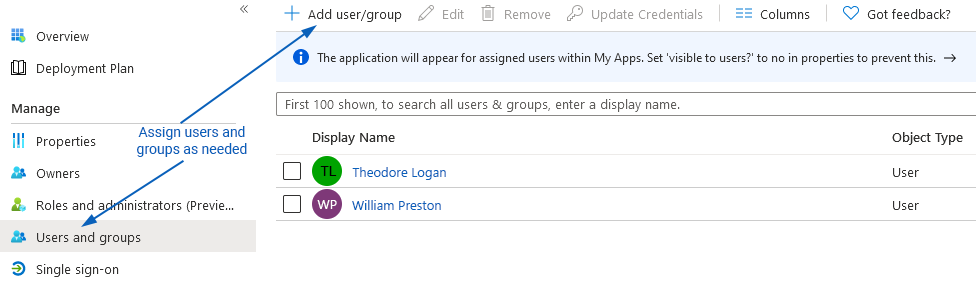
- Select Users and groups and use + Add user/group to assign your Statseeker users permission to access Statseeker