
Index
Overview
Discovery refers to the process Statseeker uses to locate devices on your network, and depending on the type of Discovery being run:
- Test communications between Statseeker and the device for future data collection
- Collect configuration information from those devices, building an inventory of monitored hardware
A Rewalk is a type of Discovery, but unlike a typical Discovery, a Rewalk does not discover any new devices. Rather, the Rewalk identifies configuration changes on known devices (those that have been previously discovered), updating the Statseeker configuration to match.
Statseeker has a default scheduled Rewalk which is scheduled to run Daily at 11am server-time.
- The default Rewalk schedule can be modified
- Additional Discovery processes can be scheduled
- A scheduled Discovery can be configured with the same degree of customization as a manually run Discovery.
Scheduling Discovery
Multiple schedules can be configured, but do consider the start-time and typical duration of other scheduled Discoveries, as only a single Discovery process can run at a time. The Discovery process will first check to see if another Discovery is already running; if it is, then the new Discovery will not proceed.
To schedule a Discovery:
- Select Administration > Network Discovery > Discover My Network
Accessing the schedule configuration screen varies depending on the type of Discovery and whether or not the Discovery process is being customized.
To schedule a default Network Discovery or Rewalk targeting all enabled IP Address Ranges, referencing all SNMP Credentials, and obeying all default settings:
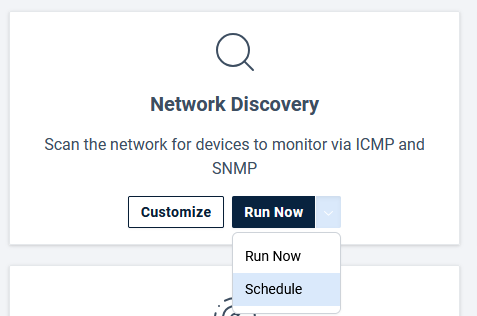
- In the Network Discovery/Rewalk panel, click the dropdown button next to Run Now and select Schedule
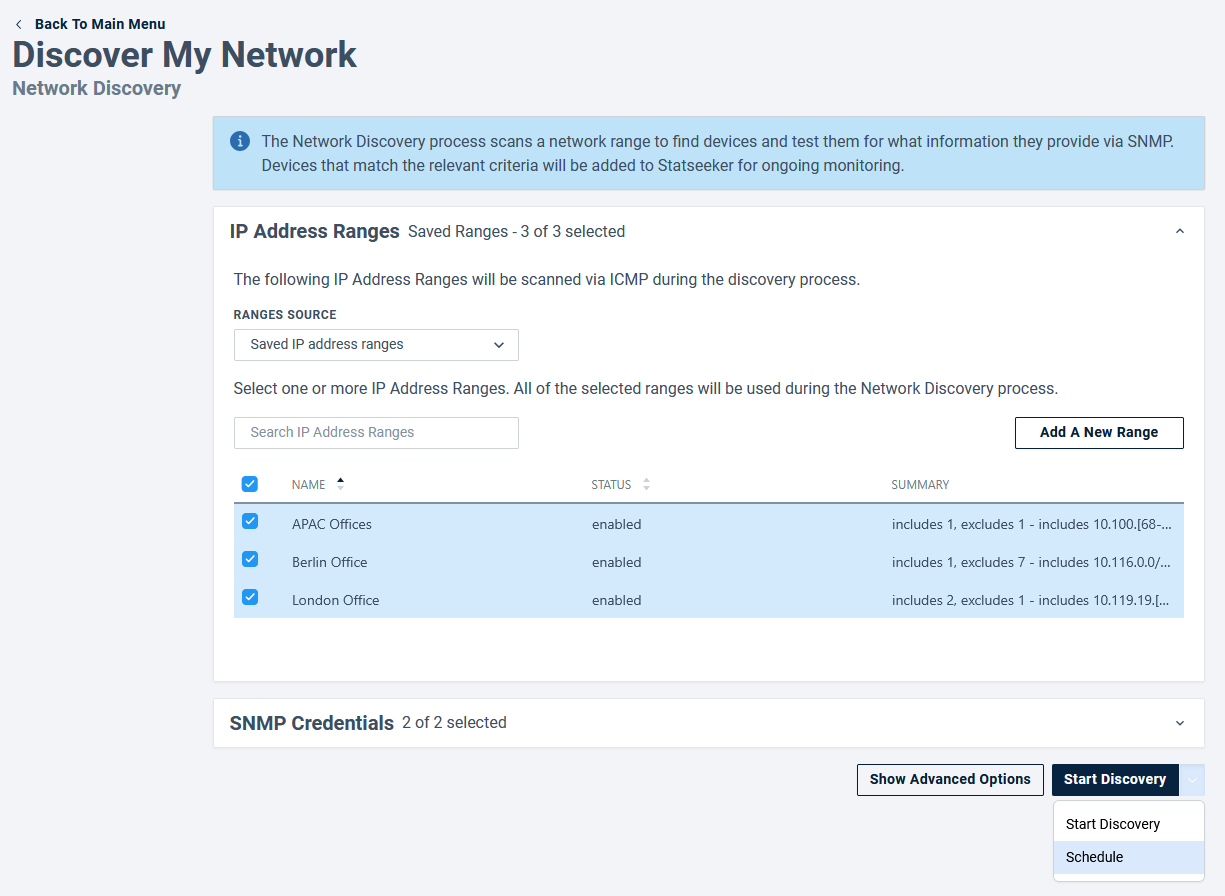
To schedule a customized Network Discovery or Rewalk targeting specific IP Address Ranges, referencing specific SNMP Credentials, and obeying custom settings:
- In the Network Discovery/Rewalk panel, click Customize
- Configure the Discovery/Rewalk as needed
- Click the dropdown button next to Start Discovery and select Schedule
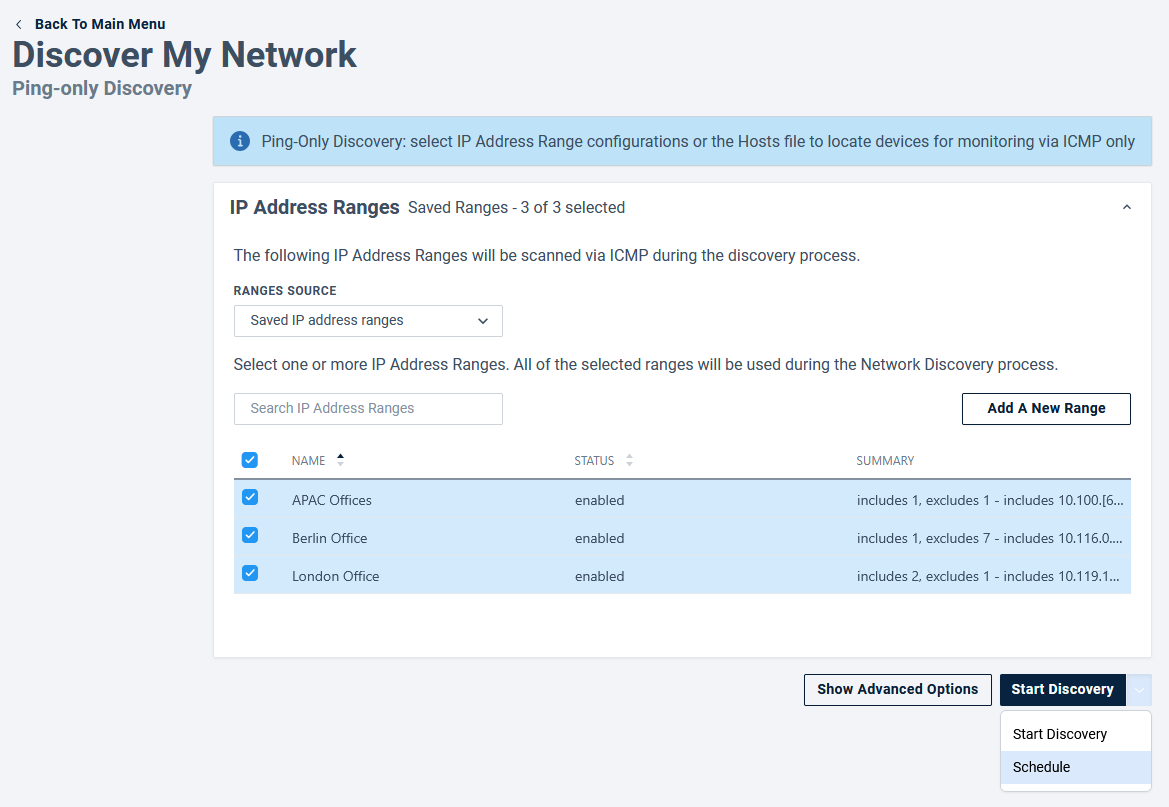
To Schedule a Ping-Only Discovery:
- In the Ping-Only Discovery panel, click Customize & Run
- Configure the Discovery as needed
- Click the dropdown button next to Start Discovery and select Schedule
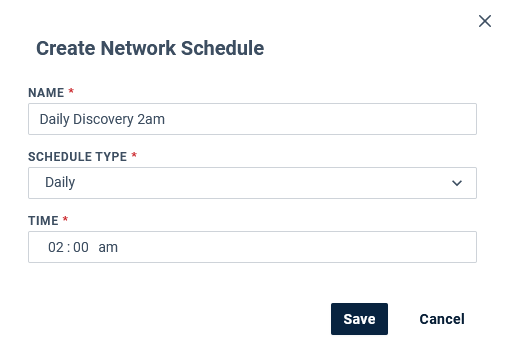
- Name the schedule to differentiate it from other Discovery schedules
- Configure the Schedule Type and Start Date/Time
- Once – run the Discovery once at the nominated date-time
- Daily – (default) run the Discovery daily at a specified time
- Weekly – run the Discovery weekly on a specified day and time
- Monthly – run the Discovery monthly on a specified day and time
- Advanced – run the Discovery according to a schedule specified in crontab syntax
- Click Save
The schedule is saved, and you are returned to the Network Discovery configuration screen where you can:
- Create additional schedules from the current Discovery configuration
- Edit and/or manually run the Discovery
- Exit the Discovery configuration screen
Schedule Type: Once
The schedule is a combination of start date and time.
- Click to select, and then type to set the Start Date elements, or use the calendar control
- Click to select, and then type to set the Start Time elements
Note: the Time element is displayed in 12-hour time (HH:MM AM/PM), but also accepts 24-hour time input, automatically setting AM/PM according to the hours value.

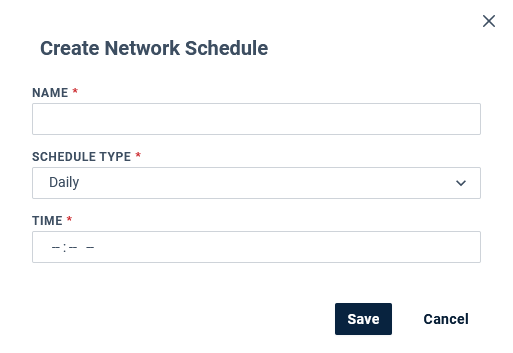
Schedule Type: Daily
The schedule only requires a start time.
- Click to select, and then type to set the Start Time elements
Note: the Time element is displayed in 12-hour time (HH:MM AM/PM), but also accepts 24-hour time input, automatically setting AM/PM according to the hours value.
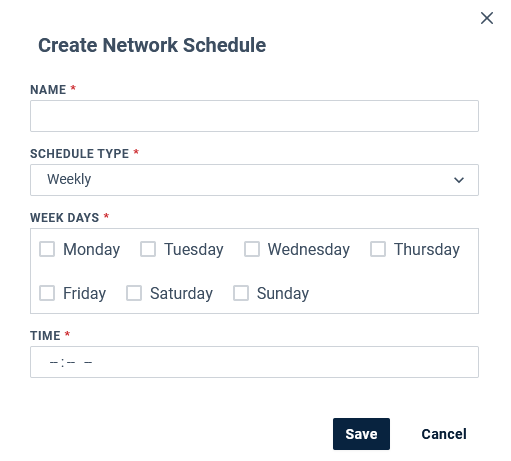
Schedule Type: Weekly
The schedule is a combination of weekday and start time.
- Use checkboxes to select one or more days of the week
- Click to select, and then type to set the Start Time elements
Note: the Time element is displayed in 12-hour time (HH:MM AM/PM), but also accepts 24-hour time input, automatically setting AM/PM according to the hours value.
Schedule Type: Monthly
The schedule is a combination of days of the month and start time.
- Use checkboxes to select one or more days of the week
- Click to select, and then type to set the Start Time elements
Note: the Time element is displayed in 12-hour time (HH:MM AM/PM), but also accepts 24-hour time input, automatically setting AM/PM according to the hours value.

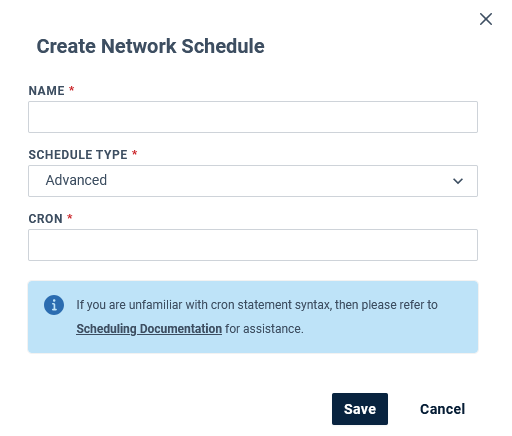
Schedule Type: Advanced
This schedule type requires a cron expression. The cron expression requires these five fields, in this order:
- Minute Hour Day-of-Month Month Day-of-Week
The allowed values for these fields are:
- Minute: 0-59
- Hour: 0-23
- Day-of-Month: 1-31
- Month>: 1-12
- Day-of-Week: 0-7 (0 and 7 = Sunday)
- Each can be replaced by * to indicate ‘all values’
- Supports hyphen-separated ranges e.g.8-11
- Support comma-separated lists e.g. 8,9,11,12
Examples:
- Every day at 11am: 0 11 * * *
- 5am and 8pm on the 1st and 15th of every month: 0 5,20 1,15 * *
- 2am Mon-Fri every week: 0 2 * * 1-5
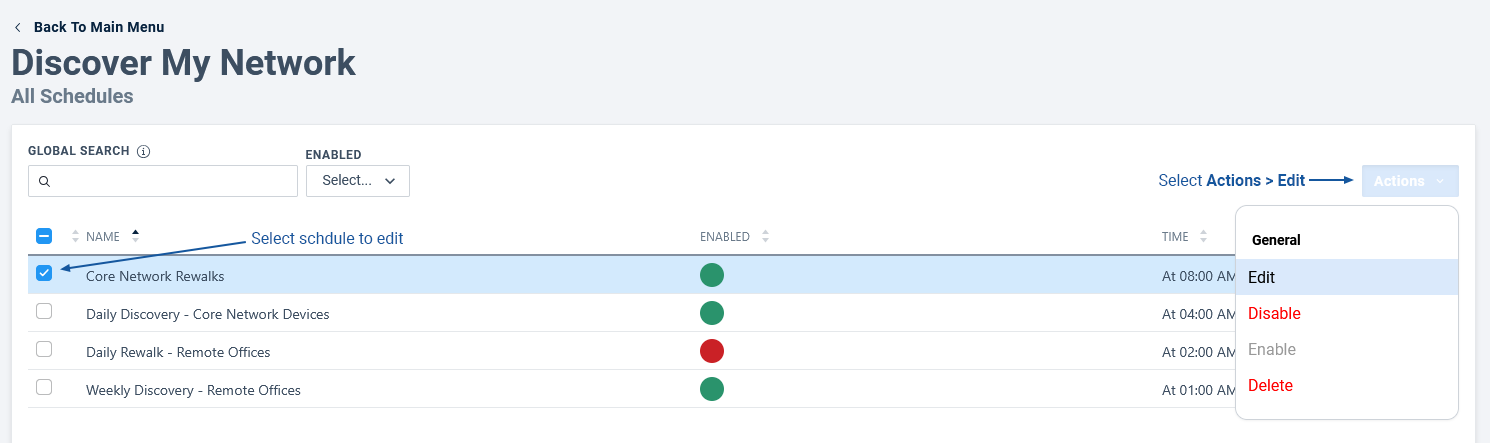
Reviewing and Editing Discovery Schedules
Discovery schedules can be reviewed, edited, disabled/enabled, and deleted.
- Select Administration > Network Discovery > Discover My Network
- In the View Schedules panel, click View Discovery Schedules
The schedule list can be filtered via the Search field and Enabled flag.

Editing Schedules
Schedules can be edited to update the schedule name and start date-time. Only a single schedule can be Edited at a time.
- Select Administration > Network Discovery > Discover My Network
- In the View Schedules panel, click View Discovery Schedules
- Use the checkboxes to select a single schedule and click Actions > Edit
- Update the schedule as needed and click Save
Enable/Disable Schedules
Schedules can be disabled/enabled as needed. A disabled schedule becomes inactive and will not trigger any Discovery processes, but the configuration is maintained for future use. Multiple schedules can be Disabled/Enabled at a time.
- Select Administration > Network Discovery > Discover My Network
- In the View Schedules panel, click View Discovery Schedules
- Use the checkboxes to select one or more schedules and click Actions > Disable or Enable as needed
- If Disabling schedules, you will be prompted to confirm the action
Deleting Schedules
Schedules can be deleted as needed, and multiple schedules can be Deleted at a time. Once deleted, a schedule is lost unless the server is restored from backup.
- Select Administration > Network Discovery > Discover My Network
- In the View Schedules panel, click View Discovery Schedules
- Use the checkboxes to select one or more schedules and click Actions > Delete
- Confirm the action when prompted