
Legacy Documentation for Statseeker version 5.5.3
Index
Overview
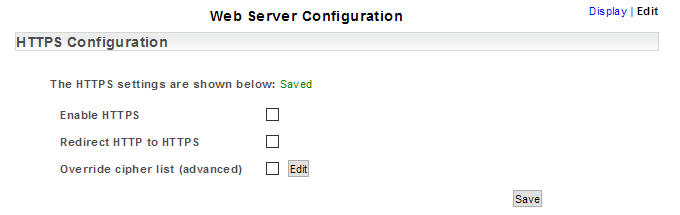
A Statseeker installation includes a configured and enabled web server to deliver the Statseeker User Interface. By default, a fresh install of Statseeker 5.4.2+ will use HTTPS and be configured with a self-signed SSL certificate. Statseeker servers which were initially installed from earlier versions may not have HTTPS enabled, as web server configurations are not modified on upgrade.
[top]
By default, installing Statseeker 5.4.2+ will enable HTTPS, but servers installed from earlier versions (and upgraded to 5.4.2+) may still be running in HTTP. To enable HTTPS: The web server will:Enabling HTTPS
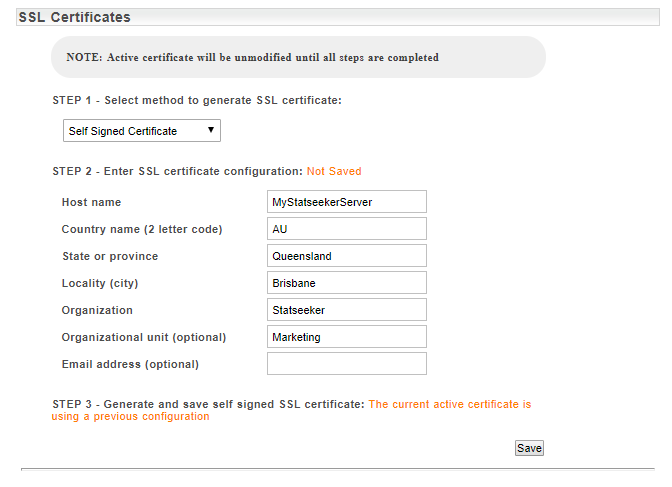
| Field | Description |
| Host name | |
| Country name (2 letter code) | Two-character ISO format country code |
| State or province | State or province in which the company is registered/licensed |
| Location (city) | Location/city in which the company is registered/licensed |
| Organization | Legal name under which the organization was registered/licensed |
| Organizational Unit (optional) | The organizational unit within the company e.g. Marketing |
| Email address (optional) | An email address to be associated with the management of this certificate |
- Configure the certificate information as needed and click Save
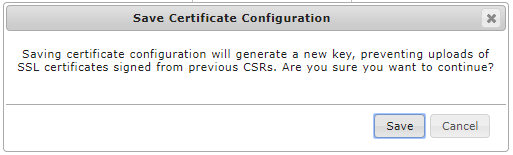
A confirmation prompt will be displayed, advising you that updating the active certificate will initiate a web server restart. This does not affect Statseeker’s ability to monitor your network, but will result in the web interface being unavailable until the reboot is complete (typically, 10-30 seconds).
Creating a Certificate Signing Request (CSR)
A certificate Signing Request is required to generate an SSL certificate from a third-party certificate signing authority (CA). A certificate from an established and recognized CA will be interpreted by browsers as a ‘trusted’ certificate, and consequently, that your Statseeker server web interface is a trusted destination.
When creating a CSR, Statseeker first generates a private encryption key, then generates the CSR using this private key. You then pass the CSR on to a trusted CA and they will supply the signed certificate to use with your server. The resulting certificate is generated to work with your private key, consequently, Statseeker will prevent the uploading of SSL certificates that have been generated in response to another signing request i.e. utilizing a different private key.
To create a CSR:
- Select Administration Tool > Statseeker Administration > Web Server Configuration
- Click Edit (top left corner)
- Select Certificate Signing Request from the SSL Certificates > Step 1 drop-down

| Field | Description |
| Host name | |
| Country name (2 letter code) | Two-character ISO format country code |
| State or province | State or province in which the company is registered/licensed |
| Location (city) | Location/city in which the company is registered/licensed |
| Organization | Legal name under which the organization was registered/licensed |
| Organizational Unit (optional) | The organizational unit within the company e.g. Marketing |
| Email address (optional) | An email address to be associated with the management of this certificate |
- Configure the certificate information as needed and click Save
A confirmation prompt will be displayed, advising you that creating the signing request will prevent the uploading of SSL certificates that have been generated in response to another signing request.
- Confirm the creation of the CSR by clicking Save
The CSR will be saved to /home/system/etc/ssl_new on the Statseeker server, and can now be viewed or saved to the local machine or other network-aware repository. Certificate authorities will allow you to either upload a CSR, or paste the content of a CSR into a field. Either way, the CSR will then be used to generate a signed certificate which you can, in turn, download and use to secure your Statseeker server.
Once you have received your signed certificate from the CA you can upload the certificate to your Statseeker server, see Upload a Signed Certificate
Upload a Signed Certificate
Your selected Certificate Authority will respond to your certificate signing request with a signed certificate that can be uploaded to your Statseeker server.
To upload a signed certificate to your Statseeker server:
- Select Administration Tool > Statseeker Administration > Web Server Configuration
- Click Edit (top left corner)
- Select Certificate Signing Request from the SSL Certificates > Step 1 drop-down
- Select Browse, locate and select your signed certificate
- Click Upload Certificate
- Once uploaded, click Save to restart the web server
No changes are made to your existing certificate configuration prior to successfully uploading a new signed certificate and then clicking Save. Once you click Save, the existing configuration is discarded and the new certificate and key will be used by your Statseeker server.
Upload a Signed Certificate and Private Key
This process is used when you have an existing signed certificate and its associated private key. To upload:
- Select Administration Tool > Statseeker Administration > Web Server Configuration
- Click Edit (top left corner)
- Select Upload Certificate and Key from the SSL Certificates > Step 1 drop-down
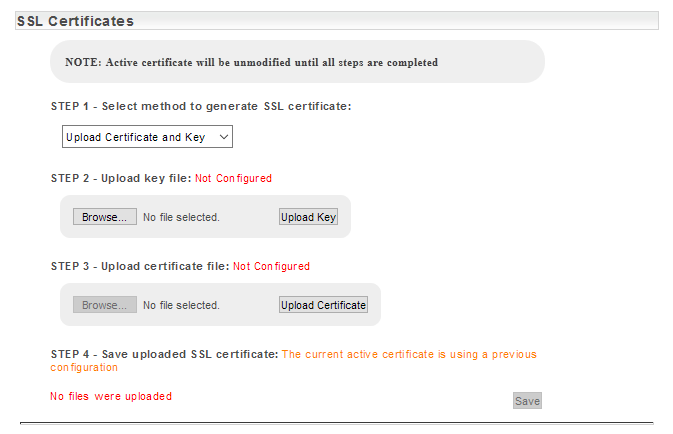
- Select Browse, locate and select your private key
- Click Upload Key
- Select Browse, locate and select your certificate
- Click Upload Certificate
- Once uploaded, click Save to restart the web server
No changes are made to your existing certificate configuration prior to successfully uploading a both the key, and the signed certificate, and then clicking Save. Once you click Save, the existing configuration is discarded and the new certificate and key will be used by your Statseeker server.