Index
- Overview
- Timeseries Cache Timezone
- Time Filter Favorites List
- Managing a User's Favorite List
- Creating a Time Filter Favorite
- Creating an ad-hoc Time Filter in the Console
- Report Configuration and Time Filters
- Baseline Range Editor
- The Advanced Time Filter Editor
- Editing the Query String
- Timefilter & Range-Query String Syntax
Overview
Statseeker offers both a list of pre-configured filters, as well as the ability to create custom time filters to suit your requirements. The time filters Favorites list appears as a drop-down and is available wherever there is the option to provide a time filter. The list content is configurable per Statseeker user account and can be managed by an Admin user.
Statseeker offers both the ability to create an ad-hoc time filter and apply it to a selected report, and the ability to create and save a custom time filter to the Favorites list.
Timeseries Cache Timezone
Statseeker caches commonly referenced data into a number of time range specific buckets. This caching provides an extensive performance boost, most notably when retrieving and sorting large amounts of historical data. Be default, the timezone used by the cache is set to the admin user account timezone, which is usually the Statseeker server timezone as well.
For the best performance benefit from the timeseries data cache, the cache timezone should be set to the same timezone as that used by the majority of the Statseeker users. This typically results in less data for a requested report falling outside of the cached data and needing to be retrieved from the timeseries database. To set the timeseries cache timezone:
- Select Administration > Network Discovery - Advanced Options > Advanced Options
- From the Reports section, set the Timeseries Cache Timezone as needed and click Save

The cache will be rebuilt over the next couple of hours, replacing the old data as the rebuild progresses.
Time Filter Favorites List
The time filter Favorites list is the quickest and easiest method of specifying a time filter for your report; simply select an entry from the drop-down.
To make use of a time filter favorite:
- Select a time filter from the Favorites list prior to launching the report
The selected time filter will be passed through to the report and employed as a default value. If the report configuration included a time filter, then this pre-configured filter will be applied as the default value regardless of any time filter selection made from the Console. Most reports feature the Time Selector allowing users to modify this default value from within the report.
Managing a User's Favorite List
The contents of the time filter Favorites list are user specific. By default, all users receive a pre-filled Favorites list featuring a range of commonly used filters, but this list can be edited.
An Admin user can remove and edit the default entries in the Favorites list, with these changes affecting all users. An Admin user can also create new entries for the Favorites list and then configure these entries to be available to other users as needed.
Creating a Time Filter Favorite
To create a Favorite:
- Select Administration > User Profile/Grouping > Add/Edit Time Filters
- Click Add
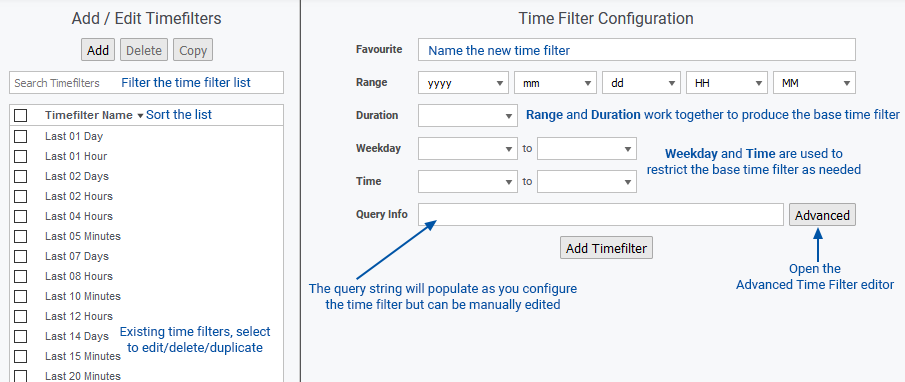
- Specify a name for the configuration in the Favorite field
- Use the Range, Duration, Weekday, and Time to specify the filter
- The query string can be manually edited using timefilter syntax, see Timefilter & Range-Query String Syntax for details
- Click Save when done
Duplicating Filters
If the new filter is a variation on an existing filter, you can:
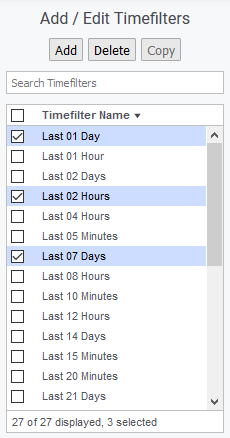
- Select the existing filter and click Copy
- Update the configuration and click Add Timefilter
Time Filter Ranges (Inclusive\Exclusive Boundaries)
The Range component of a filter has an inclusive start and an exclusive finish. For example, a time filter for the month of June 2020 would be displayed in the Query Info field as range = 2020-6-01 to 2020-7-01, everything from, and including, the first second of June 1st until, and excluding, the first second of July 1st.
Basic Time Filter Editor Limitations
The basic Time Filter Editor cannot create filters with multiple ranges or time exclusions. These complex filters can be created, and tested, within the Advanced Time Filter Editor.
Time Filter Verification
You can verify the scope of any time filter using the Advanced Time Filter Editor:
- Configure your filter
- Click the Advanced button to open the Advanced Time Filter Editor
- Click Test
- Review the output of the filter to confirm it is covering the date/time ranges you require
- Update and retest as needed and click Done
Clicking Done will return you to the previous configuration screen and update the content of the Range field with the time filter configuration from the Advanced Time Filter Editor.
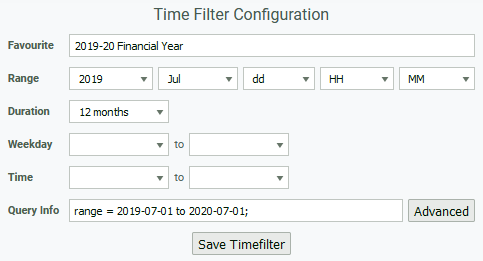
Example: 2019-20 Financial Year
- Select any filter and click Modify
- Rename the filter to 2019-20 Financial Year
- Set Range to 2019 Jul
- Set Duration to 12 months
- The Query Info should be range = 2019-07-01 to 2020-07-01;
- Click Save Timefilter
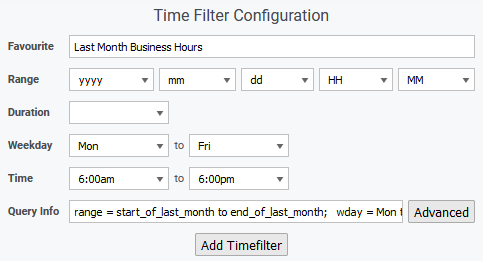
Example: Last Month, Business Hours of 6am-6pm, Mon-Fri
- Select the Last Month filter and click Copy
- Rename the filter to Last Month Business Hrs
- Set Weekday to Mon to Fri
- Set Time to 6:00am to 6:00pm
- The Query Info should be range = start_of_last_month to end_of_last_month; wday = Mon to Fri; time = 06:00 to 18:00;
- Click Save
Creating an ad-hoc Time Filter in the Console
Custom time filters can be created directly in the Console and applied to the next run report, but these filters cannot be saved. The options provided, and their use, mimic those of the Time Filter Editor used to create entries for the Favorites list, see Creating a Time Filter Favorite for details.
Report Configuration and Time Filters
All reports built in the Reports panel can have a custom time filter applied in the report configuration. If the report configuration does not feature a time filter, then the report will make use of the time filter options in the Console.
In addition, these reports feature a built-in time filter allowing you to modify the reporting period from within the report. For more details on this feature see, Custom Reporting > Time Filter.
Baseline Range Editor
Historical baseline data is used by reports, dashboards and threshold configurations that include data forecasting, anomaly detection, or baseline analytics (see Baselining for details on baselining and its' uses).
The Baseline Range Editor is the UI component used to specify your baseline history; the period of historical data used to generate your baseline. This control is available from the Baseline History Edit button in report, dashboard and threshold configurations.
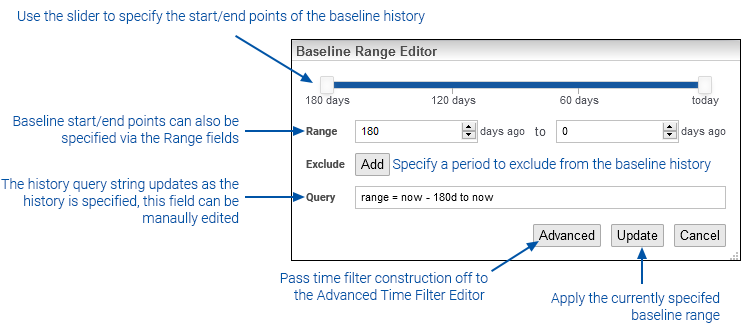
To modify the baseline history:
- Click the Baseline History Edit button
- Modify the start/end points for the history via the slider or the range fields
If an exclusion period is needed for any date range within the baseline history:
- Click the Exclude Add button
- Specify the start/end points of the exclusion period via the calendar controls
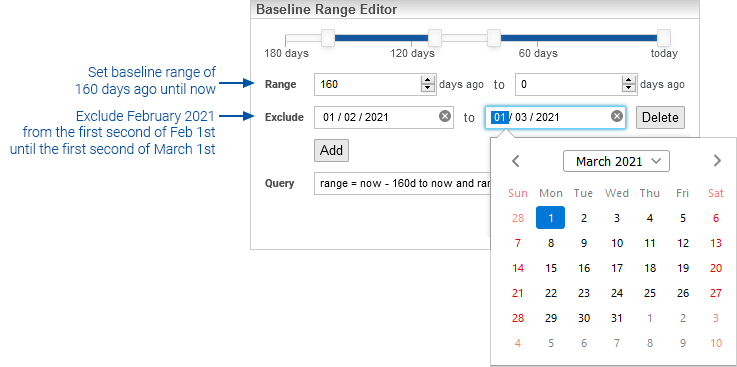
The Range component of a filter has an inclusive start and an exclusive finish. For example, a time filter for the month of June 2020 would be displayed in the Query Info field as range = 2020-6-01 to 2020-7-01, everything from, and including, the first second of June 1st until, and excluding, the first second of July 1st.
- Click Update when the baseline range configuration is complete
The Query string can also be manually edited, but this requires a working knowledge of the Statseeker time filter syntax. For details on the syntax required see Timefilter & Range-Query Syntax.
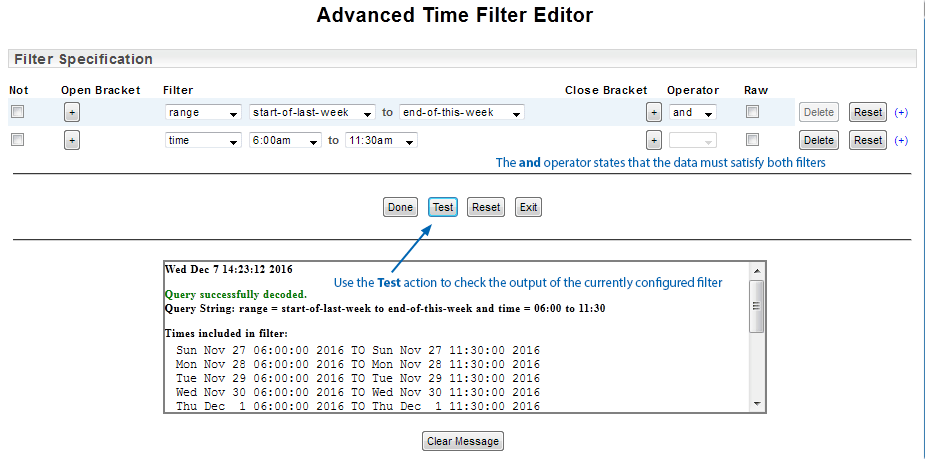
When working with complex time filter ranges you have the option to pass the configuration off to the Advanced Time Filter Editor. This editor also features and option to test a time filter and output all dates included in the specified range. For details on using the Advanced Time Filter Editor, and testing time filter ranges, see the Advanced Time Filter Editor.
The Advanced Time Filter Editor
The Advanced Time Filter Editor can be accessed from the edit ( ) button on the Console or the Advanced button in the Time Filter Editor. The purpose of this editor is to:
- Test a time filter and confirm that the output is as intended
- Create complex time filters and have them returned to the Console for use, or returned to the Time Filter Editor to be set as an entry in the Favorites list

All time filters must contain at least one logically equivalent range filter (i.e. "range =") to provide the base reporting period. Once a range has been specified, additional filters can be applied to refine the date-time range.
By default, all additional filters are applied with an and operator, restricting the default range. In the example below, only those data points that satisfy both the range filter and the time filter are included.
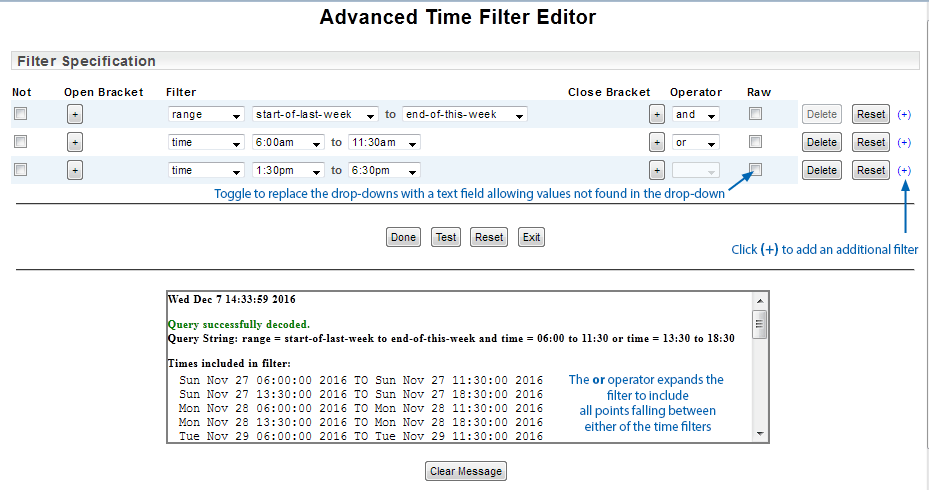
You can use an or operator to expand the filter. In the example below we add an additional time filter, specify an or operator and use the Test action to validate and evaluate the filter.
The Advanced Time Filter Editor also allows you to apply brackets for grouping arguments/filters as well as a not operator. In the example below, we have applied brackets to group the two time filters and applied a not operator to the weekday filter to create a 'not Monday' filter.
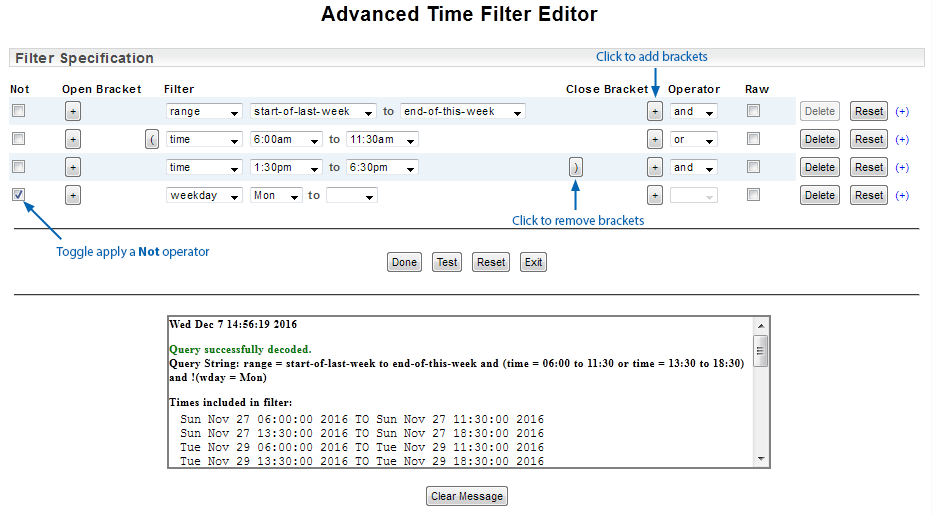
Without the brackets the argument excluding Monday would only be applied to the second of the time filters. With the brackets, the two time filters are grouped, and the 'and not Monday' argument is applied to everything within the brackets.
The Raw checkbox will convert the filter fields into a single editable string field displaying the current query string. This string may be manually edited, see Editing the Query String for details.
For details on the various filters and their use see Query Syntax.
Once the time filter is configured to suit your requirements, click Done to have the filter query copied to the time filter editor you were previously using, i.e. either the Console or the Time Filter Editor. From there you can apply the filter to a report or save the filter to the Favorites list as required.
Editing the Query String
The time filter Query Info field (displayed in the Console and the Time Filter editor) contains the query string resulting from the configured time filter. This string automatically updates from changes to the time filter fields and can also be manually edited. The same string can be accessed in the Advanced Time Filter Editor by checking the Raw checkbox associated with a filter.
Timefilter & Range-Query Syntax
There are a number of basic time-unit abbreviations that are used when directly specifying time-periods and filters within Statseeker:
- s - seconds e.g. 300s
- m - minutes e.g. 2m
- w - (dashboards only) weeks e.g. 3w
- h - hours e.g. 8h
- d - days e.g. 4d
- mon - (non-dashboards only) months e.g. 6mon
The timefilter query string consists of any number of filters separated by semicolons (;), and must contain at least one Range statement, see Range Operators for details . Any number of filters can then be applied to the date/time range that has been specified in a range statement. The types of filters that can be specified are:
- Range
- Year
- Month
- Day of month
- Day of week
- Time of day
Range Filter
The range filter is quite flexible and can be expressed as either a:
- [start date-time] to [finish date-time], where start values are inclusive and end values are exclusive
- [date-time] +/- duration
The date-time parameter can be expressed in a number of formats:
- Keywords
- An ISO 8601 date-time value (ccyy-mm-dd HH:MM:ss)
- Year is mandatory,
- All other values are optional provided that all values to the left of the omitted value are defined
- Values that have been omitted will default to their lowest values
- E.g.
- 2015 denotes midnight January 1, 2015
- 2015-01-08 denotes midnight January 8, 2015
- 2015-01-08 08:00 denotes 8am on January 8, 2015.
Date-time Keywords
Statseeker allows the use of keywords to replace common use date-time values in range filters.
- now, current time
- start_of_today, the most recently elapsed midnight UTC
- start_of_this_week, the most recently elapsed midnight UTC for Sunday
- start_of_this_month, UTC value for start of this month
- start_of_this_year, UTC value for start of this year
- start_of_last_week, UTC value for start of last week
- start_of_last_month, UTC value for start of last month
- start_of_last_year, UTC value for start of last year
- end_of_last_week, UTC value for end of last week
- end_of_last_month, UTC value for end of last month
- end_of_last_year, UTC value for end of last year
E.g. start_of_today OR start of today OR start-of-today
Logical and Arithmetic Operators
Logical Operators
The Range filter (range) can be defined as either:
- "range = x to y" to denote an equivalent/inclusive range, i.e. x to y
- "range != x to y" to denote a NOT range, an exclusive range, i.e. all things not x to y
The NOT operator (!) can also be applied to a grouped filter by prepending it before a set of brackets.
E.g. (wday = Mon to Friday and !((month = Dec; mday = 10 to 31) or (month = Jan; mday = 1 to 10))) would return:
- All days of the week between Monday to Friday, inclusive
- Excluding any day between December 10th and December 31st or any day between January 1st and January 10th
Arithmetic Operators
Range filters can also include the "+" (plus) and "-" (minus) arithmetic operators. These operators can be used in conjunction with value codes (d = days, h = hours, m = minutes, and s = seconds) and keywords to produce variable time filters.
- now - 1d, this time yesterday
- now + 24h, this time tomorrow
- now -2h30m15s, 2hours, 30 minutes, and 15 seconds ago
- now -30d to now +30d, 30 days ago to 30 days from now
Year Filter
The Year filter (year)must be specified as a 4-digit year with inclusive start and end values (optional).
E.g.:
- year != 2015, not any date-time within 2015
- year = 2010, all date-time values within 2010
- year = 2010 to 2012, all date-time values between the start of 2010 and the end of 2012
Month Filter
The Month filter (month) has inclusive start and end values (optional) and can be specified as:
- Full name (January, February, etc.)
- 3-letter abbreviated name (Jan, Feb, etc.)
- An integer representing the month (1, 2, etc.)
E.g.:
- month = Jan, all date-time values within January
- month != 2 to 4, not any date-time value within the months of February, March or April
- month = July to September, all date-time values between the start of July and the end of September
Day of Month Filter
The Day of Month filter (mday) has inclusive start and end values (optional) and can be specified as:
- A string representation of the day in the month (1st, 2nd, etc.)
- An integer representation of the day in the month (1, 2, etc.)
E.g.:
- mday != 1st to 7th, not any date-time between the start of the 1st and the end of the 7th
- mday = 16, all date-time values between occurring on the 16th
Day of Week Filter
The Day of Week filter (wday) has inclusive start and end values (optional) and can be specified as:
- Full name (Monday, Tuesday, etc.)
- 3-letter abbreviated (Mon, Tue, etc.)
- An integer representing the day of the week (1, 2, etc.)
E.g.:
- wday = Mon to Wed, all date-time values between the start of Monday to the end of Wednesday
- wday != Sunday, not any date-time value occurring on a Sunday
- wday = Saturday, all date-time values occurring on a Saturday
Time of Day Filter
The Time of Day filter (time) which, when used to define a range, has an inclusive start-value and an exclusive end-value can be specified in the following formats:
- 24-hour notation (01:00, or 13:30:30, etc.)
- 12-hour notation (1am, 12:30:15pm, etc.)
- An integer (0-86400) representing the second within the day
E.g.:
- time = 8am to 17:28, all date-time values between 8am and 17:28
- time != 5:00 to 10:00, no date-time value between 5am and 10am

