* Legacy Documentation for Statseeker v5.5.5 *
Index
- Overview
- RNA Host Requirements
- Deploying the RNA as a Virtual Machine (ESXi)
- Deploying the RNA as a Virtual Machine (Hyper-V)
- Deploying the RNA on a Physical Host
- Data Collection on your RNA
Overview
The Remote Network Appliance (RNA) is a platform which can be deployed to areas of your network that cannot be monitored by Statseeker in the typical manner. The interfaces on the RNA then act as traffic collectors, allowing you to configure elements of your network to send NetFlow/sFlow and summarized LAN traffic (port or VLAN mirroring) data to the RNA, data which the RNA can then forward on to Statseeker via HTTP. The architecture is based around a bootable USB or virtual disk which turns the host machine into a remote Statseeker platform within minutes. The RNA operates entirely in RAM, therefore any PC can be turned into an RNA without affecting its local operating system.
When RNAs are deployed, the Statseeker server:
- Communicates with the RNAs via HTTPS and can operate through proxies
- Regularly polls all enabled RNAs
- Synchronizes the system time of each RNA
- Automatically updates older RNA versions
- Applies required configuration files to each RNA
- Monitors the health and logfiles of each RNA
The configuration and state for all RNAs connected to your Statseeker server are available from the Admin Tool:
- Select Admin Tool > traffic Analyzer > Remote Network Appliance
The Statseeker server has a resident RNA device on the local server as part of the default install. You will be creating additional RNA device configurations for deployment within your network.

Page Actions
- Refresh – refresh the page to display updated RNA configuration data
- Add – add a new RNA configuration
- LAN Segments – review the LAN to RNA interface relationships for your configured RNAs
- Download – download an unconfigured RNA image (all configuration must be made on the CLI of the RNA once deployed)
RNA Specific Actions
- Edit – edit the RNA configuration
- Del – delete the RNA configuration
- Info – display the RNA configuration/state report
- Log – display the log file for the RNA
- NIC – display the NIC details for the RNA
- Proc – display the processes running on the RNA (ps command)
- Boot – remote reboot the RNA
- Download – download an image of the RNA for deployment
RNA Host Requirements
Whether physical or virtual, the minimum hardware requirements for the RNA host are very low:
- CPU: 1GHz
- RAM: 128M
- Connectivity: Ethernet
Deploying the RNA as a Virtual Machine (ESXi)
RNA’s can be deployed as virtual devices anywhere on your network. The process for the virtual deployment can be summarized as:
- Create the RNA image on the Statseeker server
- Convert the RNA image to a virtual disk image
- Build the VM utilizing the VMDK
- Launch the VM and configure interfaces for your network
Create the RNA Image
The creation of the RNA image is done on your Statseeker server.
- Select Admin Tool > traffic Analyzer > Remote Network Appliance
- Click Add
The RNA configuration window will be displayed.
- Provide details for the RNA as needed
- RNA Name – the entity name applied to the RNA (alpha-numeric, no spaces)
- Title – label for the RNA
- Details – notes field
- IP Address – IP address for the RNA
- Netmask – netmask for the RNA
- Default Gateway – gateway for the segment of the network that will house the RNA
- Mode – enable/disable communication with the RNA
- Via Proxy – enable if communication between the RNA and Statseeker server will only be possible via HTTP proxy
- Rate Limit – limit the communication rate between the RAN and Statseeker server
- Timeout – the number of seconds to allow for a transmission to the Statseeker server to complete (set to 0 for continuous communication)
- Interface N Description – description for the interface
Note: the RNA supports up to 8 additional interfaces which can be used to receive NetFlow/sFlow and summarized LAN traffic (port or VLAN mirroring) data from elements of your network. Each data source requires it’s own dedicated interface on the RNA but there is no limit to the number of RNA’s you deploy to your network. The description field can be used to differentiate these additional interfaces.
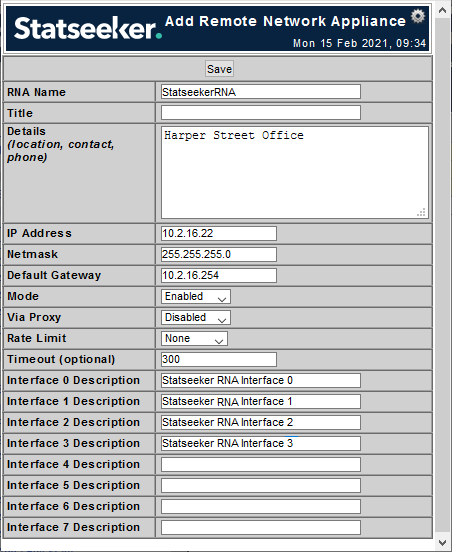
- Complete the configuration as needed and click Save
The RNA page will update to present details of the newly configured RNA.

- From the RNA specific actions of the new RNA, click Download
The RNA configuration will be saved as an ISO, compressed into a *.gz file and downloaded to your local machine.
Convert the ISO to a VMDK
You will need to employ a 3rd-party tool to convert the ISO into a VHD. Both QEMU and StarWind’s V2V Converter are tools that have been reliably used by Statseeker.
The following command can be used to convert your ISO to VMDK format
qemu-img convert -f raw -o adapter_type=lsilogic,subformat=monolithicFlat,compat6 -O vmdk <path_to_rna_uncompressed_image&rt; <output_rna_name&rt;.vmdk
While some tools allow for the output of the conversion process to be automatically uploaded to the host system, the instructions below reflect the process of using a 3rd-party tool to produce a locally saved output, which is then manually copied to the host as needed.
- Unpack the archive
- Convert the ISO to a VMDK, saving the output to your local machine
Once the conversion is complete you should have both a *.vmdk and a *-flat.vmdk file.
Create the VM
- Upload both the *-flat.vmdk and *.vmdk files to a vSphere datastore which points to an NFS share on your network
- Use vSphere’s Copy to option to place the VMDK in the datastore which will house your RNA VM
- Create the VM – when prompted, specify the OS as Other > FreeBSD 12 or later versions (64-bit)
When you reach the step of ‘Customize Hardware’:
- Remove the default hard disk
- Select Add New Device > Existing Hard Disk
- Select the RNA VMDK
The RNA supports up to 8 additional interfaces which can be used to receive NetFlow/sFlow and summarized LAN traffic (port or VLAN mirroring) data from elements of your network. Each data source requires it’s own dedicated interface on the RNA, but there is no limit to the number of RNA’s you deploy to your network.
- Add additional Network Adaptors as necessary for your RNA use
- Save the VM configuration
- Edit the settings for the VM, increasing the hard disk size to 16GB and Save the new configuration
Launch and Configure the RNA
- Launch the VM and open a remote console
Once you reach the login prompt the RNA is operational.
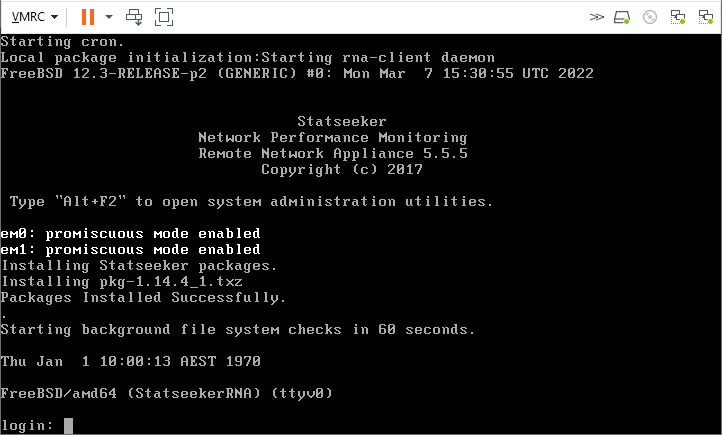
- Login as root, no password is required
- Set the date/time as needed (date yymmddhhmm.ss)
- use Alt+F2 to enter configuration mode
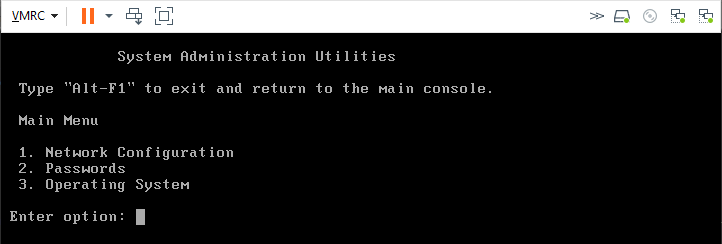
- Select option 2 to update the root user password for the RNA as needed
- Option 1 Network Configuration allows you to review and edit the configuration details for all interfaces available to the RNA
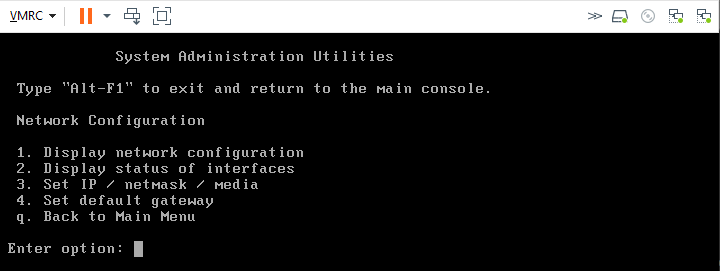
The RNA will reboot if any changes are made to the networking configuration.
- When configuration is complete, use Alt+F1 to return to the root CLI
Deploying the RNA as a Virtual Machine (Hyper-V)
RNA’s can be deployed as virtual devices anywhere on your network. The process for the virtual deployment can be summarized as:
- Create the RNA image on the Statseeker server
- Convert the RNA image to a virtual disk image
- Build the VM utilizing the VHD
- Launch the VM and configure interfaces for your network
Create the RNA Image
The creation of the RNA image is done on your Statseeker server.
- Select Admin Tool > traffic Analyzer > Remote Network Appliance
- Click Add
The RNA configuration window will be displayed.
- Provide details for the RNA as needed
- RNA Name – the entity name applied to the RNA (alpha-numeric, no spaces)
- Title – label for the RNA
- Details – notes field
- IP Address – IP address for the RNA
- Netmask – netmask for the RNA
- Default Gateway – gateway for the segment of the network that will house the RNA
- Mode – enable/disable communication with the RNA
- Via Proxy – enable if communication between the RNA and Statseeker server will only be possible via HTTP proxy
- Rate Limit – limit the communication rate between the RNA and Statseeker server
- Timeout – the number of seconds to allow for a transmission to the Statseeker server to complete (set to 0 for continuous communication)
- Interface N Description – description for the interface
Note: the RNA supports up to 8 additional interfaces which can be used to receive NetFlow/sFlow and summarized LAN traffic (port or VLAN mirroring) data from elements of your network. Each data source requires it’s own dedicated interface on the RNA but there is no limit to the number of RNA’s you deploy to your network. The description field can be used to differentiate these additional interfaces.
- Complete the configuration as needed and click Save
The RNA page will update to present details of the newly configured RNA.
- From the RNA specific actions of the new RNA, click Download
The RNA configuration will be saved as an ISO, compressed into a *.gz file and downloaded to your local machine.
Convert the ISO to a VHD
You will need to employ a 3rd-party tool to convert the ISO into a VHD. Both QEMU and StarWind’s V2V Converter are tools that have been reliably used by Statseeker.
The following command can be used to convert your ISO to VHD format
qemu-img convert -f raw -o adapter_type=lsilogic,subformat=monolithicFlat,compat6 -O vhd <path_to_rna_uncompressed_image&rt; <output_rna_name&rt;.vhd
While some tools allow for the output of the conversion process to be automatically uploaded to the host system, the instructions below reflect the process of using a 3rd-party tool to produce a locally saved output, which is then manually copied to the host as needed.
- Unpack the archive
- Convert the ISO to a VHD (pre-allocated image), saving the output to your local machine
Create the VM
Edit the VHD:
- Select Server
- Select Actions > Edit Disk
- Locate and select your RNA VHD
- Select Expand > 16GB
- Click Finish
Create the VM:
- Select Server
- Select Actions > New > Virtual Machine
- Name the VM and specify a Location as needed
- Choose Generation 1
- Set Startup Memory = 2048 MB and deselect Dynamic Memory
- Configure Networking options to suit your requirements
Note: the RNA supports up to 8 additional interfaces which can be used to receive NetFlow/sFlow and summarized LAN traffic (port or VLAN mirroring) data from elements of your network. Each data source requires it’s own dedicated interface on the RNA but there is no limit to the number of RNA’s you deploy to your network. The description field can be used to differentiate these additional interfaces.
When assigning the virtual hard disk:
- Select Use an existing virtual hard disk
- Select your edited/expanded RNA VHD
- Finish the VM configuration
Launch and Configure the RNA
- Launch the VM and open the console
Once you reach the login prompt the RNA is operational.
- Login as root, no password is required
- Set the date/time as needed (date yymmddhhmm.ss)
- use Alt+F2 to enter configuration mode
- Select option 2 to update the root user password for the RNA as needed
- Option 1 Network Configuration allows you to review and edit the configuration details for all interfaces available to the RNA
The RNA will reboot if any changes are made to the networking configuration.
- When configuration is complete, use Alt+F1 to return to the root CLI
Deploying the RNA on a Physical Host
RNA’s can be deployed on physical devices anywhere on your network. The process for physical deployment can be summarized as:
- Create the RNA image on the Statseeker server
- Convert the RNA image to a bootable USB
- Launch the VM and configure interfaces for your network
Create the RNA Image
The creation of the RNA image is done on your Statseeker server.
- Select Admin Tool > traffic Analyzer > Remote Network Appliance
- Click Add
The RNA configuration window will be displayed.
- Provide details for the RNA as needed
- RNA Name – the entity name applied to the RNA (alpha-numeric, no spaces)
- Title – label for the RNA
- Details – notes field
- IP Address – IP address for the RNA
- Netmask – netmask for the RNA
- Default Gateway – gateway for the segment of the network that will house the RNA
- Mode – enable/disable communication with the RNA
- Via Proxy – enable if communication between the RNA and Statseeker server will only be possible via HTTP proxy
- Rate Limit – limit the communication rate between the RAN and Statseeker server
- Timeout – the number of seconds to allow for a transmission to the Statseeker server to complete (set to 0 for continuous communication)
- Interface N Description – description for the interface
Note: the RNA supports up to 8 additional interfaces which can be used to receive NetFlow/sFlow and summarized LAN traffic (port or VLAN mirroring) data from elements of your network. Each data source requires it’s own dedicated interface on the RNA but there is no limit to the number of RNA’s you deploy to your network. The description field can be used to differentiate these additional interfaces.
- Complete the configuration as needed and click Save
The RNA page will update to present details of the newly configured RNA.
- From the RNA specific actions of the new RNA, click Download
The RNA configuration will be saved as an ISO, compressed into a *.gz file and downloaded to your local machine.
Create a Bootable USB from the ISO
You will need to employ a 3rd-party tool to create a bootable USB from the ISO. A tool that has been reliably used by Statseeker is Win32 Disk Imager.
Select and test a tool suitable for your environment and needs, then:
- Unpack the archive
- Use the extracted ISO to create a bootable USB
Launch and Configure the RNA
- Modify the boot order for the host to ensure that the USB will be used as the primary boot drive
- Insert the USB and restart the host
Once you reach the login prompt the RNA is operational.
- Login as root, no password is required
- Set the date/time as needed (date yymmddhhmm.ss)
- use Alt+F2 to enter configuration mode
- Select option 2 to update the root user password for the RNA as needed
- Option 1 Network Configuration allows you to review and edit the configuration details for all interfaces available to the RNA
The RNA will reboot if any changes are made to the networking configuration.
- When configuration is complete, use Alt+F1 to return to the root CLI
Data Collection on your RNA
The RNA supports up to 8 interfaces which can be used to receive NetFlow/sFlow and summarized LAN traffic (port or VLAN mirroring) data from elements of your network.
Netflow/sFlow
To collect NetFlow/sFlow data:
- Each device sending NetFlow/sFlow data to the RNA should be configured to forward the flow data to a unique port on the first interface of the RNA. This interface should be connected to a non-mirrored switch port.
On your Statseeker server:
- Select Admin Tool > Traffic Analyzer > Flows
- Select your RNA from the dropdown
- Specify a unique Port on the Statseeker server, this port will receive all content from the specified RNA
- Set a label and click Save
For more details around configuring your RNA connection to Statseeker for NetFlow/sFlow, see Netflow Configuration.
For details on reporting on your NetFlow/sFlow data, see Traffic Analyzer.
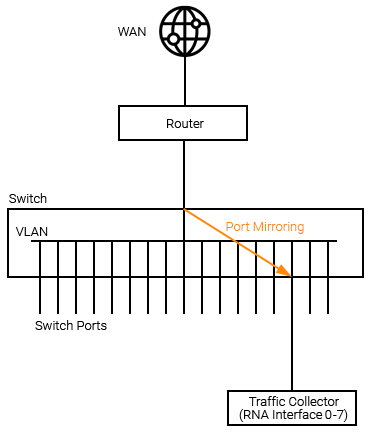
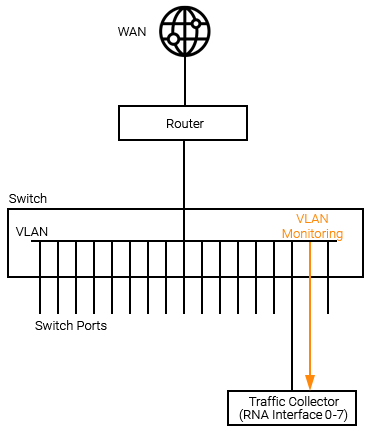
Summarized LAN Traffic Data
When traditional flow data is not available, Statseeker RNA’s can be configured to receive mirrored port or VLAN traffic and output summarized traffic data, forwarding this data on to your Statseeker server. LAN traffic collectors should be configured as follows:
Port Mirroring
VLAN Mirroring
No additional configuration on the Statseeker side is required with regard to LAN traffic collection. For details on reporting on your NetFlow/sFlow data, see Traffic Analyzer.