
Index
- Overview
- Manual Group Creation
- Renaming a Group
- Deleting Groups
- Manually Populating Groups
- Managing Users, and their Access with Grouping
- Grouping for SLA Reporting
Overview
Grouping is a fundamental feature in the Statseeker product, it is a core mechanic utilized by:
- Reporting
- Thresholds
- Alerting
- Visibility and access control
- Filtering response data when utilizing the API
While Automated Grouping is designed to handle the majority of your grouping requirements, manual grouping offers a very limited set of functionality that auto-grouping doesn’t. Manual grouping is required for:
- Managing Statseeker user account’s access and visibility to devices and reports
- Grouping non-infrastructure elements such as reports, users, and SLA configurations
Manual Group Creation
In addition to those groups created by the Automatic Grouping process you can manually create and populate groups to suit your needs.
- Select Administration > User Profile/Grouping > Add / Edit Groups
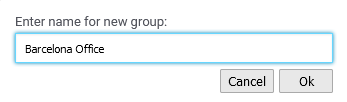
- Click Add
- Enter a name and click OK
The created group can now be populated with any number and type of entities.
Renaming a Group
To rename an existing group:
- Select Administration > User Profile/Grouping > Add / Edit Groups
- Select the group and click Rename
- Update the name and click OK
- Custom Reports with filter configurations that reference the old group name will not find the group content and, as a result, may be missing the desired data
- If the renamed group is managed by an Auto Grouping rule, then unless the Auto Grouping rule is updated it will create and populate a new group, with the old group name on the next discovery/rewalk
Deleting Groups
To delete groups:
- Select Administration > User Profile/Grouping > Add / Edit Groups
- Check the box to select one or more groups and click Delete
- Confirm the action to delete the group/s
Deleting groups does not impact the entities contained within the group/s outside of removing them from a deleted group.
- Custom Reports with filter configurations that reference the group will not find the group content and, as a result, may be missing the desired data
- If the deleted group is managed by an Auto Grouping rule, then unless the Auto Grouping rule is updated the old group will be recreated and populated on the next discovery/rewalk
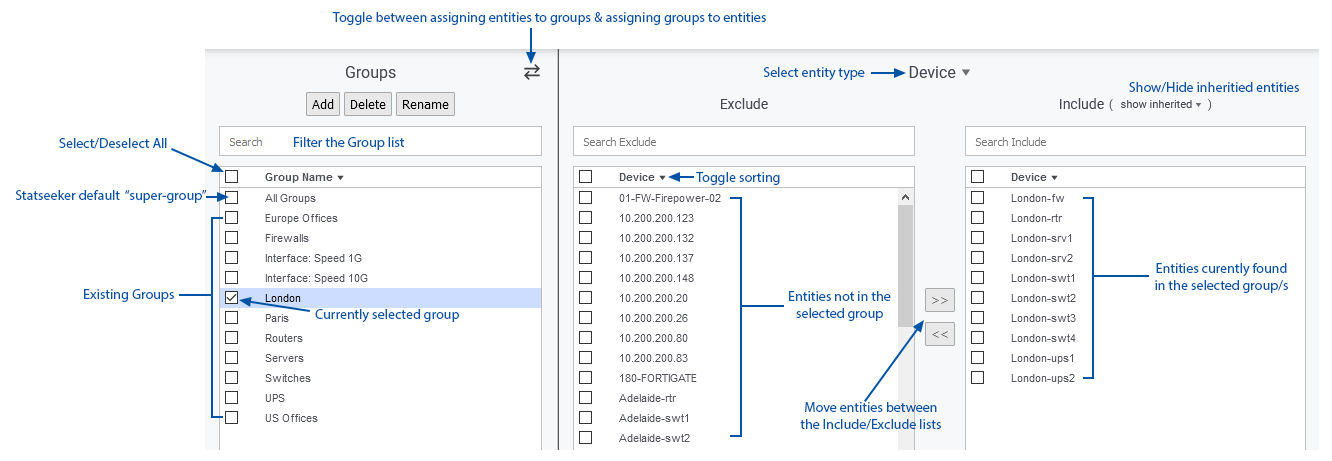
Manually Populating Groups
All groups can have their contents edited manually from Administration. This can be achieved in two ways, adding entities (device, interface, report, user, etc.) to a group or selecting an entity, and selecting which groups will contain that entity.
Adding/Removing entities to/from a group
- Select Administration > User Profile/Grouping > Add / Edit Groups
- Select one or more groups
The Exclude\Include columns will update to display the content of the group/s.
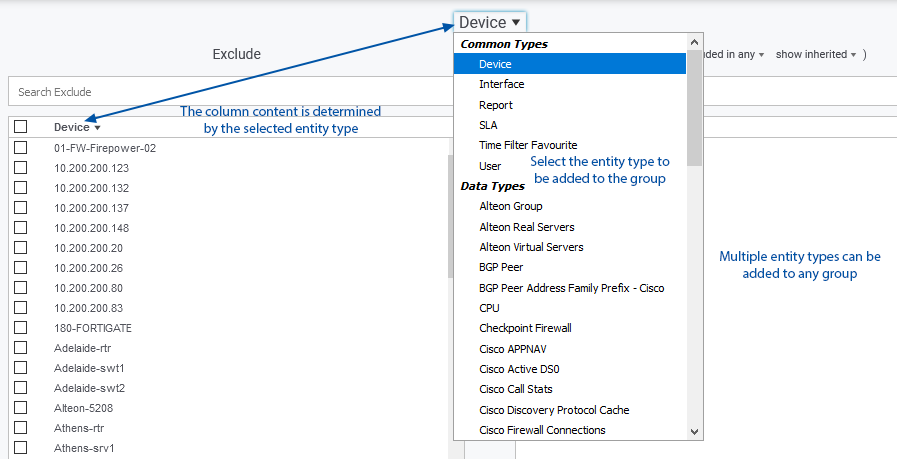
The entity type defaults to Device and the Exclude\Include column content is restricted to the selected entity type.
- Select the type of entity to be added to the group from the drop-down list above the Exclude\Include columns
- Select entities in the Exclude columns and click
 to add the entities to the group
 - Select entities in the Include columns and click
 to remove the entities from the group
There is no confirmation, the group contents are updated immediately.
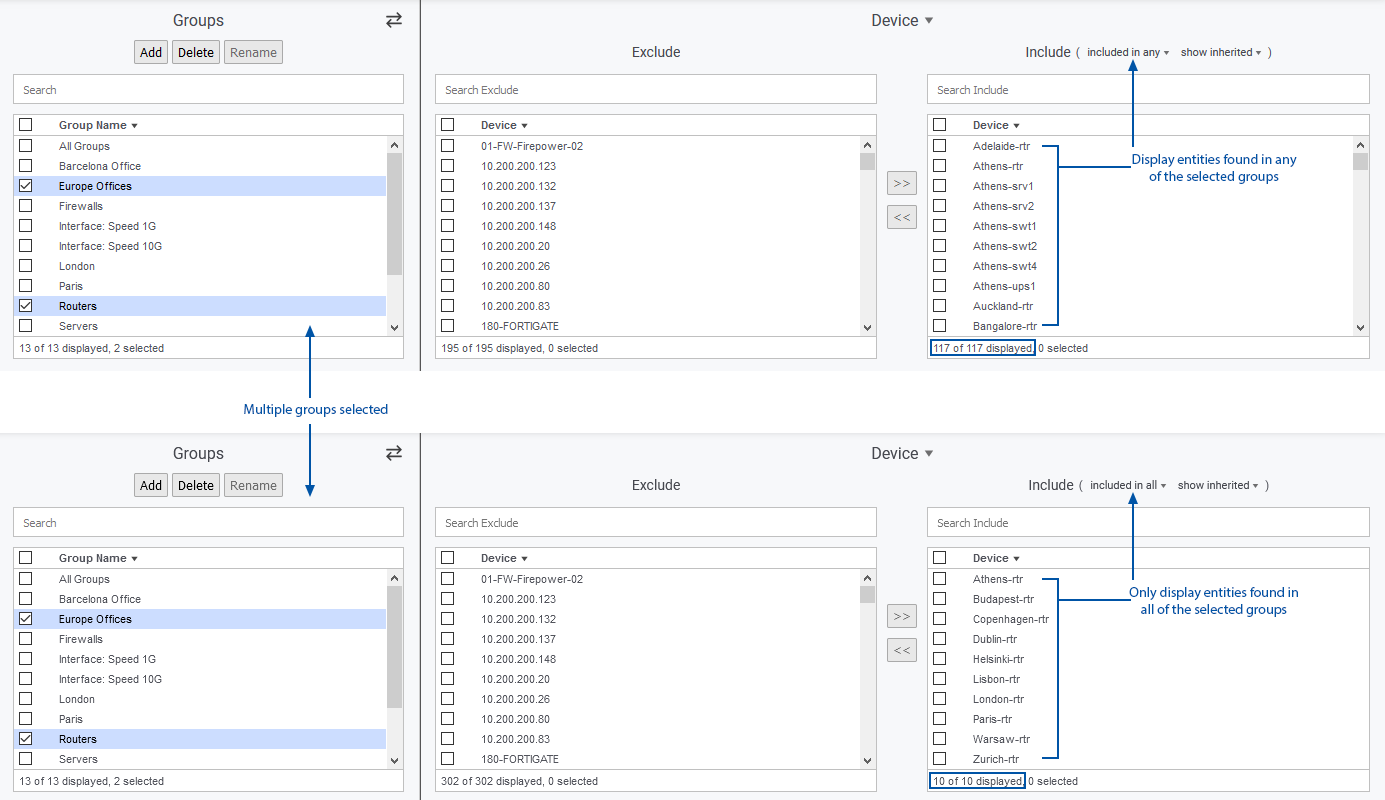
Selecting Multiple Groups
By selecting more than one group, multiple groups can be populated at a time using this method, the selected entities being added to each of the selected groups. When selecting multiple groups the Exclude\Include columns can be configured so that:
- Entities found an any of the selected groups are displayed in the Include column
- Only entities found in all of the selected groups are displayed in the Include column
Selecting groups to contain an entity
Grouping can be managed by starting with the entity (or entities) and then selecting groups that will contain the entity.
- Select Administration > User Profile/Grouping > Add / Edit Groups
- Click the Entity\Group toggle (
 )
) - Select the entity type from the dropdown above the first column
- Select one or more entities
The Include/Exclude lists will update to indicate which groups currently contain the selected entity.
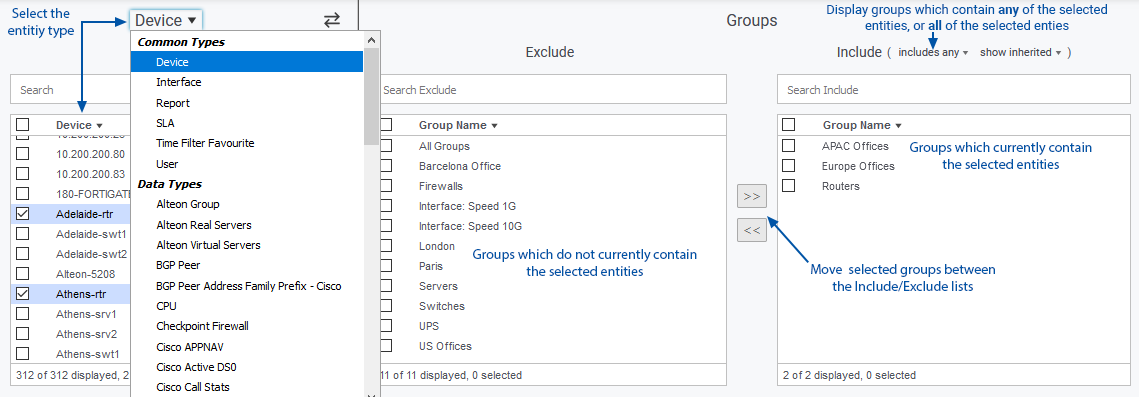
- Select entities in the Exclude columns and click to add the entities to the group, the group will move to the Include column
- Select entities in the Include columns and click to remove the entities from the group, the group will move to the Exclude column
There is no confirmation, the group contents are updated immediately.
Selecting Multiple Entities
When selecting multiple groups the Exclude\Include columns can be configured so that:
- Groups containing any of the selected entities are displayed in the Include column
- Only groups containing all of the selected entities are displayed in the Include column
When “includes any” is used, there is no indication which of the selected entities resides in which groups in the Include column.
- Adding a group to the Include column will add all selected entities to that group
- Removing a group from the Include column will remove any instance, of any of the selected entities, from the group
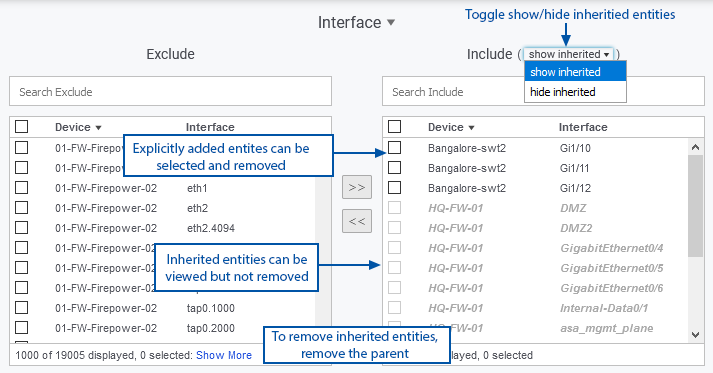
Inherited Entities
When adding devices to a group, the group also inherits all of the entities found on that device. These inherited entities include interfaces, CPU’s, memory modules, temperature sensors, file systems, fans, etc. This inheritance works in a single direction only, from parent to child entity.
- Setting the entity type to device and adding a device to a group will add all interfaces on the device as inherited entities
- Setting the entity type to interface and explicitly adding an interface to a group does not also add the parent device to the group
Inherited entity visibility can be toggled by the option displayed above the Include column. Inherited entities are ‘greyed-out’ and cannot be selected or removed, to remove an inherited entity, remove the parent. Removing a parent entity from a group will also remove any associated inherited entities but does not remove any explicitly added child entities.
Show/Hide Inherited Entities
- Inherited entities (of the currently selected entity type) can be shown/hidden via the toggle located above the Include column
Managing User Access & Permissions with Grouping
By default, a new Statseeker user account has no visibility of your network via Statseeker. To allow the user to use Statseeker, and view data collected from your network, you need to associate the user account with one or more groups. Typically, a group is a subset of the monitored devices and interfaces on your network, but a group can contain any Statseeker entities:
- Devices
- Monitored entities on a device such as interfaces, CPUs, file systems, etc.
- Statseeker reports, SLAs and other configuration objects
- Statseeker users
Statseeker has a super-group called ‘All Groups’ which contains all Statseeker entities. The default admin user account has permission to access this ‘All Groups’ group, granting the account access to all Statseeker data. Another advantage of All Groups is that this never needs to be updated. As new groups are created/edited/deleted, the All Groups permission simply gives the user access to all reports, and the entire monitored network regardless of how that network evolves over time.
To create other network-wide, Admin-level accounts:
- Assign the account the Is Admin role
- Assign permission to access the All Groups supergroup
If the user account is going to be configured to restrict access to a subset of your monitored network:
- Assign groups as needed to the user account during (or after) user account creation. This can be done in the user account configuration screen (User Profile/Grouping > Add/Edit Users)or from User Profile/Grouping > Add/Edit Groups in Administration.
- At least one of the assigned groups will need to contain reports. Without the All Groups permission, the user will have no access to any Statseeker reports so a group containing the reports the user will have access to needs to be assigned to the user.
Example:
Our new user, Theodore, logs into the Statseeker server but has no visibility of any device or associated report.
Theodore’s user account needs to be associated with both devices and reports. We already have a group, London Offices, which contains the devices in the location that Theodore will be administering, but we need to also give Theodore access to reports. We could simply add reports to the London Offices group and give Theodore access to that group, but instead we are going to create a new group specifically for reports and all new network engineer accounts can be assigned that group when they join the organization.
We:
- Select Administration > User Profile/Grouping > Add / Edit Groups
- Click Add and enter the group name Engineer Reports in the text field and click Ok

The group will be created and automatically selected, ready for population.
- Set the entity type to Report
- Assign a selection of reports to the group
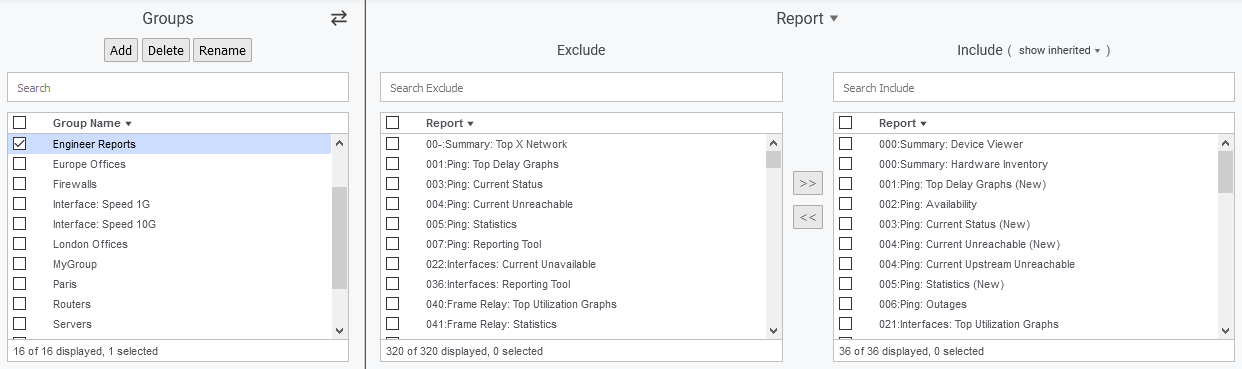
- Click the Entity\Group toggle ()
- Set entity type to Users
- Select Theodore from the list of users
- Select both the London Offices and Engineer Reports groups from the list and click to add the groups to the Include column
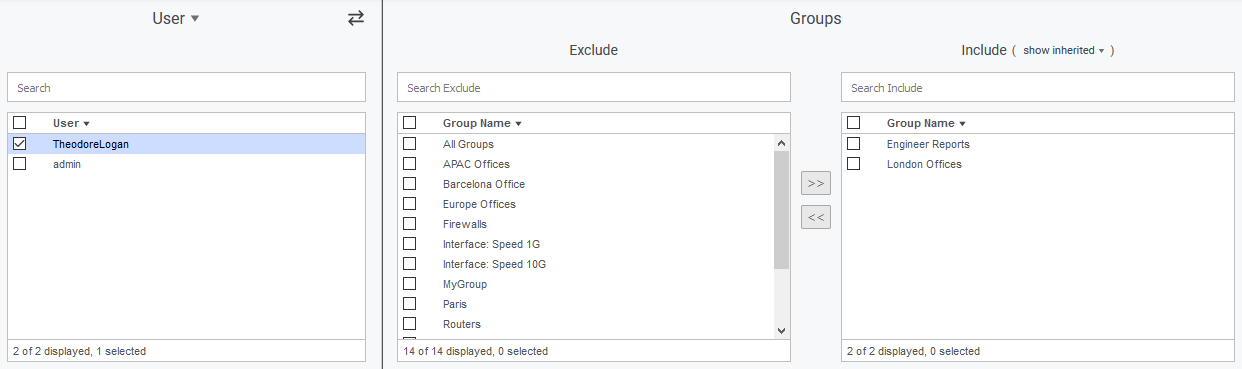
Theodore refreshes his browser and can now see the devices and reports contained within the two groups that his user account has been associated with.
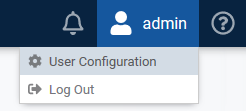
While group population can only be done from the Add/Edit Groups page in Administration, assigning groups to a user can be achieved from either:
- Administration > Add/Edit Groups
- Administration > Add/Edit Users
- Main navigator, User Configuration
Reports can be configured to be targeted to a specific device/entity, or group of devices/entities, or they can be configured to be network-wide. If a Statseeker user only has visibility to a subset of your network, viewing a network-wide report will instead show the report as if it was configured to target just those elements of your network to which they have visibility.
Grouping for SLA Reporting
Manual grouping is also a required component for SLA reporting. This topic is covered in detail in its own document, see Service Level Agreement (SLA) Reporting for details.