** Legacy Documentation for Statseeker v5.6.1 **
Index
- Overview
- SNMP Communities
- IP Address Scan Ranges
- Hosts File
- Device Naming
- Custom Data Ranges
- “Known” Devices and Reusing/Reassigning IP Addresses
- Breakdown of the Discovery Process
- Additional Discovery Process Settings
- Running Network Discovery
- Reviewing the Output of the Discovery Process
- Daily Rewalk and Automated Discovery Options
Overview
SNMP Discovery refers to the process Statseeker uses to:
- Discover SNMP enabled devices on your network
- Collect configuration information from those entities to be used for polling, reporting, and alerting purposes
There are several configuration options used by the discovery process to target the devices on your network that you want Statseeker to report on:
- SNMP Community Strings
- IP Address Ranges
- Hosts File
- Custom Data Ranges
- Adding an entry to the discovery scan ranges file does not result in the device being added to Statseeker until a Discovery By Ranges is completed
- Adding a device to the hosts file will result in the device being added as a ‘ping-only’ device, no SNMP polling of the device will occur until a Discovery By Host is completed
You can also use SNMP Filtering rules to restrict which devices are returned from Discovery. For more information on this see SNMP Device Filtering.
The rewalk process is a scheduled discovery which, by default, occurs daily at 11am server-time. A rewalk does not discover any new devices, rather it identifies configuration changes on known devices, updating the Statseeker configuration to match. For details on scheduling the rewalk, or converting a rewalk to a full automated discovery process, see Daily Rewalk Options.
SNMPv1/2/3 Communication
Standard Statseeker Discovery and Rewalk processes communicate with network infrastructure via SNMPv2.
- SNMPv1 – can be used to communicate with an individual device per process run, see Add A Single Device for details
- SNMPv3 – can be used to communicate with individual or groups of devices, see Adding SNMPv3 Devices
SNMP Communities
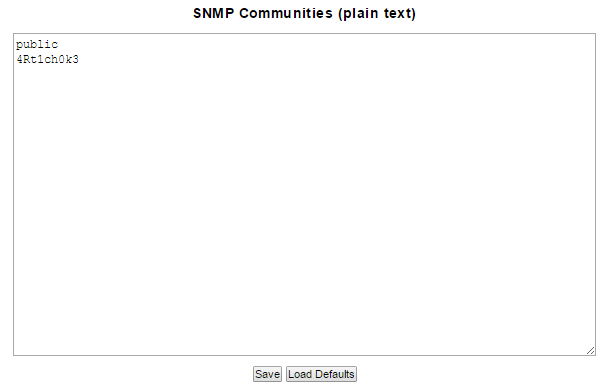
The SNMP Community String is a password-like identifier that is included with an SNMP getRequest to allow/restrict access to a device. Typically, devices feature a default read-only access community string of public.
Statseeker requires read access to the device for polling purposes and the SNMP Communities configuration includes the default community string of public. If your network features devices that have a modified read-only access community string, then you will need to add this string to the Statseeker Discovery configuration. To do this:
- Select Administration Tool > Network Discovery > SNMP Communities
- Add additional community strings, one per line, to the SNMP Communities list
- Click Save
IP Address Scan Ranges (IPV4)
IP address ranges can be used by the SNMP Discovery and rewalk process to define which elements of your network to walk for polling purposes. Multiple address ranges can be defined, 1 per line using the following format:
include/exclude NetworkAddress[/Netmask] or NetworkPattern
Lines can be commented out by inserting a leading hash # and blank lines are ignored.
For example:
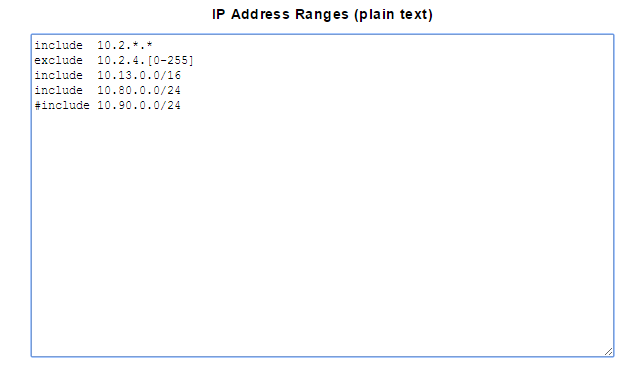
Will result in the following address ranges being probed by the discovery process:
10.2.0.0 to 10.2.3.25510.2.5.0 to 10.2.255.25510.13.0.0 to 10.13.255.25510.80.0.0 to 10.80.0.255
To set IP Address Scan Ranges:
- Select Administration Tool > Network Discovery > IP Address Scan Ranges
- Enter include/exclude statements as required, one per line
- Click Save
The scan ranges will be evaluated, and the output displayed for you to verify the specified ranges.
The discovery process will scan your network within the defined scan ranges and name devices according to sysname, or IP address if sysname is empty. At the end of discovery, it will rename devices according to the contents of the hosts file.
Hosts File (IPV4/6)
The Hosts File serves two purposes:
- To filter the devices walked in the discovery process, a Discover Using Hosts will only discover those devices listed in the Hosts File
- To ensure that an appropriate name is associated with a device if the device is not currently configured in a way that will return one, for device naming hierarchy see Device Naming
The file lists IP addresses and host names in the following format:
IPAddress one or more spaces hostname
e.g.10.1.1.1 router110.1.1.4 switch1
- Each device must have only ONE entry, for devices with multiple IP addresses, specify the address that should be polled by Statseeker
- Hostnames can only contain alpha-numerics, hyphens and periods
IPv6 Address Syntax
Statseeker supports standard IPv6 address formats:
- Full address – 2001:0db8:85a3:0000:0000:8a2e:0370:7334
- Leading zeros omitted – 2001:db8:85a3:0:0:8a2e:370:7334
- Empty group replacement – 2001:db8:85a3::8a2e:370:7334
While any number of consecutive empty groups can be collapsed to the double colon replacement (::), only a single instance of this replacement can be used in an address. Address range statements for IPv6 addresses are not supported.
To populate the Hosts File:
- Select Administration Tool > Network Discovery > Hosts File
- Enter IP address and hostname pairs, one per line
- Click Save
Devices specified in the hosts file are added as ping only devices until a Discovery Using Hosts is performed.
Device Naming
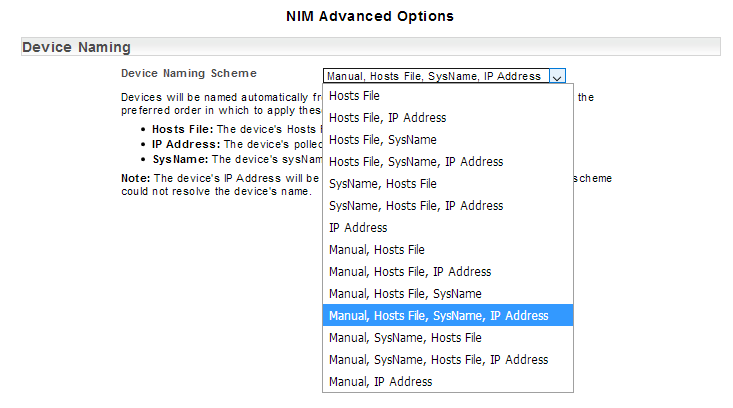
The default device naming convention is:
- Manual Name > Hosts File > SysName > IP Address
This hierarchy can be modified in the Admin Tool see:
- Administration Tool > Network Discovery – Advanced Options > Advanced Options > Device Naming
When running a Discover Using Ranges, devices are named according to SysName, or IP address if SysName is empty. At the end of discovery, Statseeker will rename devices according to the specified hierarchy.
When running a Discover Using Hosts, the devices are named according to the contents of the hosts file.
You can set a manual name for a device by:
- Selecting the device (or group which contains the device) in the Console
- In the Reports column, select General > Device Details
- Click the corresponding entry in the Device column
This will open the NIM Edit Device dialog.
- Enter the desired name and click Rename
This records the manually set name against the device’s record in Statseeker, it does not write anything back to the device itself. Clicking Reset in the NIM Edit Device dialog will remove any previously set manual name.
Custom Data Ranges
By default, Statseeker will query all devices on your network for any enabled custom data type. For more information see Custom Data Types.
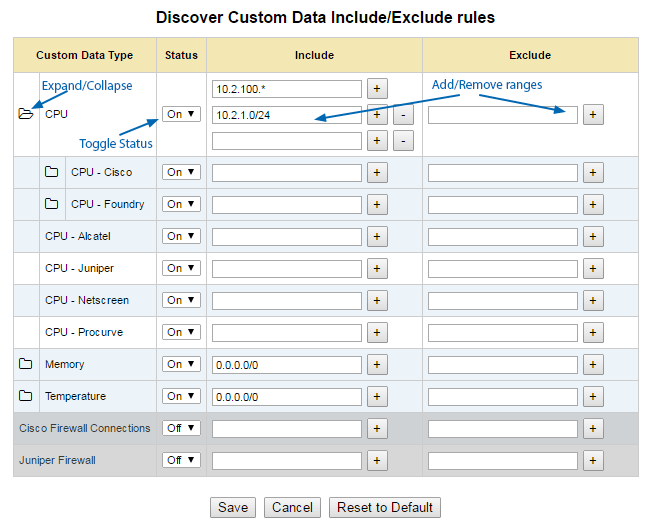
To assign a discovery range for a custom data type:
- Go to Administration Tool > Network Discovery > Custom Data Ranges to display the associated configuration page
- Click Edit (top-right) to enable configuration
- The data collection Status for a given data type can be toggled On or Off per type, vendor within that type and product within that vendor
- Rules to include/exclude multiple data ranges can be assigned at any exposed data type level in the following formats:
include/exclude NetworkAddress[/Netmask] or NetworkPattern
“Known” Devices and Reusing/Reassigning IP Addresses
By default Statseeker will run a full discovery process, this process will discover new devices and update the configuration details for all ‘known’ devices. A device is considered known if Statseeker already has a record of a device at that IP address.
The Ping and SNMP walk steps can skipped for ‘known’ devices by disabling the Ignore Saved Details option, significantly reducing the duration of the discovery/rewalk process for very large networks but configuration details will not be updated for known devices.

If you are reassigning an IP Address, ensure that Ignore Saved Details is enabled prior to running discovery against the new device.
The Discovery Process and Additional Settings
The SNMP discovery process is as follows:
- Ping all addresses defined in IP Address Scan Ranges (only done when discovering by IP ranges)
- Test the SNMP version and community for each device by retrieving the device’s sysDescr
- If discovering by IP range, this is every device that responded to the ping
- If discovering by hosts file, this is every device specified in the hosts file
- If discovering by IP range, then use any specified SysDescr Rules to prune this list of devices, for details on this see Filtering using SNMP SysDescr Rules
- Retrieve SNMP Engine IDs for the devices remaining in the list
- Remove any virtual devices from the list, such as Hot Standby Router Protocol (HSRP) devices
- Retrieve the table of IP addresses configured on each device
- Remove any duplicate devices
- Assign internal entity numbers for any newly discovered devices
- Perform an SNMP walk on the device – can be skipped for known (previously discovered) devices via the Ignore Saved Details checkbox
- Perform a Statseeker configuration build
- If auto-grouping is enabled, run through the default (interface speed/type) and custom auto-grouping rules, see Automated Grouping
Additional Discovery Process Settings
The Admin Tool contains additional settings related to the discovery process. Some of these options will impact your data storage footprint, contact Statseeker Technical Support if you have any concerns around this issue.
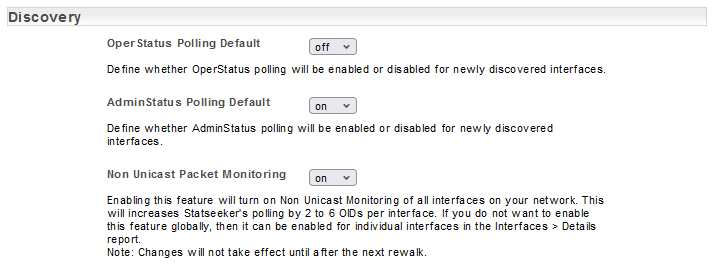
Interface Polling Options
By default, Statseeker enables non-unicast packet monitoring and interface Admin Status ifAdminStatus polling, and disables Interface Operational Status (ifOperStatus) polling. These settings can be modified from within the Admin Tool:
- Select Admin Tool > Network Discovery – Advanced Options > Advanced Options
- Locate the settings in the Discovery section and update as needed
- Click Save
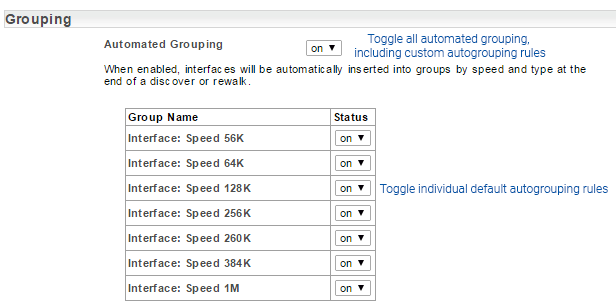
Automated Grouping Options
By default, Statseeker creates and populates a number of Interface groups based on the speed and type of interfaces encountered during the discovery process. The creation of these groups can be disabled globally or on a group-by-group basis. The settings around this functionality can be modified from within the Admin Tool:
- Select Admin Tool > Network Discovery – Advanced Options > Advanced Options
- Locate the settings in the Grouping section and update as needed
- Click Save
For more information and details on managing custom autogrouping rules, see Automated Grouping.
Running Network Discovery\Rewalk
To run SNMP Discovery:
- Ensure that you have configured community strings, IP ranges &/or hosts file entries appropriate for the discovery that you are going to run
- Select Administration Tool > Network Discovery > Discover My Network
- Click Discover Using Ranges, Discover Using Hosts or Rewalk as required

The discovery process will begin and the Administration Tool window will display a scrolling log of the process. Discovery time will vary depending on the number of devices being discovered and the number of grouping rules being applied. A small discovery could complete in a few minutes, however a full rewalk of thousands of devices can take a few hours. For very large networks (in excess of 5000 devices &/or 250,000 interfaces) it is recommended that you contact Technical Support for advice tailored to your network.
Statseeker will continue to poll all known devices during the discovery and will begin polling new devices once the discovery process is complete.
- The graphing of collected data requires that there be data from at least 2 reporting periods (i.e. If the data is being graphed at a 1 minute granularity, then you need at least 2 minutes of data before the graph can be displayed)
- Some stock reports default to a Last 5 Minutes reporting period, displaying a 5min average. These averages may be skewed by null values if the polled entity wasn’t available for polling for the entirety of that 5 minute window.
Reviewing the Output of the Discovery Process
Once a discovery process has begun the output is displayed in the Admin Tool.
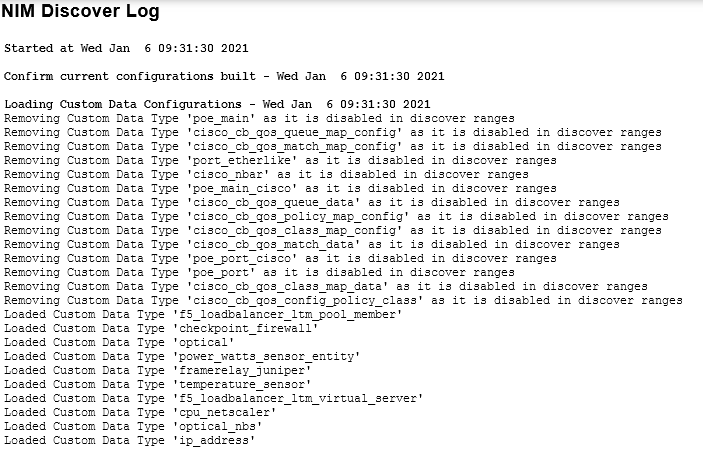
If you leave the screen and the return prior to the completion of the discovery process the options available will be updated to indicate that a discovery is in progress.

Historical discovery records are available from the Admin Tool, see Log Viewer for details.
Daily Rewalk and Automated Discovery Options
The rewalk process is a scheduled discovery which, by default, occurs daily at 11am server-time. A rewalk does not discover any new devices, rather it identifies configuration changes on known devices, updating the Statseeker configuration to match.
The process runs as a cron job and can be edited from within the Admin Tool:
- Select Administration Tool > Expert Tools > Crontab
There may be multiple entries in your Statseeker crontab and the rewalk can be identified by the process name nim-discover. The syntax for the crontab entries is:
Minute Hour Day-of-Month Month Day-of-Week Process-to-be-run verbose-flag verbose-level discovery-type-flag redirect-output
A default rewalk entry will be:
0 11 * * * nim-discover -v 3 -r > $SSHOME/nim/etc/discover.log 2>&1
Additional entries can be added to the crontab to provide additional rewalks or to schedule automated discovery. If adding additional jobs or modifying existing jobs, restrict changes to the schedule and discovery-type-flag. The options for these values are:
| Field | Values |
| Minute | 0-59 |
| Hour | 0-23 |
| Day-of-Month | 1-31 |
| Month | 1-12 |
| Day-of-Week | 0-7 (0 and 7 = Sunday) |
| discovery-type-flag |
|
- Schedule value options
- Each be replaced by * to indicate ‘all values’
- Supports hyphen separated ranges e.g.8-11
- Support comma separated lists e.g. 8,9,11,12
- The nim-discover process will first check to see if another instance of nim-discover is already running. Only a single nim-discover can run at a time, so schedule multiple process according to their typical duration within your network.
Example:
Entries for an 11am daily rewalk and a 10pm daily discovery by IP range.
0 11 * * * nim-discover -v 3 -r > $SSHOME/nim/etc/discover.log 2>&1
0 22 * * * nim-discover -v 3 -R > $SSHOME/nim/etc/discover.log 2>&1
[top]